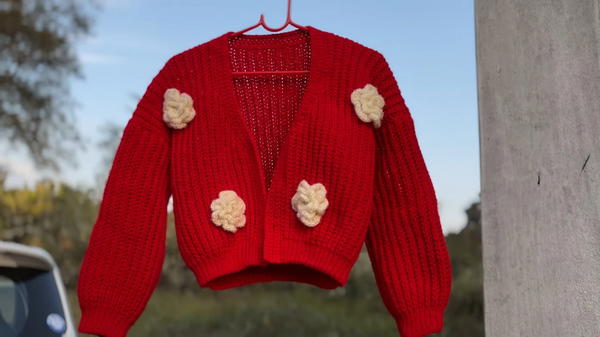
Wrap yourself in style with this Crochet Ribbed Cardigan, which is for adding cozy warmth & timeless elegance to your everyday look.
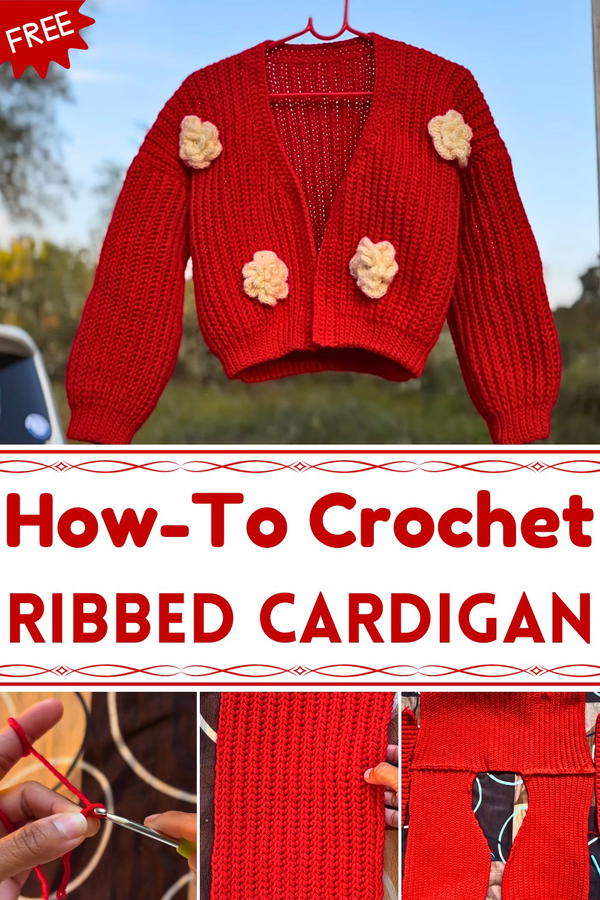
The beauty of this piece lies in its simplicity and adaptability, making it just as fitting for relaxed days at home as it is for casual outings or evening gatherings. Its specialty is versatility; worn open for a laid-back look or closed for a refined touch, it pairs beautifully with dresses, skirts, or trousers. The cardigan’s soft flow and breathable feel make it ideal for layering, providing both warmth and grace without heaviness.
Its benefit extends beyond practicality, offering a sense of comfort and confidence with every wear. The gentle lines and smooth texture highlight the elegance of minimalism, while its lasting quality ensures it remains a cherished wardrobe favorite. Combining beauty, ease, and function, this cardigan stands as a perfect balance of style and comfort that enhances both everyday wear and special moments with quiet sophistication.
Materials Needed
- Yarn:
- 100% Acrylic Yarn (Medium #4 Weight) in your desired color.
- Hook Sizes:
- 4.5mm Crochet Hook
- 6mm Crochet Hook
- Additional Materials:
- Stitch markers
- Scissors
Special Features
- Beginner-Friendly: The tutorial uses simple stitches like slip stitches and half-double crochet slip stitches.
- Customizable Length: The foundation chain can be adjusted according to the size and length of the cardigan you want.
- Seamless Design: Panels are joined together using single crochet stitches to give a neat finish.
- Flexible for Sizing: Easily adapted for any size by adjusting the number of rows and chains.
- Modern Ribbed Texture: Achieved through working into back loops and decreases for shaping.
Level of Difficulty
This project is beginner-friendly but requires patience when counting stitches and working through different rows. If you’re familiar with simple stitches like slip stitch and half-double crochet, you’ll find this project manageable and enjoyable.
Tutor’s Suggestions
- Use Stitch Markers: These are especially helpful for marking decreases or the last stitch of a row, preventing confusion.
- Count Rows Regularly: Ensure an even number of rows to keep symmetry for your panels.
- Customize Length and Width: Adjust the foundation chains and row counts to suit your size preferences.
Step-by-Step Instructions
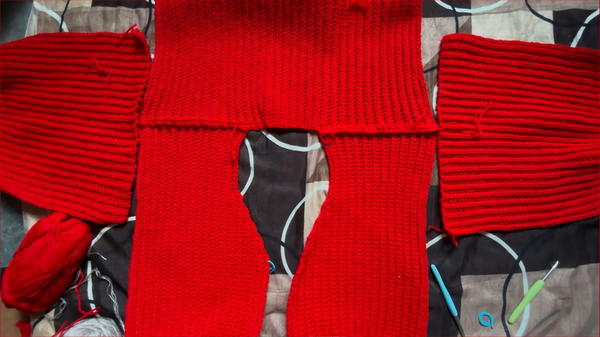
1: Crocheting the Back Panel
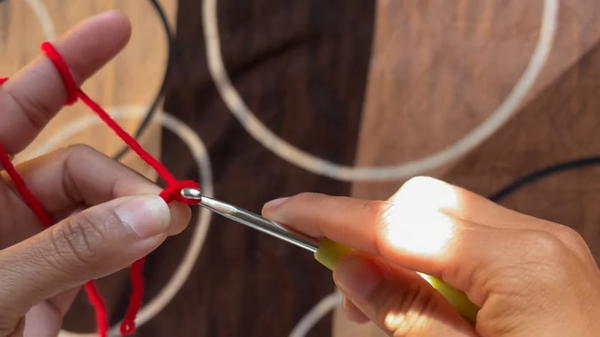
Foundation Chain:
- Using the 4.5mm hook, start with a slip knot, then chain 8 stitches.
- Switch to the 6mm hook, and continue chaining to your desired length (e.g., 70 chains for a medium-sized cardigan).
First Row:
Turn your yarn and work into the back bumps of the chain.
Skip the first stitch and work half-double crochet slip stitches in the back loops only across the row.
How to Half-Double Crochet Slip Stitch:
- Yarn over, insert the hook into the back loop of the stitch, yarn over again, pull through the stitch (you have 3 loops), then pull through all 3 loops.
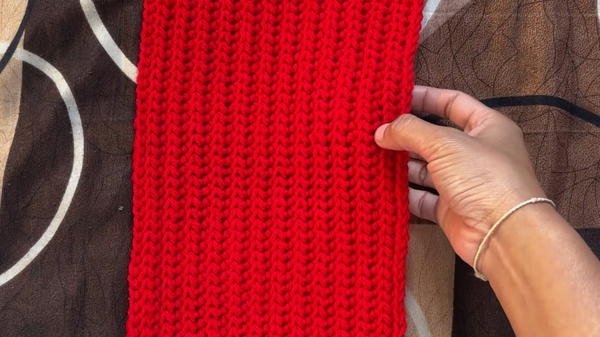
Next Rows:
- Chain 1 and turn your work. Continue with half-double crochet slip stitches in the back loops only until the end of the row.
Total Rows:
- Keep repeating this pattern until you complete 70 rows for the back panel.
- Note: Count completed rows by the fine ribbed lines in your pattern.
2: Crocheting the Front Panels
Foundation Chain:
- Chain half the length of the back panel (e.g., 35 chains for a medium size).
Row Repetition:
- Follow the same method as for the back panel—half-double crochet slip stitches in the back loops only—to crochet each front panel.
- Continue for 35 rows.
Shaping the Front Panel:
- After Row 25, decrease stitches to give the front panel its angled look:
- Skip the first stitch and work a decrease at the last two stitches (pull yarn through 3 loops into one).
- Repeat decreases every alternate row until Row 35 is complete.
- After Row 25, decrease stitches to give the front panel its angled look:
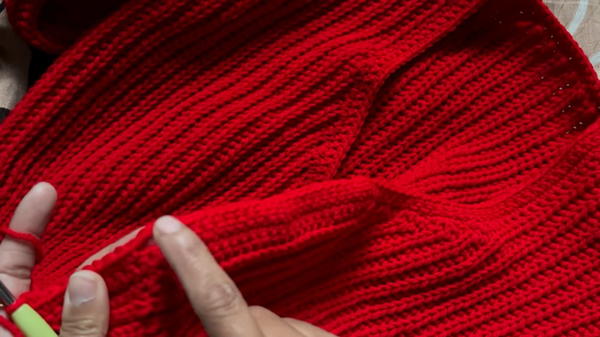
3: Joining the Panels
Lay the Panels:
- Place the back panel flat and align the front panels on top.
Count and Mark:
- Count 25 stitches from the edge of the back panel and place a stitch marker on both sides.
Joining the Shoulders:
- With the wrong side facing, join panels at the shoulders using single crochet stitches across the marked section.
- Attach the yarn, insert the hook through the stitches of both panels, yarn over, and pull through both loops to create a clean seam.
4: Adding Sleeves
Sleeve Foundation:
- Chain 55 chains (or adjust based on width preferences for the sleeve).
Sleeve Rows:
- Work half-double crochet slip stitches into the back loops for the entire length of the sleeve, similar to the front and back panels.
- Crochet for 25–30 rows, depending on the desired length.
Attaching Sleeves:
- Fold the sleeve panel and locate its center. Align this with the shoulder join and attach the sleeve using single crochet stitches.
- Fold the sleeve panel and locate its center. Align this with the shoulder join and attach the sleeve using single crochet stitches.
5: Creating the Ribbing
Single Crochet Ribbing:
- Attach the yarn to the bottom edge of the cardigan and single crochet from one side to the other, including the edges of the front and back panels.
- Add two single crochets when reaching the corners to allow smooth turns.
Buttonholes (Optional):
- To create buttonholes, chain 2 stitches at even intervals across one front edge. Skip 1–2 stitches and continue single crochets in the row.
Rows:
- Work 5 rows of single crochet for the ribbing. Make sure to add two single crochets in buttonholes to reinforce the structure.
Conclusion
Once your cardigan panels are sewn together and the ribbing is added, you’ll have a completed handmade cardigan ready to wear! Repeat the process for any adjustments like creating additional sleeves, reinforcing edges, or sewing on decorative accents.
With its ribbed texture, this cardigan is a cozy and stylish addition to your wardrobe—perfect for layering in cooler weather.
Final Tip
Crochet Ribbed Cardigan unique by experimenting with colors, adding pockets, or embellishing your design with flowers or buttons. Remember, the key to professional-looking results is consistent tension and evenly worked stitches.


