Delight in playful charm with this Free Crochet My Melody Sanrio Pattern, adding a cute handmade touch perfect for gifts or decorating your space.
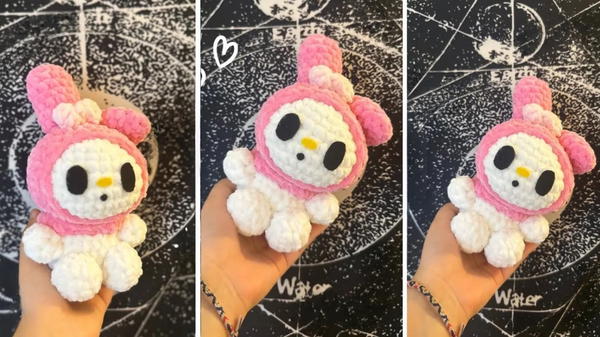
In a cozy corner of a bedroom, soft toys have always brought comfort and joy, turning ordinary spaces into playful retreats. The Free Crochet My Melody Sanrio pattern captures that same charm, transforming yarn into a beloved character that delights fans of all ages. Its detailed stitching and vibrant colors bring My Melody to life, offering both visual appeal and tactile enjoyment.
Pretty Crochet My Melody Sanrio for Seasonal Gifts
Perfect for decorating shelves, beds, or desks, this crochet creation adds personality and warmth to any room. Lightweight yet durable, it can be handled, displayed, or gifted without losing shape, making it an ideal companion for collectors or children alike. The repetitive, soothing stitches provide a mindful crafting experience, suitable for beginners while still engaging experienced crocheters with charming details.
Beyond decoration, it serves as a heartfelt handmade gift, showcasing thoughtfulness and creativity in every stitch. Its size and structure allow for versatile display options, sitting proudly on a desk, tucked into a cozy corner, or added to a collection of favorite characters. Each completed piece embodies both charm and care, turning yarn into a meaningful keepsake that sparks smiles and nostalgia.
Special Features of the Project
- Type of Project: A plush toy created using amigurumi techniques.
- Skill Level: Beginner to Intermediate. While basic stitches are used, familiarity with shaping techniques like increases, decreases, and working in the round is helpful.
- Key Techniques: Magic ring, single crochet, increases, decreases, stuffing, and sewing pieces together.
- Uses: This project is perfect as a gift, decoration, or keepsake.
- Tutor's Recommendations: Use soft yarn to achieve a plush texture, and ensure even tension, especially when working with thicker or plushier yarns.
Materials Needed
- Plush yarn (recommended in white for the main pieces)
- Crochet hook (sized appropriately for chosen yarn)
- Scissors
- Stuffing material
- Stitch marker
- Tapestry needle (for sewing and weaving in ends)
Step-by-Step Instructions
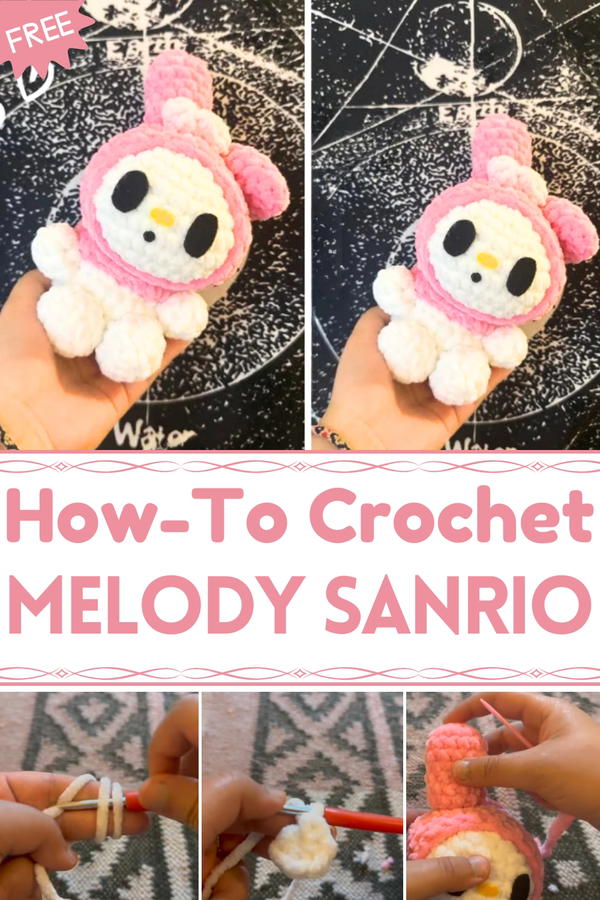
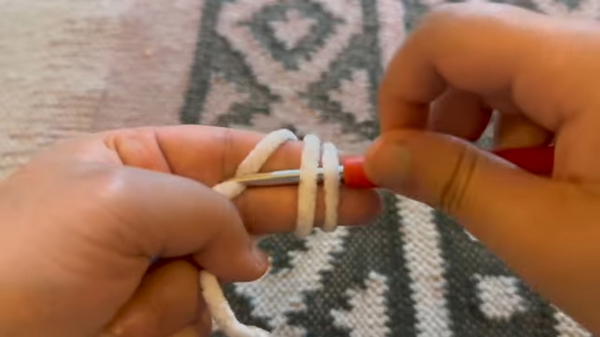
Step 1: Create the Magic Ring
Leave a small yarn tail and wrap the yarn around two fingers twice to form a loop.
Insert the hook under the loops, pull the working yarn through, and then yarn over to secure the magic ring.
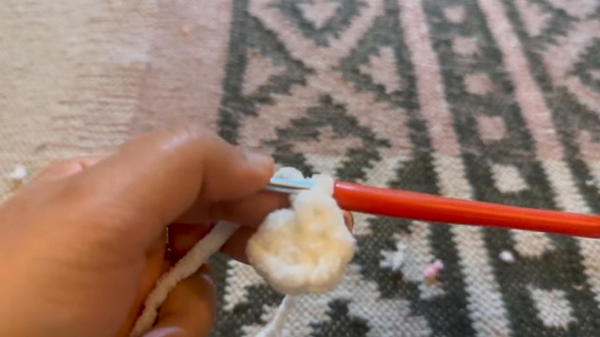
Make 6 single crochets (SCs) into the magic ring:
- Insert the hook into the ring, pull up a loop, yarn over, and pull through both loops on the hook. Repeat this 6 times.
Tighten the magic ring by pulling its tail until the ring closes completely.
Step 2: Rounds for the Shape
Round 2 - Make 6 increases:
- Insert the hook into the first stitch, make 2 single crochets (an increase). Repeat this for all 6 stitches (12 stitches total).
Round 3 - Create an alternating pattern:
- Make 1 single crochet (SC) in the first stitch, then do 1 increase (2 SCs in the same stitch). Repeat around (18 stitches total).
Rounds 4 to 7:
- Continue adding stitches in this pattern:
- Round 4: 2 SCs, then 1 increase (repeat around).
- Round 5–6: Follow the sequence of SCs and increases.
- Round 7: Make 4 SCs, then 1 increase (repeat around).
- Continue adding stitches in this pattern:
For the next 3 rounds, work 1 SC in each stitch around to maintain the shape.
Step 3: Start Decreasing
Decreasing Pattern:
- Work the following sequence:
- 2 SCs followed by 1 decrease: Insert the hook into the front loop of the first stitch and the front loop of the next. Yarn over, pull through 2 loops, yarn over again, and pull through the final 2 loops.
- Work the following sequence:
Continue decreasing:
- Gradually decrease stitches by alternating between SCs and decreases in subsequent rounds.
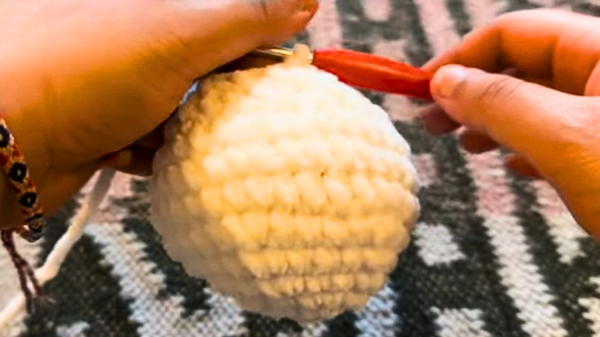
Add stuffing to the project as you work. Ensure the plush toy is firm but not overstuffed.
Continue working decreases until the piece closes entirely. Use a tapestry needle to thread through the remaining stitches and weave in the ends.
Step 4: Create the Additional Pieces
Head:
- Follow the same steps as the main ball shape (body), but modify the size (use fewer stitches and rounds based on the video’s details).
Arms and Legs:
- Start with 6 SCs in a magic ring.
- Add 1 round of 1 SC and 1 increase for shaping.
- Work 2 additional rounds of SCs for the arms and at least 3 rounds for the legs. Stuff lightly before fastening off.
Ears:
- Begin with 6 SCs in a magic ring and add 6 increases in the following round. Work single crochet rounds for shaping (6 rounds total).
Collar and Bow:
- Collar: Chain 16, work a combination of half-double crochets (HDCs), double crochets (DCs), and slip stitches (SLST) according to the pattern. Leave a yarn tail for attaching.
- Bow:
- Work 6 SCs in a magic ring. Follow a pattern of HDC increases, slip stitches, and other increases to shape the bow.
- Fold the bow slightly and secure it with stitches to create the central "knot."
Step 5: Assemble the Plush Toy
- Position the head on top of the body. Sew it in place using a whip stitch.
- Attach arms and legs symmetrically to the body.
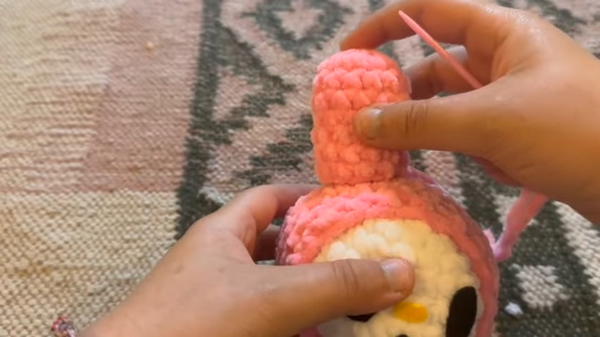
- Sew ears to the head:
- Fold one ear slightly and sew it down to create a "curved ear" effect.
- Attach the bow and collar to finalize the plush toy.
Tutor’s Suggestions
- General Tips:
- Use a stitch marker to avoid losing track of rounds.
- Gently tighten plush yarn to prevent tearing or distortion.
- For Beginners:
- Practice the magic ring on regular yarn to get comfortable with it before using plush or heavy yarn.
- Shaping Suggestion:
- Stuff as you go to maintain a smooth, rounded shape.
Tip for Success
When attaching parts, pin them into place first to ensure symmetry, then secure them with small whip stitches. This will save you time and frustration if adjustments are needed.
Conclusion
This plush toy project is a rewarding and creative way to hone your crochet skills while crafting something adorable. The combination of amigurumi techniques and soft plush yarn results in a cuddly creation perfect for gifting or decoration.


