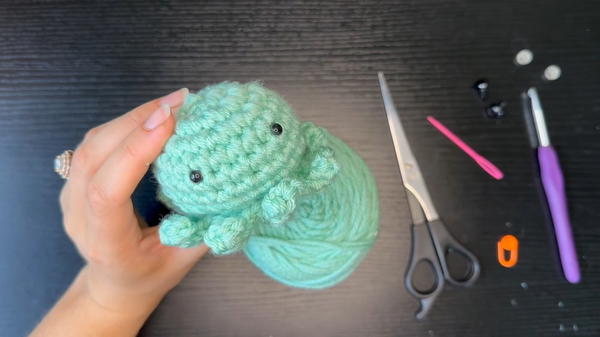
Catch adorable vibes with this Free Crochet Octopus Amigurumi Pattern, showcasing soft tentacles and a charming design perfect for gifting or décor.
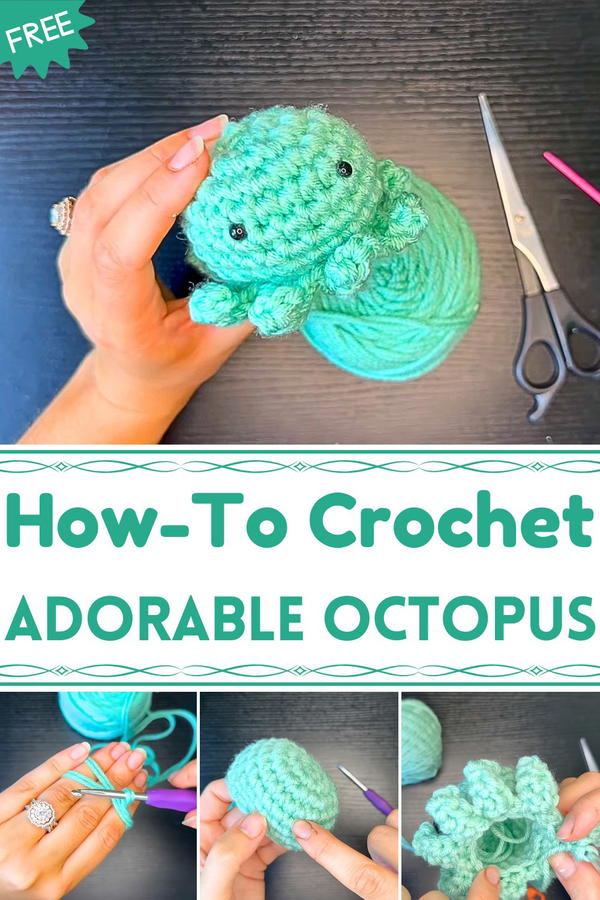
Each tentacle curls in just the right way, making it both cute and comforting—especially for babies who find the spirals soothing to touch. This pattern is a joyful project for beginners and experienced makers alike, turning leftover yarn into a pocket-sized friend full of charm. Lightweight, soft, and full of personality, it’s an easy way to brighten up nurseries, classrooms, or workspaces.
The Free Crochet Octopus Amigurumi Pattern is more than a small toy—it’s a cheerful reminder that happiness can come in eight tiny tentacles and a smile that never fades. Whether it’s a gift or a keepsake, this adorable octopus spreads lighthearted joy with every squishy squeeze.
Special Features
- Customizable Size: You can use bulky yarn or doubled strands of worsted-weight yarn to create different-sized octopi.
- Eco-Friendly Option: Instead of polyfill stuffing, the tutor suggests using scrap yarn or fabric for stuffing, promoting sustainable crafting.
- Integrated Tentacles: The tentacles are crocheted directly into the front loops, adding a fun textured detail without extra assembly.
- Secure Safety Eyes: Tips are provided to ensure the eyes remain firmly locked, especially when gifting to children.
- Beginner-Friendly Techniques: Includes step-by-step guidance for creating a magic ring, single crochet increases, decreases, and slip stitches.
Materials Needed
- Yarn:
- Two strands of number 4 (worsted-weight yarn) held together for a larger octopus.
- Alternatively, use bulky (blanket) yarn for a similar effect or single-strand yarn for smaller plushies.
- Crochet Hook:
- 5 mm hook for thicker or doubled yarn.
- 3.5 mm hook for single-strand yarn.
- Safety Eyes: Larger safety eyes or smaller ones, depending on the look you prefer.
- Stuffing:
- Polyfill stuffing or scrap yarn/fabric (environmentally friendly option).
- Scissors: For trimming yarn.
- Darning Needle: For weaving in ends and sewing up gaps.
- Stitch Marker: Helps track progress in each round while working in continuous spirals.
Level of Difficulty
- Beginner-Friendly: Simple crochet techniques like single crochets, increases, decreases, and slip stitches are used throughout the project. The pattern is straightforward, but beginners should focus on using stitch markers and following the front/back loop instructions carefully.
Tutor’s Suggestions
- Use Stitch Markers: Essential for keeping track of rounds, especially when working in continuous rounds.
- Secure the Safety Eyes: Lock the eyes into place with their backings facing downward to ensure they don’t fall out. You can also add fabric and hot glue for extra security.
- Work With Two Strands: Combining two strands of yarn gives the octopus a thicker shape and visually interesting texture.
- Dealing With Loose Centers: Pull the tail of your magic ring tightly as needed while working to keep the center firmly closed.
- Eco-Friendly Stuffing: Reduce waste by using scrap yarn or fabric instead of polyfill stuffing.
Step-by-Step Instructions
1. Create the Magic Ring (Base Step)
- Wrap the yarn around your fingers to form a magic ring.
- Hold the short tail between your pinky and ring finger.
- Wrap the yarn around the front, creating an X at the back.
- Insert your hook under the first loop, grab the second loop, and pull up.
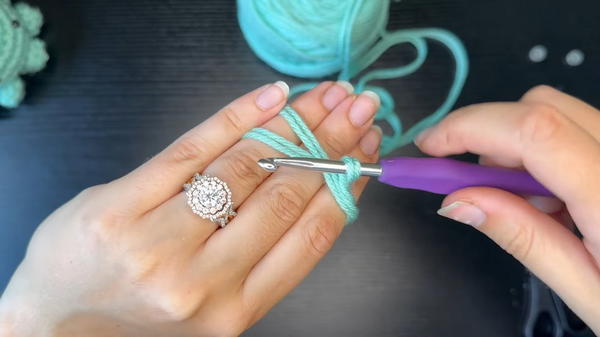
- Yarn over and chain one to secure the ring.
- Crochet 8 single crochets into the magic ring.
- Pull the tail tightly, but leave it for later as part of the stuffing.
2. Rounds 1–3: Shaping the Head
- Round 1: Single crochet twice into each stitch (increase). You’ll have 16 stitches.
- Round 2: Alternate single crochet and increase around. Result: 24 stitches.
- Round 3: Alternate two single crochets and one increase around. Result: 32 stitches.
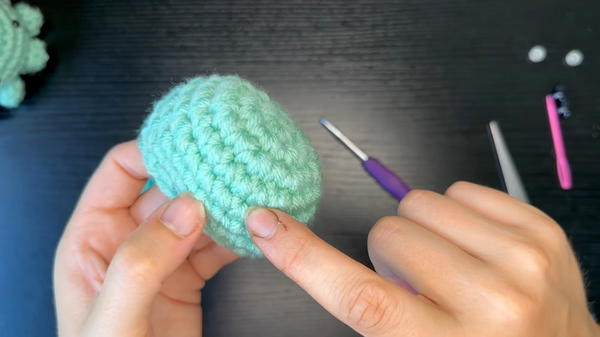
3. Rounds 4–7: Building the Body
- Single crochet evenly in each round to elongate the body of the octopus. Repeat for 4 rounds.
- Check progress by counting the visible "V" shapes along the rounds to ensure accuracy.
4. Add Safety Eyes
- Insert safety eyes between rounds 5 and 6.
- Place the first eye where desired, then count 4–5 stitches apart for the second eye. Adjust placement until satisfied.
- Push the locking backings onto the safety eyes with the flaps facing downward for extra security.
5. Round 8: Single Crochet and Decrease
- Alternate single crochet and decrease stitches.
- For decreases: Insert your hook into the front loops of two consecutive stitches, yarn over, pull through both loops, and finish the decrease.
- Continue working around the body, using a stitch marker to track the start of the round.
6. Round 9: Creating Tentacles
- Front Loop Work: Work tentacles into the front loops only.
- Slip stitch into front loops.
- Chain 6.
- Slip stitch into the second chain from the hook.
- Single crochet into the next 2 chains.
- Half-double crochet into the final 2 chains.
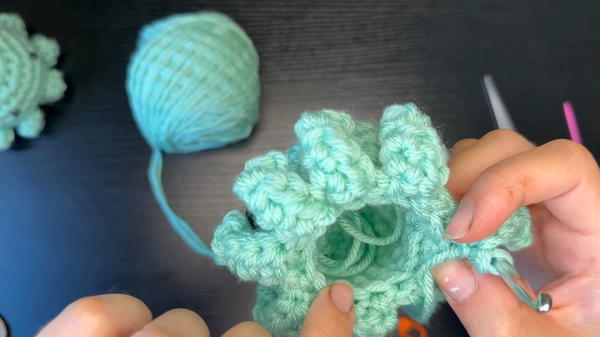
- Slip stitch into the next front loop and repeat.
- Continue the pattern to create 8 tentacles.
7. Round 10: Closing the Body
- Back Loop Decrease: Work in the back loops only.
- Insert into the first and second back loops, yarn over, pull up loops, and pull through all three loops on the hook.
- Place a stitch marker in the first stitch and continue decreasing around.
8. Stuff the Octopus
- Use polyfill or scrap yarn/fabric to stuff. Adjust the filling for a rounded, even shape.
9. Final Round: Traditional Decreases
- Alternate decreases until the opening is closed.
- Fasten off and weave the tail through the remaining stitches for a neat finish.

Uses
- Decor: Use as a whimsical decoration for kids' rooms or themed events.
- Gifts: Perfect handmade gift for friends and family.
- Toys: Soft and safe (if safety eyes are securely attached), suitable for play.
- Keychains: Make smaller versions and attach keychain hardware for an accessory.
Conclusion
This plushy crochet octopus is a fun and rewarding project, blending essential crochet techniques with creative details like the tentacles and safety eyes. With customization options for size and texture, this pattern allows crocheters to experiment with color combinations and sustainable stuffing methods.
Pro Tip
For an eye-catching design, experiment with variegated yarns or mix two contrasting colors when doubling strands.


