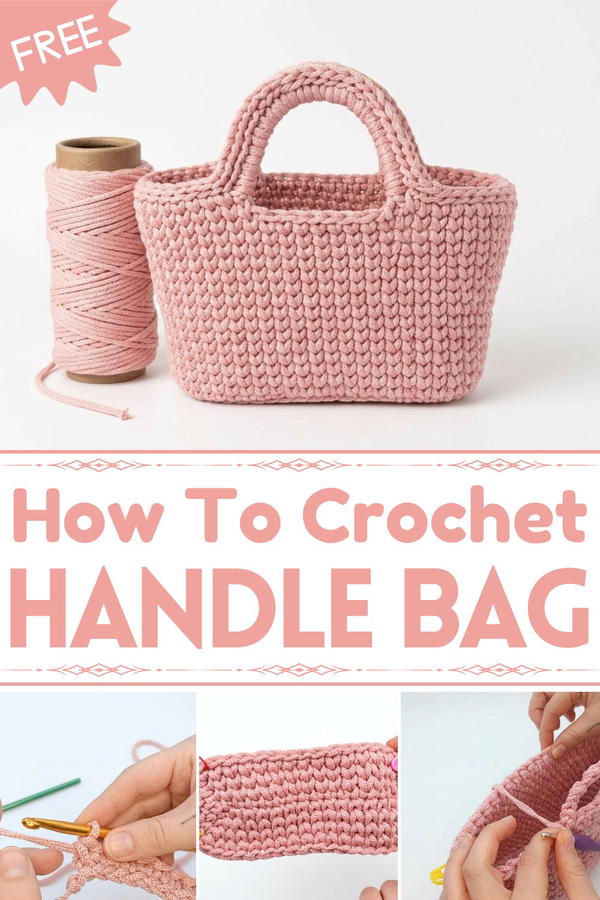
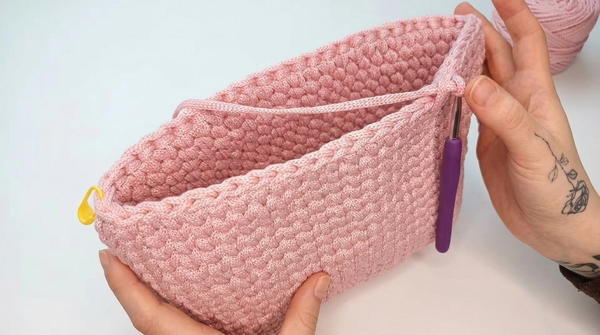
Carry elegance with ease! Try this Free Crochet Handle Bag Pattern for a stylish and practical bag that’s perfect for everyday use or special occasions.
A simple bag can say so much about your style, and the Free Crochet Handle Bag Pattern lets you achieve an eye-catching look that’s practical too. This crochet handle bag is lightweight, sturdy, and perfect for carrying your daily essentials or even doubling as a trendy tote. Its textured appearance and soft curves make it not only functional but also a stunning accessory for any outfit. Whether you’re going shopping, heading out for a casual day, or looking for the perfect handmade gift, this bag is a perfect choice.
Crochet Handle Bag Free Pattern for Organizing Your Essentials
Its versatile size and vibrant yarn options allow you to personalize it to suit your needs, making it a striking statement piece that stands out effortlessly. The comfortable handle makes it easy to carry, while the durable design ensures it holds up to everyday use without a problem. This crochet bag is a beautiful combination of stylish looks and everyday usefulness, making it a delightful project to try.
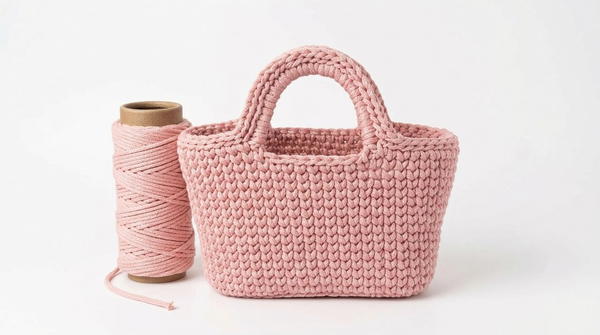
Crochet Pink Handbag Pattern
Skill Level
Intermediate to Advanced
This pattern is suitable for crocheters who are comfortable working with individual crochet techniques such as invisible closures, reverse rib stitches, and low-centered stitches.
Materials
Yarn:
- Linda Big Cord Yarn (or similar 500–600g thick cord yarn).
- Yarn weight: Super bulky.
- Example color: Pink (adjust for personal customization).
Crochet hook:
- Hook Size: 6 mm crochet hook for general work.
- Optional: 5 mm hook for fine adjustments where needed.
Stitch Markers:
- 4–5 markers used to track increases and corners.
Scissors
Optional:
- Wool Needle for weaving in yarn ends.
Lighter:
- Use for securing yarn ends (optional and only recommended for synthetic cord or ribbon yarn).
Key Abbreviations (US Terminology)
- ch: chain
- sc: single crochet
- sl st: slip stitch
- dc: double crochet
- inc: increase (place 2 stitches in same stitch or space)
- V: the visible V-shape of stitches (front and back loops).
Special Notes
- The handbag is worked from the base upward, beginning with a rectangular base followed by the bag's main body and handles.
- The pattern uses invisible closures and precise centered single crochet stitches to create a seamless, polished look.
- Keep tension loose when working with bulky cord yarn to avoid strain on your hands.
Pattern Instructions
Base Creation
Foundation Chain
Chain a length to fit your desired base size:
- For a medium bag: Chain 16 chains, adding 1 extra chain for turning.
- Adjust chain length to make a larger or smaller base, ensuring you maintain even chain stitches.
Row 1:
- Skip the first chain.
- Insert hook into the back loop of the 2nd chain and work 1 sc.
- Mark the first stitch with a stitch marker.
- Work 1 sc into the back loop of each chain across.

End of Row 1:
- On the final chain, insert the hook into the “loop inside the last chain” (not just the back loop).
- Work 3 sc into the same space.
- Mark all three stitches with stitch markers.
Round 2:
Working along the opposite side of the foundation chain:
- Insert hook into the whole V stitch (front and back loops together).
- Work sc into each stitch until the other end.
Last Stitch:
- In the final stitch of this side, work 3 sc into the same stitch as before to turn the corner.
- In the final stitch of this side, work 3 sc into the same stitch as before to turn the corner.
Invisible Closure:
- Pull up the loop on the last stitch.
- Insert hook from the back of the first real stitch of the round. Pull the loop through to the back.
- Carefully position the new loop in the center bottom stitch of the first real stitch.
Round 3:
Work centered single crochet stitches:
- Insert hook centered into the V of each stitch (front and back).
- Eliminate gaps or holes by placing stitches directly into the center.
- Continue until the stitch marker at the corner.
Increase at Corners:
- For every marked corner stitch:
- Work 2 sc into the same stitch (increase).
- Continue corner increases until completing the base radius.
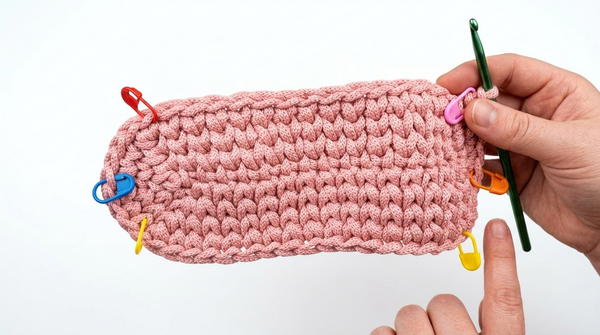
- For every marked corner stitch:
Tip: If using bulky yarn and difficulty arises, switch to a smaller hook size (5 mm) for finer adjustments in tight spaces.
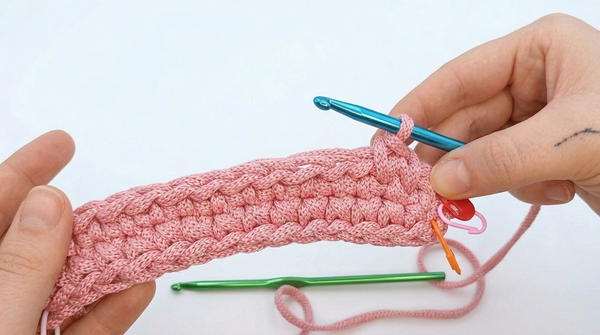
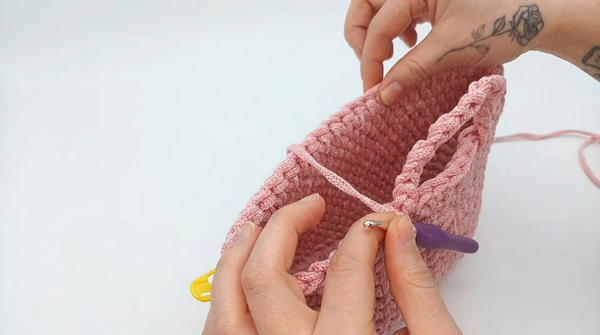
Creating the Body of the Bag
Transition Round (Reverse Rib Stitch):
- To create an edge between the base and body:
- Work into the back loop of each stitch, inserting your hook further into the horizontal thread below the back loop.
- sc into each stitch across.
- Complete the round as usual with an invisible closure.
Body Stitch Pattern:
After completing the reverse rib round, choose your desired stitch pattern for the handbag's body:
- Option 1 (recommended): Centered single crochet stitches for a knit-like texture.
- Option 2: Star stitch, puff stitch, or any decorative stitch.
Begin with centered single crochet stitches:
- Insert hook centered into each stitch (back and front loops, directly in the V).
- Work evenly into each stitch across.
- Repeat these rounds until you reach the desired height for the body (e.g., 17 rounds for medium size).
Handles
Partition for Handles:
- Divide Bag into Three Sections:
- Use stitch markers to mark:
- Two side sections for the walls.
- One central section for the handles.
- Example for medium size: Divide into sections such as 9 stitches, 8 stitches (handle), 9 stitches.
- Use stitch markers to mark:
Handle Chains:
Based on the middle section, leave free chains (detached from the bag body):
- Example: For an 8-stitch handle, chain approximately 16 stitches (double the handle space).
Anchor handle chains:
- Skip the stitches for the handle.
- Insert hook into the next marked stitch and continue working sc centered stitches.
Second Handle:
Repeat the process on the opposite side to create the second handle.
Finishing
Invisible Closure for Upper Edge:
- Cut yarn.
- Use hook to close invisibly, mimicking a clean new stitch.
- Thread ends securely.
Weaving and Securing Ends:
- Use a wool needle to weave yarn ends inside the reverse rib stitches.
- Optionally, burn and secure synthetic yarn ends using a lighter.

Conclusion
This structured pink handbag showcases a clean and polished texture with well-defined edges. The seamless construction ensures durability and aesthetic appeal, making it a versatile accessory for daily use.
Pattern Correction
- Foundation Chain: Ensure a soft initial chain to accommodate bulky yarn tension.
- Corners: Always mark corner increases to avoid accidental misalignment.
Tips
- Switch Hooks: Use a smaller crochet hook for tight spaces or intricate closures.
- Test Handle Chains: Adjust chain length to ensure comfortable grip.
- Blocking: Gently block finished bag for uniform tension and structure.


