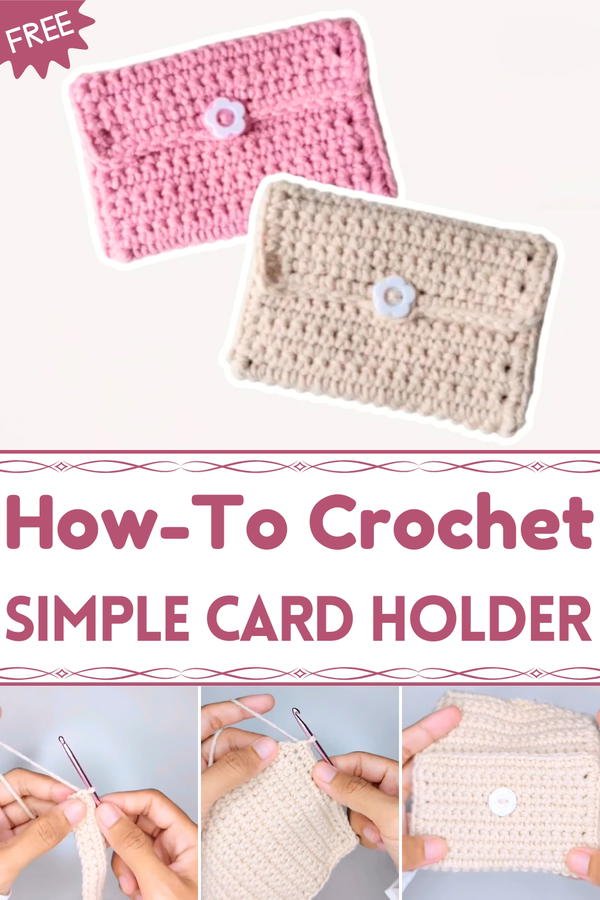
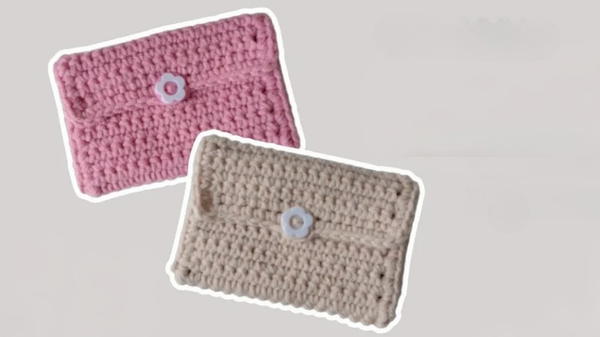
Organize in style with the Free Crochet Card Holder Pattern, adding a sleek and practical touch to daily essentials, gifts, or on-the-go accessories.
In bustling daily life, keeping credit cards, ID, or loyalty cards organized can be surprisingly challenging. The Free Crochet Card Holder pattern offers a compact and stylish solution, providing a simple yet functional way to carry essentials securely. Its lightweight construction ensures easy portability, making it perfect for slipping into a handbag, backpack, or even a pocket, keeping important cards within easy reach without the bulk of a traditional wallet.
Crochet Card Holder Pattern Perfect for Office or School Use
The card holder features snug compartments that hold cards firmly while allowing effortless access, reducing the risk of loss or damage. Its soft, durable yarn creates a comfortable texture that adds a tactile appeal to everyday use. With options to mix colors or create small accents, each card holder can reflect personal style while maintaining practicality. The open-weave or textured stitches enhance both aesthetics and flexibility, allowing slight expansion to accommodate multiple cards without stretching out of shape.
Beyond everyday convenience, the Free Crochet Card Holder pattern serves as a thoughtful, handmade gift for friends, family, or coworkers. It encourages mindful engagement through hands-on crafting while transforming a simple necessity into a stylish, functional accessory. Combining portability, durability, and charm, this card holder turns a practical item into a personal statement that organizes and protects essentials in an elegant, accessible way.
Special Features
- Beginner-Friendly Design: Ideal for those new to crochet, as the tutorial primarily uses simple stitches.
- Tool Versatility: The Xiaomi Craft DIY kit used here offers materials to make three different projects.
- Small and Practical: The holder is lightweight, compact, and easy to carry, making it a useful accessory for daily use.
- Minimal Materials Required: The project uses a minimalistic approach, with basic tools and techniques, keeping it simple yet effective.
- Personalization Option: You can add buttons, patterns, or colors to suit your preferences.
Materials
- DIY Kit from Xiaomi Craft: Comes with materials for three projects (cardholder, mini pouch, and amigurumi octopus).
- Crochet Hook: Included in the DIY kit.
- Yarn: Lightweight cotton yarn, typically provided in the kit.
- Button: For the closure mechanism.
- Scissors: To cut excess thread.
- Tapestry Needle: For sewing and finishing.
Step-by-Step Tutorial
1. Creating the Foundation
- Start with a Slipknot: Begin by making a simple slipknot to secure the yarn.
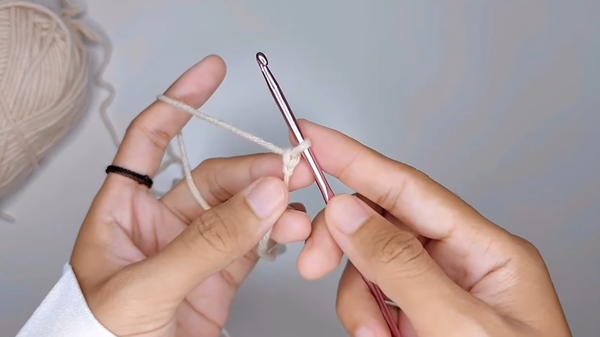
- Create 18 Chains: Crochet a foundation chain consisting of 18 stitches. Ensure the count is accurate to maintain proper dimensions.
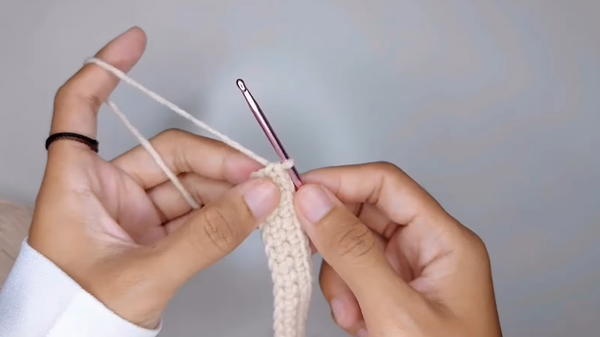
2. First Row: Single Crochet
- Insert the crochet hook into the second hole from the hook.
- Work single crochet stitches in each of the next 17 holes across the row.
3. Second Row: Continuing Single Crochet
- Chain 1 and turn the work.
- Continue working single crochet stitches along the row.
- Ensure you have 17 single crochets in this row.
4. Repeat Rows to Build the Length
- Continue working single crochet for subsequent rows.
- Repeat this pattern until you complete 30 rows or until the piece measures approximately 17 cm in length.

5. Adding the Border
- Work single crochet stitches along each side of the rectangle to create a neat border.
- At each corner, make 3 single crochets in the same stitch to ensure smooth and rounded edges.
- Keep crocheting single stitches along the sides, and add 3 single crochets whenever you meet a corner.
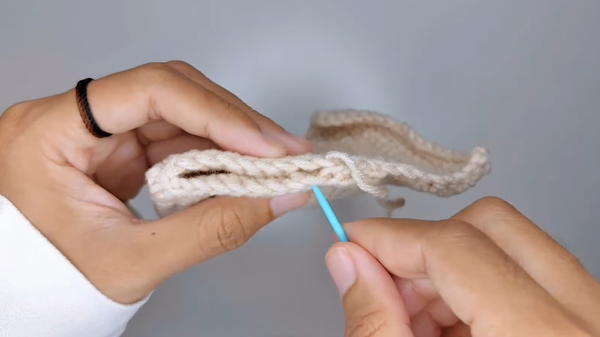
6. Creating a Buttonhole
- On one side of the rectangle, crochet 6 single stitches.
- Create a buttonhole by making 3 chains and skipping 3 stitches on the base.
- After the buttonhole, continue with another 6 single crochets to complete the side.
7. Finishing the Border
- Crochet single stitches along the remaining sides of the piece.
- Slip stitch to the first hole to join the edges seamlessly.
8. Preparing for Sewing
- Leave a long thread at the end of the border for sewing.
- Cut the yarn using scissors.
- Create a second identical panel if needed for the back.
9. Assembling the Card Holder
- Sew along the sides using the leftover yarn, securing the two panels together.
- Tidy up loose threads by weaving them into the work.
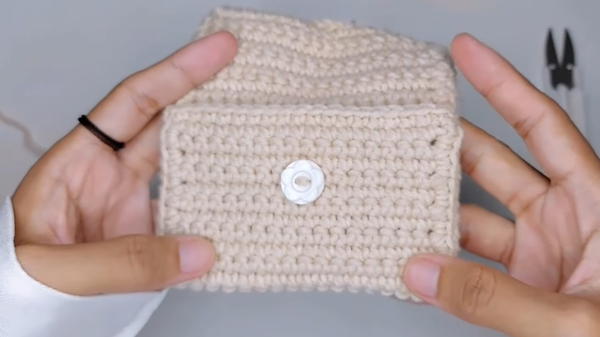
10. Attaching the Button
- Sew the button directly opposite the buttonhole using a needle and thread.
- Ensure the button is firmly attached, as it serves to close and secure the holder.
Tutor’s Suggestions
- Take Precise Measurements: Confirm the length and width of the crocheted piece to ensure functionality (approximately 17 cm long).
- Work Slowly on Corners: Adding 3 single crochets in each corner is essential for smooth edges, so take your time to ensure accuracy.
- Use Quality Yarn and Tools: The Xiaomi DIY kit provides materials designed for beginners, ensuring a smoother crafting experience.
- Ask Questions: If anything feels unclear, the tutor encourages viewers to ask questions in the comments section.
Level of Difficulty
This project is perfect for beginners. It includes straightforward techniques like single crochet, chain stitches, and simple sewing, making it ideal for novice crocheters to practice their skills and create an impressive finished product.
Uses
- Compact Storage: Perfect for holding cards, money, or small essentials.
- Travel Accessory: Lightweight and portable for trips or everyday use.
- Handmade Gift: A thoughtful, functional, and customizable item to give to friends or family.
- DIY Personalization: Great for experimenting with colors, buttons, and patterns.
Tip
When working on the border and corners, ensure the stitches are tight and evenly spaced. This creates a polished and professional look, preventing curling at the edges.
Conclusion
This crochet card holder tutorial is an excellent project for beginners and experienced crocheters alike. It offers a practical outcome with simple and effective techniques. Using just a few materials and following detailed instructions, you can crochet a functional card holder while improving your crochet skills.