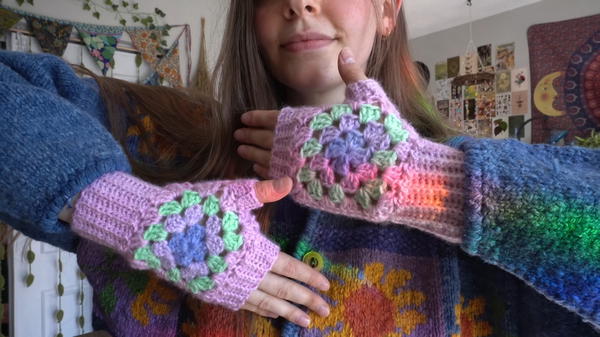
Stay cozy and chic with the Free Crochet Granny Fingerless Gloves Pattern, adding a vintage-inspired touch to chilly days, casual outfits, or thoughtful gifts.
During brisk afternoons when typing on a keyboard or scrolling through a phone, cold hands can be frustrating yet full coverage gloves often feel restrictive. The Free Crochet Granny Fingerless Gloves pattern offers an ideal solution, keeping fingers free for movement while providing warmth and comfort to palms and wrists. Their airy, textured structure allows ventilation, preventing hands from overheating while maintaining cozy coverage in cooler environments.
Crochet Granny Fingerless Gloves Pattern to Add Warmth in Style

These gloves feature flexible, stretchy stitches that adapt to different hand sizes, ensuring a snug and comfortable fit. The granny-style motifs create a visually appealing, classic look that complements both casual and semi-formal attire, making them suitable for indoor and outdoor activities. Whether reading, knitting, or enjoying a morning walk, these gloves combine practicality with subtle elegance. Using soft, durable yarn enhances comfort while ensuring longevity, giving the gloves a soft touch against the skin without compromising warmth.
Beyond their functional appeal, the Free Crochet Granny Fingerless Gloves pattern encourages creativity and personalization, offering opportunities to experiment with colors, textures, or small decorative accents. These gloves make thoughtful gifts while serving as versatile winter accessories, transforming simple hand coverings into stylish, practical companions. Their combination of warmth, mobility, and charm makes them a perfect addition to any wardrobe, adding both comfort and style to daily routines.
Special Features
- Beginner-Friendly Design: Perfect for crochet beginners and enthusiasts who want to hone their skills using simple techniques.
- Customizable: You can experiment with different granny square styles, colors, and sizes, depending on your preferences and hand size.
- Efficient Use of Time: The gloves can be made quickly for last-minute gifts or additions to your wardrobe.
- Comfortable Fit: The ribbing adds stretch and a snug feel to the gloves.
- Creative Recycling: A great project for using leftover yarn from previous crochet projects.
Materials Needed
- Yarn: Four different colors of yarn; leftover or scrap yarn works well for this project. Ensure one color has enough for the ribbing.
- Crochet Hook: 6 mm hook (or hook size recommended for your yarn). A smaller hook, 5 mm, is used for ribbing to ensure a tighter fit.
- Blocking Board: Used for making granny squares evenly shaped (optional but recommended).
- Tapestry Needle: For seaming granny squares and weaving in ends.
- Scissors: For trimming yarn tails.
Step-by-Step Instructions
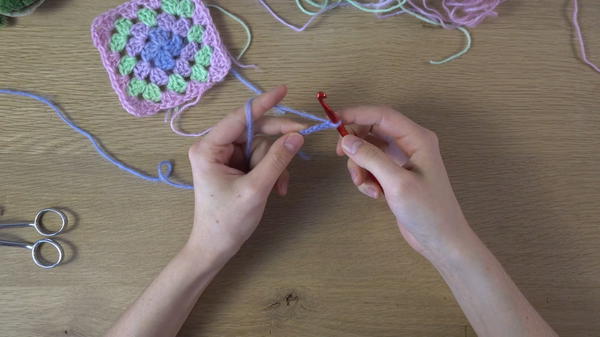
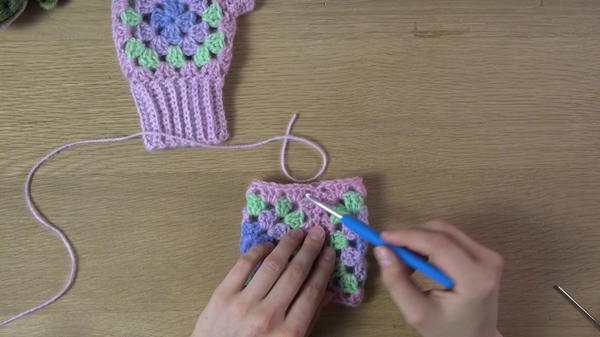
1. Making the Granny Squares
Foundation Ring:
- Make a slip knot, chain 4, and slip stitch into the first chain to create a circle.
- Make a slip knot, chain 4, and slip stitch into the first chain to create a circle.
Row 1:
- Chain 2 (counts as the first double crochet).
- Create the clusters:
- Work 3 double crochets into the circle. Chain 2 to form the corner.
- Repeat this process 3 more times to form 4 clusters (3 double crochets each) with chain 2s in between as corners.
- Slip stitch into the top of the chain 2 and finish the row.
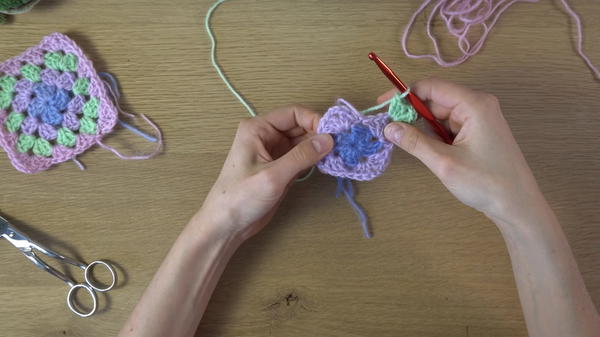
Adding New Colors:
- Join a new color into any of the four corners by inserting your hook, then pull the new yarn through. Chain 2 (counts as the first double crochet).
- Work the corners by creating 3 double crochets, chain 2, 3 double crochets into each corner.
- For the sides, add a cluster of 3 double crochets without chaining in between. Slip stitch to complete the round.
- Note: Repeat this step for additional rows, gradually adding new colors.
Determine the Size:
- Add or remove granny square rows based on your hand size. The creator uses 4 rows for a snug fit.
Blocking Granny Squares (Optional):
- Spray each square with water and pin them onto a blocking board to make them perfectly square. Let them dry for 24-48 hours.
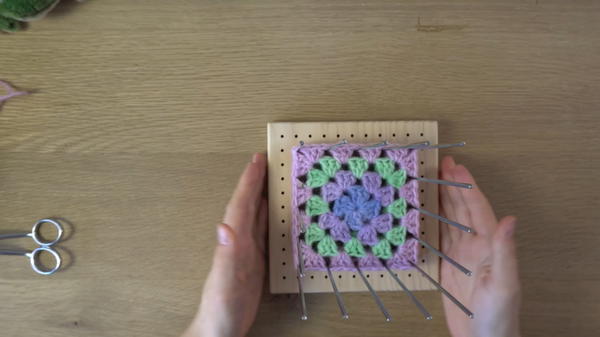
- Spray each square with water and pin them onto a blocking board to make them perfectly square. Let them dry for 24-48 hours.
2. Seaming the Granny Squares
Flip to the Wrong Side:
- Place 2 squares together with their wrong sides facing outward.
Whip Stitch Seam:
- Use a tapestry needle to whip stitch along the side of the granny squares.
- For the side opposite the thumb hole, seam the squares completely.
Creating the Thumb Hole:
- Whip stitch along one side of the granny squares but stop after the first set of 3 double crochets (cluster), leaving an opening for the thumb.
Repeat for the Other Glove:
- Seam the second pair of granny squares in the same way, ensuring thumb holes match.
- Seam the second pair of granny squares in the same way, ensuring thumb holes match.
3. Adding Ribbing to the Gloves
Bottom Ribbing (Cuff):
- Attach yarn to the corner of one glove.
- Chain 12 (or desired length) for the ribbing. Add 1 turning chain.
- Back Loop Only (BLO) Single Crochet: Work single crochet stitches into the back loops only of the chain.
- Slip stitch into the next 2 stitches of the granny square and turn your work.
- Continue working BLO single crochet stitches back and forth until you go around the cuff entirely.
Top Ribbing:
- Follow the same steps as the bottom ribbing, but use a smaller chain size (6 chains, plus 1 turning chain).
- Work BLO single crochet around the top of the glove.
Thumb Ribbing:
- Add a shorter ribbing chain (4 chains plus 1 turning chain) to the thumb area.
- Attach yarn, work BLO single crochet, and slip stitch into the thumb area until complete.

4. Seaming the Ribbing
- Align Front and Back Loops:
- Use a tapestry needle to sew the ribbing together. Go through the front loop of one edge and the back loop of the opposite edge to create a seamless look.
- Secure the ends and weave in yarn tails.
Tutor’s Suggestions
- Blocking Helps A Lot: Blocking the granny squares ensures perfect alignment and a polished final look.
- Use a Tighter Hook for Ribbing: A smaller hook (5 mm) makes the ribbing neater and provides a snug fit.
- Keep Colors Consistent: Ensure you have enough yarn of your primary color for all the ribbing portions.
- Customize Sizes: Add or remove rows in the granny squares or adjust the ribbing length to fit your hand size.
Level of Difficulty
This project is beginner-friendly! The granny squares require simple double crochet clusters, and the seaming/ribbing includes straightforward single crochet and whip stitching. Even beginners can achieve a professional-looking result with patience and practice.
Uses
- Stylish Accessories: Perfect for adding flair to your winter wardrobe.
- Thoughtful Gifts: Great handmade gifts for friends and family.
- Customizable Projects: Experiment with different colors or patterns for versatile looks.
- Eco-Friendly Crafting: Ideal for using leftover yarn or scrap materials.
Tip
For a seamless and polished look, pay close attention to aligning your stitches while seaming. Keep tension consistent in your whip stitches, and don’t pull too tightly to avoid puckering.
Conclusion
This tutorial blends creativity and functionality to produce charming crochet fingerless gloves. With simple granny square techniques and minimal materials, you can craft unique accessories that are cozy and stylish.