Express bold emotions with the Free Crochet Angry Emoji Hair Clip Pattern that adds quirky charm, fun style, and a handmade touch to any look.
Emotions can be shown in the most unexpected ways, and accessories are a playful avenue to make a statement. Small touches of creativity can make a hairstyle truly stand out, adding both charm and function. The Free Crochet Angry Emoji Hair Clip Pattern captures this perfectly, transforming yarn into a vivid and fun accessory that conveys attitude and whimsy. Its compact size makes it ideal for clipping onto ponytails, buns, or loose strands, bringing personality to daily wear.
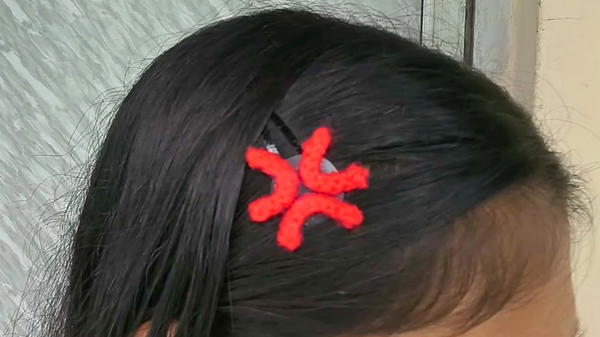
Whimsical Crochet Angry Emoji Hair Clip Pattern for Bold Style

Lightweight yet sturdy, it keeps hair in place comfortably while adding a playful accent to any look. Perfect for kids, teens, or anyone who enjoys quirky details, it also makes a thoughtful handmade gift that spreads smiles.
The pattern allows for creative freedom in color choices and facial expressions, letting each clip feel unique and personalized. Quick to finish yet full of character, it turns minimal materials into an accessory that’s both functional and expressive. With the Free Crochet Angry Emoji Hair Clip Pattern, small pieces of yarn become charming statements, proving that even tiny accents can make a big impact in everyday style.
Materials Needed
- Yarn
- Medium-weight yarn or crochet thread (color options depend on the emoji you want to create). The tutorial uses a warm yellow shade to match the emoji aesthetic.
- Crochet Hook
- Suitable for the yarn weight you’re using. The tutorial doesn’t specify the hook size, but a 3.5 mm - 4 mm hook should work with medium-weight yarn.
- Scissors
- A small, sharp pair of scissors to cut excess yarn.
- Darning/Tapestry Needle
- To weave in ends and secure the project.
Step-by-Step Instructions
1: Make a Slip Knot
- Start by creating a slip knot:
- Wrap the yarn around your index or middle finger to form a loop.

- Take the working yarn and pull it through the loop using your fingers.
- Tighten the knot around the hook.
- Wrap the yarn around your index or middle finger to form a loop.
- Insert the Hook:
- Once the slip knot is formed on the hook, pull it gently to ensure it’s snug but flexible.
2: Create the Foundation Chain
- Chain 10 to Start:
- Yarn over, pull through the loop on the hook. This forms your first chain.
- Repeat this motion 10 times to form 10 chains, each of which looks like a "V" shape at the top.
- Tips for Chains:
- Hold the slip knot between your thumb and middle finger to stabilize the foundation as you work.
- Count the "V" shapes at the top of the chains to ensure you have 10.
3: Work Slip Stitches into the Chains
- Slip Stitch into the Back Bumps:
- Turn the foundation chain slightly to locate the back bumps (behind the "V" shapes of the chain).
- Insert the hook into the first back bump, yarn over, and pull through both loops on the hook.
This completes one slip stitch. - Repeat the same step for each of the 10 chains.
- Finalize the Row:
- When you reach the last chain, complete the slip stitch and gently pull up the loop to tighten.

- When you reach the last chain, complete the slip stitch and gently pull up the loop to tighten.
4: Finish the Symbol
- Cut the Yarn:
- Use scissors to cut the working yarn, leaving a small tail.
- Pull the yarn tail through the loop on your hook and pull to secure.
- Secure and Tie Loose Ends:
- Tie the loose yarn ends together tightly. Use the darning needle to weave in the ends for extra security.

- Tie the loose yarn ends together tightly. Use the darning needle to weave in the ends for extra security.
5: Repeat the Process
- Make Two More Pieces:
- Repeat Steps 1-4 twice more to create three identical "W" shapes (or arch shapes) in total.
These three shapes will form the base of your angry emoji.
- Repeat Steps 1-4 twice more to create three identical "W" shapes (or arch shapes) in total.
- Assembly:
- Tie or weave the loose ends of the three pieces together to give the final product a unified look.
6: Add Emojis for Styling (Optional)
- If desired, use embroidery, beads, or other crochet embellishments to stylize the emoji. For the angry emoji look:
- Add small frowns, furrowed brows, or other design details using black and red yarn for added expression.

- Add small frowns, furrowed brows, or other design details using black and red yarn for added expression.
Special Features
- Removable Crochet Clip: Attach this design to a hair clip, bag, or key chain for a playful and functional accessory.
- Beginner-Friendly: Using only chains and slip stitches, this project is especially suitable for crochet novices.
- Customizable: You can easily adapt the design to represent different emojis (happy face, sad face, hearts, etc.).
- Quick to Make: The entire project takes less than 30 minutes to complete, making it perfect for last-minute DIY ideas.
Level of Difficulty
- Beginner-Friendly
This project is perfect for crochet beginners. The only skills required are chaining and slip stitching, both of which are foundational stitches in crochet. The video provides clear and easy-to-follow instructions to guide you step by step.
Tutor’s Suggestions
- Take Your Time: Begin with looser chains for easier stitching into the bumps of the foundation chain. Tight chains can be difficult to work with.
- Color Choices: Use bright yellow yarn for an authentic emoji look, but don’t hesitate to experiment with other colors to add your personal touch.
- Weave in Ends Securely: Make sure to weave in the loose ends carefully to prevent the design from unraveling.
Uses
- Accessories: Attach the crochet emoji to hair clips, headbands, or scrunchies for fun hair accessories.
- Decorations: Use the design as decoration for bags, pencil cases, jackets, or as part of a crochet emoji collection.
- Gifts: Handmade crochet emojis make charming, personalized gifts.
- Skill Practice: This project is great for practicing slip stitches and understanding foundational crochet techniques.
Tip
When slip-stitching into the back bumps of the chain, ensure that you pull up the loop slightly before completing the stitch. This prevents the stitches from becoming too tight, making the process smoother and the design more uniform.
Conclusion
The Angry Emoji Crochet Clip is a delightful project that’s simple to make, highly customizable, and functional. Whether you’re a beginner looking to sharpen your crochet skills or a seasoned crafter wanting a quick and playful project, this tutorial makes it easy to create something truly.


