Carry a splash of ocean charm with the Free Crochet Octopus Keychain Pattern, a cute and quick project perfect for keys, bags, or gifts.
A tiny octopus with playful tentacles and a cheerful face can be the perfect little companion for your keys or bag. This free crochet octopus keychain tutorial offers an easy-to-follow method for making a cute and functional accessory that’s as fun to make as it is to use. Beginning with a magic ring and a series of simple single crochets, the process is straightforward, even for beginners. The octopus’s round body takes shape in just a few rounds, with basic increases and decreases helping to define its adorable form.
Beautiful Crochet Octopus Keychain for Ocean-Themed Gifts
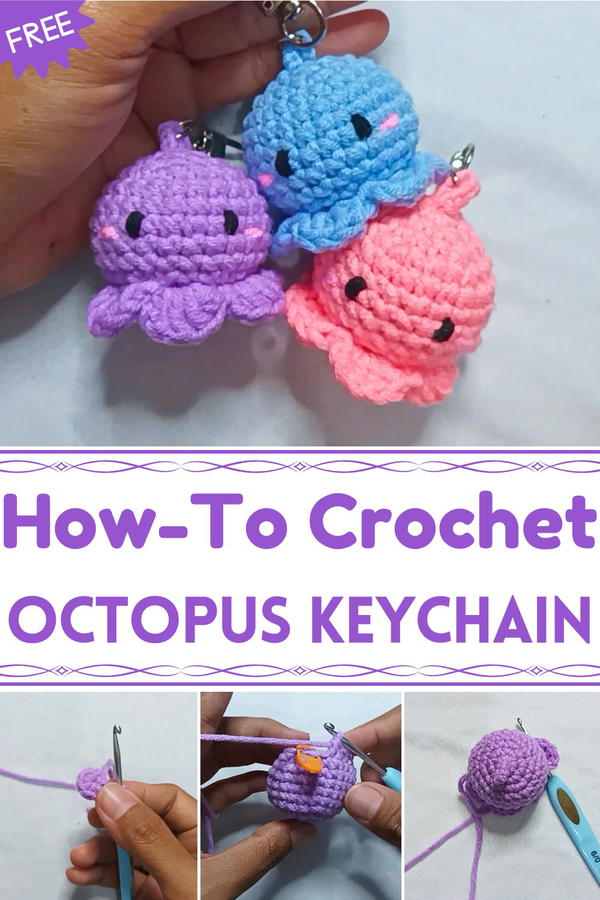
What makes this project truly delightful are its charming details. The eight tentacles, crocheted into the front loops with double crochets, give it a lively and realistic look, while the blush cheeks and small black eyes add character and personality. A splash of color can easily be customized to your taste, making each octopus unique. The use of soft milk cotton yarn ensures a smooth texture, while polyfill stuffing gives the octopus a huggable quality.
Once completed, this crochet octopus can be attached to a keyring or used as a decorative addition to zippers, backpacks, or even gift packages. Quick to complete and requiring only a few materials, it’s a satisfying project that brings joy to both maker and recipient, offering a touch of handmade charm to everyday items.

Materials Needed
- Milk Cotton Yarn (5 Ply): For the main body of the octopus.
- Pink Yarn: To add blush details to the cheeks.
- Black Yarn: To embroider the eyes if safety eyes are not used.
- Crochet Hook (3.5 mm)
- Tapestry Needle: For sewing parts together and adding details.
- Scissors: For cutting yarn and tidying loose ends.
- Stitch Marker: To track rounds.
- Polyfill: For stuffing the octopus body to give it shape.
- Keychain Ring: For turning the octopus into a keychain if desired.
Step-by-Step Instructions
1. Starting the Head and Body
1: Magic Ring
- Begin by creating a magic ring with the main yarn color.
- Crochet 6 single crochets (SC) into the ring. Pull the thread tightly to close the ring.
2: Increases
- Crochet 2 single crochets in each stitch of the first round. A total of 12 SC should be made.
- Use a stitch marker to mark the beginning of the round to ensure accuracy.
3: Alternating Pattern (Single Crochet and Increase)
- Crochet 1 SC in the first stitch, then 2 SC in the second stitch (increase). Repeat this sequence 6 times.
- By the end of this round, you should have 18 SC stitches.
4: Two Single Crochets and One Increase
- Crochet 2 SC, followed by 1 increase (2 SC in the same hole). Repeat this pattern 6 times.
- At the end of this round, you will have 24 SC stitches.
5–9: Maintain Shape
- Crochet 24 SC stitches per round without any increases or decreases. Complete 5 rounds to form the body.

2. Shaping the Body (Decreases)
10: Two Single Crochets and One Decrease
- Crochet 2 SC, then reduce the stitches by crocheting two stitches together (decrease). Repeat this pattern 6 times.
- By the end of the round, there will be 18 SC stitches.
11: Single Crochet and Decrease (Back Loop Only)
- Crochet 1 SC, followed by 1 decrease (working only in the back loops of the stitches). This creates a clean edge for attaching tentacles later.
- Repeat this sequence around, resulting in 12 SC stitches.
- Note: The tutor skips over the back loop-only technique if it’s difficult for beginners.
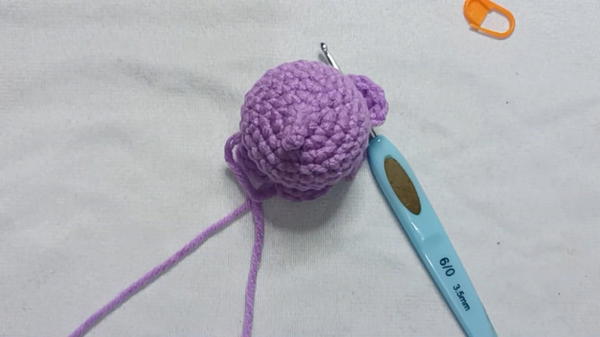
12: Decrease All Remaining Stitches
- Decrease every stitch until there are 6 SC stitches remaining.
- Leave a long yarn tail at the end—this will be used to form the key ring loop later.
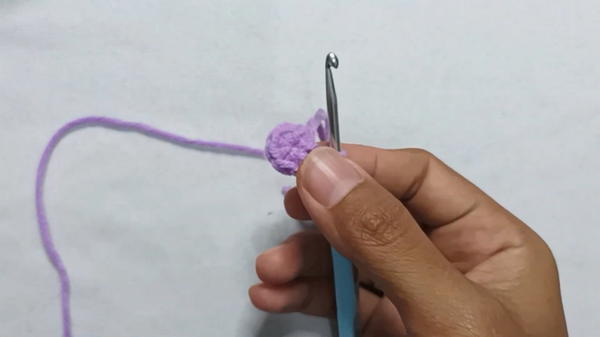
3. Tentacles
- Using the front loops left from Round 11:
- Create a slip knot on your hook. Insert it into the front loop and pull through.
- Chain 2 stitches, then crochet 4 double crochets (DC) in the same front loop.
- Skip the next stitch and slip stitch into the following one. Repeat this pattern around.
- Continue the process until all front loops are filled, forming 8 tentacles.
4. Final Touches
Stuffing
- Add polyfill stuffing into the octopus body before completely closing off the stitches.
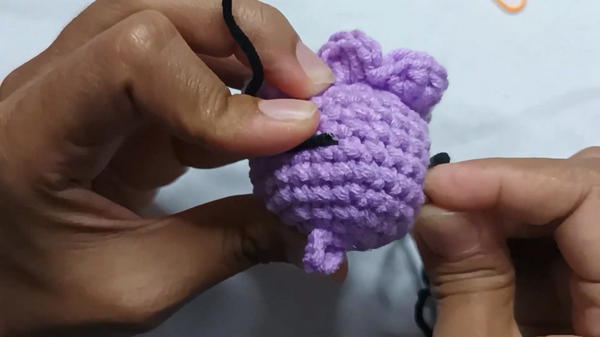
Eyes
- Embroider the eyes with black yarn:
- Place them between Round 7 and Round 8 with 4 stitches apart.
- Alternatively, use safety eyes.
Blush on Cheeks
- Use pink yarn to embroider small blush spots on either side of the octopus’s eyes.
Keychain Ring
- Loop the long yarn tail from the end of Round 12 through a keychain ring. Secure the thread by stitching it into the side of the octopus.
Special Features
- Beginner-Friendly: Simplified amigurumi techniques make this ideal for beginners, helping them learn foundational skills like magic rings, increases, and decreases.
- Compact Design: Small and practical, the finished baby octopus can be used as a portable accessory.
- Customizable: Change colors or add designs using embroidery for a unique touch.
Level of Difficulty
Beginner
This project is designed for those new to amigurumi crochet. The repetitive patterns and basic stitches make it easy to follow, while providing enough variety to develop foundational skills.
Tutor’s Suggestions
- Use Stitch Markers: Mark the beginning of each round to keep track easily.
- Skip Difficult Techniques: If back loop-only decreases feel too tricky, use regular decreases to simplify the process.
- Check Tension: Keep consistent tension while crocheting to ensure a smooth finish.
Uses of the Crochet Baby Octopus
- Keychain Accessory: Attach to bags, keys, or zippers for a cute, handmade touch.
- Gift: Perfect for gifting to friends and family.
- Decor Piece: Display on shelves, desks, or car dashboards.
Tip!
Use contrasting yarn for facial details: Choosing brighter pink blush and deep black eyes will make the octopus’s features more prominent and visually appealing.
Conclusion
The Crochet Octopus Keychain is an excellent choice for beginner crocheters looking to explore the art of handmade crafts. With its simple yet charming design, it offers a fun and practical way to learn basic techniques while creating something adorable and functional. Whether used as a keychain, gift, or display item, this project is sure to bring joy and satisfaction.


