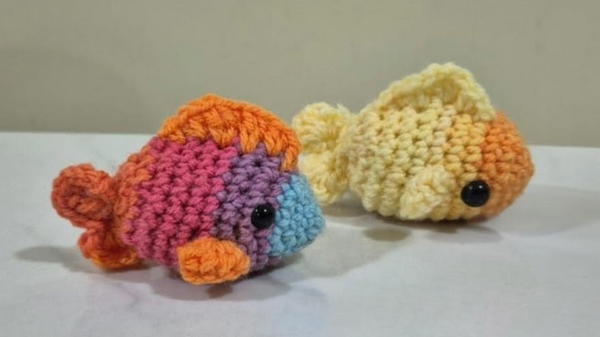
Snag a splash of cuteness with this Free Crochet Fish Amigurumi Pattern that brings soft texture, playful charm, and endless gifting possibilities.
Studies show that sensory toys not only entertain but also support early childhood development by enhancing motor skills and emotional comfort. These tiny, tactile objects become treasured favorites, often carried from car seats to cribs. The Free Crochet Fish Amigurumi Pattern introduces a playful sea creature that fits perfectly in small hands, offering charm and comfort wherever it goes.
Crochet Fish Pattern That Helps Kids Learn Colors Through Play
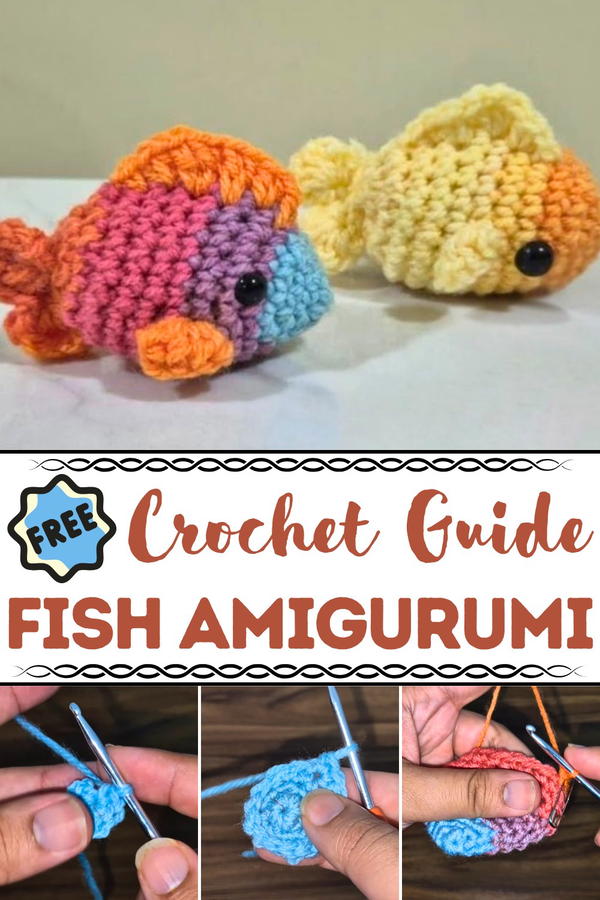
This pattern begins with a magic ring and works seamlessly in the round, using simple techniques like single crochet, increases, and decreases to shape its rounded body and pointed tail. Small fins are attached later, giving it that classic fish silhouette. Soft yet structured, the form holds up well over time while remaining gentle to touch.
Its lightweight build makes it ideal for keychains, bag charms, nursery décor, or handheld calming toys for little ones. The fish's size and ease of customization allow endless color combinations and facial expressions, turning each version into a one-of-a-kind treasure. From playful gifts to portable companions, this compact project brings delight with minimal yarn and time. Perfect for beginners or those looking for a quick yet meaningful creation, it combines usefulness with adorable appeal—making it a rewarding addition to anyone’s soft toy collection.
Step-by-Step Guide to Crochet Fish Amigurumi
Materials Needed
- Scrap yarn (any weight; variegated yarn adds an aesthetic touch; worsted weight yarn is used in this video).
- 3 mm crochet hook (adjust hook size depending on yarn weight).
- Scissors.
- Stitch marker (or a makeshift stitch marker like a bead and safety pin).
- Yarn needle.
- Stuffing.
- Small safety eyes.
Step-by-Step Instructions
Body of the Fish
Magic Ring:
- Create a magic ring by wrapping the yarn around two fingers and pulling up a loop.
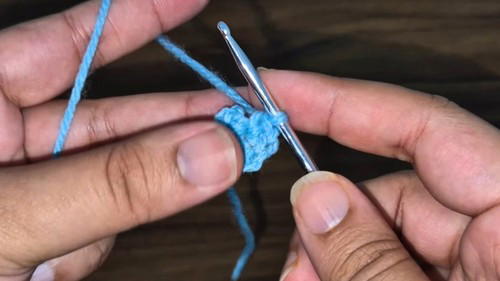
- Place 6 single crochets into the ring, then tug the tail end to close the loop.
- Create a magic ring by wrapping the yarn around two fingers and pulling up a loop.
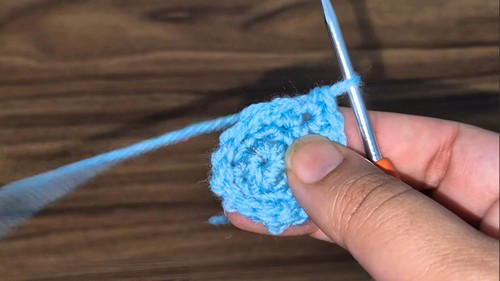
Row 2:
- Alternate single crochets and increases (one stitch with 1 single crochet, the next with 2 single crochets).
- Total: 9 stitches.
- Mark the last stitch with a stitch marker for row tracking.
Row 3:
- Alternate 1 single crochet, 1 single crochet, and an increase (two single crochets).
- Total: 12 stitches.
Row 4:
- Single crochet followed by an increase (one stitch with 1 single, next stitch with 2 singles) repeated six times.
- Total: 18 stitches.
Row 5 (and next single rows):
- Single crochet all the way around the row (no increases).
- Total: 18 stitches.
Row 6:
- Alternate 2 single crochets then an increase (two single crochets).
- Total: 24 stitches.
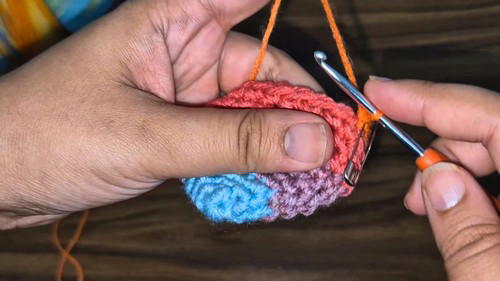
Rows 7–11:
- Single crochet all around (24 stitches per row).
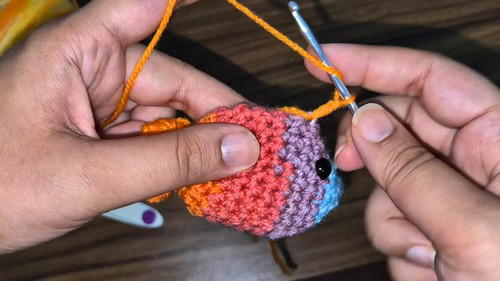
Safety Eyes
- Fold the body in half, and count five rows up from the base.
- Between rows 5 and 6, insert safety eyes on either side of the fish, ensuring they are symmetrical. Attach safety backings.
Stuffing
- Lightly stuff the body of the fish. Ensure the stuffing does not deform the shape.
Decreases
Row 1 (Decreasing):
- Alternate 2 single crochets and 1 decrease using front loops only.
- Total: 18 stitches.
Row 2:
- Alternate 1 single crochet and 1 decrease.
- Total: 12 stitches.
Row 3:
- Perform 6 decreases to close the remaining stitches tightly.
- Total: 6 stitches.
Tail Fin
Fold the last row in half (3 stitches on each side).
Work into the first 2 stitches:
- One single crochet.
- One half double crochet.
- Three double crochets.
- One more half double crochet.
- One last single crochet.
Slip stitch into the next 2 stitches to close the tail.
Repeat the tail pattern in the remaining 2 stitches:
- Single crochet, half double crochet, double crochets, then slip stitch.
Secure the tail by threading the yarn through the ends to close and shape.
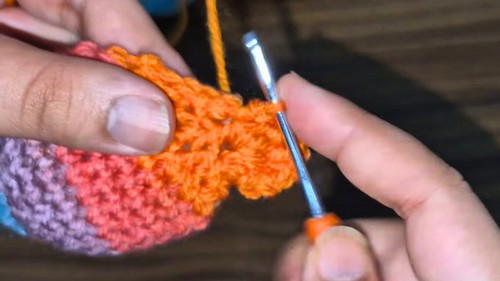
Side Fins
- Count 2 rows behind the eyes and 2 stitches below.
- Attach yarn and start the fin:
- Do five half double crochets into one stitch.
- Secure with a slip stitch in the next stitch.
- Snip off yarn and secure the ends.
- Repeat the same process for the corresponding side.
Top Fin
Fold the fish in half and locate the center top stitch (around row 5 or 6).
Attach yarn and create the fin:
- Single crochet into the first stitch.
- Two half double crochets into the next stitch.
- Two double crochets into the next.
- Three double crochets into the next.
- Two half double crochets into the next.
- Single crochet into the next stitch.
- Slip stitch into the last stitch.
Snip off yarn, hide the ends, and your fish is ready!
Special Features
- Versatility: Easily made with scrap yarn, works with yarn of any weight.
- Compact Design: A small, cute design usable as a keychain, decorative piece, or market item.
- Unique Texture: Fin details and variegated yarn add character to the piece.
Level of Difficulty
- Beginner-friendly.
- Requires familiarity with basic crochet stitches (single, half double, double crochet, slip stitch) and techniques like magic rings and decreases.
Tutor’s Suggestions
- Adjust hook size depending on yarn thickness for a tight finish.
- Ensure symmetry when attaching safety eyes.
- Avoid overstuffing to maintain the fish’s shape.
- Share finished crafts via email or Instagram.
Uses
- Perfect for gifting.
- A decorative piece for keys, bags, or small spaces.
- Ideal for selling at craft markets.
Tip for Success
If you’re struggling with symmetry while placing eyes or fins, use pins or markers to orient the stitches before attaching the components.
Conclusion
This quick and fun crochet project leaves you with an adorable fish. It’s a great way to use up scrap yarn and practice your crochet skills while crocheting something useful or decorative.


