Bring ocean-inspired fun with the Free Crochet Nemo Hat Pattern that combines cozy warmth, playful charm, and a vibrant handmade touch for all ages.
Sunny days by the beach often call for playful accessories that brighten both mood and outfit. Bringing a touch of ocean whimsy to everyday wear, the Free Crochet Nemo Hat Pattern captures the charm of everyone’s favorite clownfish in soft, cozy yarn. Its vibrant colors and cheerful details make it a standout piece for children and adults alike, perfect for outdoor adventures, themed events, or simply adding a fun twist to casual wear.
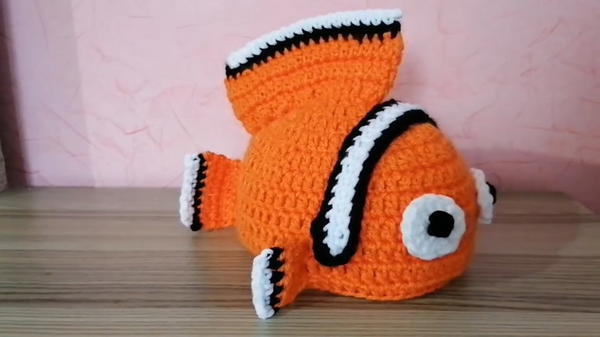
Ocean-Inspired Crochet Nemo Hat Pattern That Kids Will Cherish

The snug fit ensures warmth during cooler mornings while remaining lightweight enough for comfort throughout the day. Beyond its delightful appearance, this hat encourages creative use of yarn, allowing makers to personalize colors and textures to suit their style. It also doubles as a thoughtful handmade gift, combining playfulness with practicality for birthdays, holidays, or special occasions.
Quick to complete yet full of character, the Free Crochet Nemo Hat Pattern transforms small amounts of yarn into a wearable tribute to the sea’s most spirited clownfish. Every stitch carries charm and personality, turning a simple accessory into a cheerful statement that brings smiles wherever it goes. This hat is not just protection from the cold, it’s a playful, heartwarming piece that celebrates creativity, fun, and the joy of handmade artistry.
Materials Needed
Yarn:
- Orange Yarn: Approximately 60-70 grams (tutorial uses Jimmy Shock brand yarn).
- White Yarn: Leftover yarn for accents (tutorial uses Jean and Scott yarn).
- Black Yarn: Leftover yarn for detailing.
Crochet Hook: 4.5 mm hook.
Scissors: For cutting yarn.
Darning Needle: For sewing and weaving ends.
Step-by-Step Instructions
1: Start the Magic Ring
- Form a magic ring using two fingers:
- Wrap the yarn around your fingers.
- Insert the hook into the first strand and pull through the second strand.
- Chain 3 to start.
- Crochet 12 double crochets around the magic ring, including the initial chain-3 as one double crochet:
- Yarn over, insert the hook into the center of the ring, and pull through.

- Finish the double crochet. Repeat for all stitches.
- Yarn over, insert the hook into the center of the ring, and pull through.
- Pull the short strand to tighten the magic ring.
- Slip stitch into the third chain to close the round.
2: Crochet the Second Round (Increases)
- Chain 3 to start the round.
- Create pure increases:
- Work 2 double crochets into each stitch.
- Insert the hook at the top of each stitch hole to ensure uniformity.
- Check the last stitch (including the initial chain-3) to ensure the round is balanced.
- Join with a slip stitch to close the second round.
3: Build Subsequent Rounds
Third Round:
- Chain 3, then alternate 1 single double crochet and 1 increase (2 double crochets in the same stitch).
- Repeat until the round is complete, then join with a slip stitch.
Fourth Round:
- Chain 3, then alternate 2 single double crochets and 1 increase.
- Follow the same method to finish the round.
Fifth Round and More:
- If increasing diameter further, alternate 3 single double crochets and 1 increase.
- For every additional round, increase by one single crochet per set before creating an increase:
- Sixth round: 4 single crochets + 1 increase.
- Seventh round: 5 single crochets + 1 increase.

Measure the diameter regularly to fit the desired age group (approximate measurements are provided in the video).
4: Continue in Straight Rows
- Once you reach the necessary diameter, crochet in straight rows without increases.
- Work 1 double crochet into each stitch across the round:
- Skip the increase stitches.
- This shift creates the straight shape needed for the hat.
- Repeat rounds until reaching the desired height from the tip of the magic ring to the edge.
5: Add an Edge
To give the hat a finished look:
- Crochet half double crochets along the edge:
- Yarn over, insert the hook into the stitch, and pull through.
- Pull through all three loops on the hook at once.
- Complete 1-3 rounds of half double crochets, depending on the desired thickness of the edging.
6: Creating Nemo’s Fin
Lower Fin:
- Fold the hat in half, locate the fifth round of increases, and attach the yarn at the fold.
- Crochet 3 double crochets into one stitch, then move to the next stitch.
- Continue forming fins by repeating this pattern along the fifth round.
Upper Fin:
- Begin at the part above the magic ring and crochet similarly to create the top fin.
Small Tail Fin:
- Attach yarn near the bottom edge of the hat, leaving one edge clear.
- Crochet 9 double crochets per round, then work 2-3 rounds to form a small triangular tail.
- Add a single crochet round in black and another in white.

7: Side Fins
- Fold the hat and locate the center points for the side fins.
- Crochet 6 double crochets per round for two rounds, followed by single crochet rounds in black and white yarn.
- Repeat the same for the opposite side.
8: Create the White Stripe
- Begin with a strip of chains (roughly 29 chains for the hat in the tutorial).
- Crochet single crochets across the chain to form the stripe base.
- Add a black edge to the stripe by crocheting single crochets only into the back loops of each stitch.
- Attach the stripe by sewing it into place on the hat as illustrated in the video.
9: Make the Eyes
- Crochet a small magic ring in white yarn:
- Work 12 double crochets into the ring.
- Slip stitch to close the circle.
- Crochet a small circle in black yarn:
- Chain 2, then work 3 single crochets into the first chain.
- Attach the black circle to the center of the white circle and sew it onto the hat.
- Repeat the process to create the second eye.

Special Features
- Nemo Character Design: Fully replicates the recognizable orange, white, and black stripes and fins.
- Versatility: Sizing is adjustable for any age group.
- Customization: Fin shapes, stripes, and eyes can be customized for fun variations.
Level of Difficulty
- Beginner-to-Intermediate:
Most steps only require basic crochet stitches, but shaping fins and manipulating magic rings may be slightly challenging for beginners.
Tutor’s Suggestions
- Check Sizes: Use the approximate measurement chart provided to ensure proper sizing.
- Measure Regularly: Confirm diameter and height as you work to avoid sizing mistakes.
- Avoid Tight Stitches: Keep stitches loose enough for flexibility, especially in the increases.
- Customizable Colors: While the tutorial uses Nemo’s colors, you can adapt the hat for other characters.
Uses
- Kids’ Costumes: Great for dressing up as Nemo for themed parties or Halloween.
- Gifting: Handmade hats make thoughtful and personal gifts.
- Decor: As part of crochet collections or designs.
Tip
When working on magic rings, ensure you pull the short strand tightly enough to close the loop fully. This creates a solid and neat foundation for the hat.
Conclusion
This Finding Nemo crochet hat is a delightful project showcasing creativity and personalization. With its vibrant colors, quirky fins, and characteristic eyes, it’s sure to be a hit with children and adults alike.


