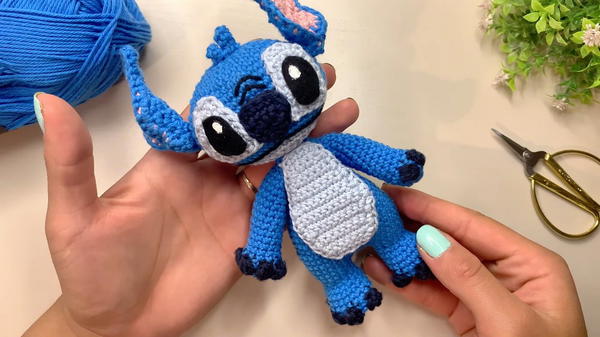
Bring playful charm to your projects with this Free Crochet Stitch Amigurumi Pattern, perfect for creating cute, handmade toys and delightful gifts.
A small ball of yarn once sat quietly on a table, waiting to be transformed into something delightful. From those simple threads emerged the Free Crochet Stitch Amigurumi pattern, offering a charming way to bring miniature figures to life. Each stitch contributes to a soft, textured form, making these tiny creations ideal companions for play, decoration, or personalized gifts.
How Crochet Stitch Amigurumi Can Enhance Your Projects

The pattern encourages hands-on focus, helping crocheters refine dexterity, stitch precision, and attention to detail, while also offering a calming, meditative effect. Amigurumi pieces crafted from this method are lightweight yet sturdy, making them perfect for displaying on shelves, keychains, or as part of a larger collection of handcrafted items. Children and adults alike can enjoy the satisfaction of completing a small project that holds both aesthetic and sentimental value.
Additionally, assembling multiple figures can lead to themed collections or playful arrangements that brighten rooms and spark conversation. The repetitive nature of the stitches fosters patience and mindfulness, transforming simple yarn into tangible joy. With its versatility, the Free Crochet Stitch Amigurumi pattern encourages innovation in how each figure is accessorized or combined, providing countless opportunities for artistic expression. This pattern balances practicality, skill development, and visual charm in a truly engaging way.
Materials Required
- Cotton Yarn: Various colors are used throughout the tutorial.
- 2 mm Crochet Hook: Ideal for working with cotton yarn.
- Scissors: To cut your yarn as needed.
- Yarn Needle: For weaving in ends and sewing pieces together.
- Pink, Light Blue, Calypso, Black, and Navy Blue Threads: As specified for different parts of the crochet piece.
Step-by-Step Instructions
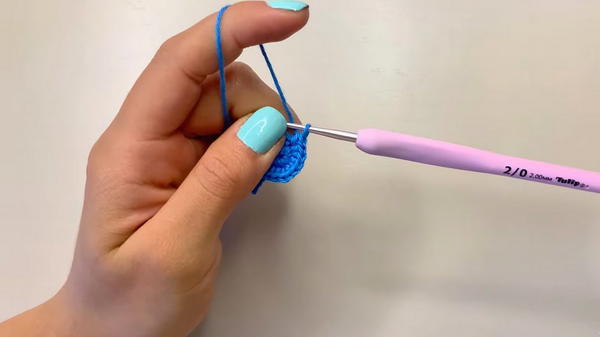
Round 1: Starting with the Magic Ring
- Form a Magic Ring:
- Use the Calypso colored thread to create a magic ring.
- Chain one (this chain does not count as a stitch).
- Inside the ring, crochet eight single crochets.
- Pull the smaller strand to close the ring.
Round 2: Increasing Stitches
- Increase:
- Join to the first single crochet of the previous round.
- Make one single crochet and mark this stitch.
- Continue making increases (two single crochets in each stitch) all around.
- You should have 16 stitches at the end of this round.
Round 3: Alternating Single Crochets and Increases
- Sequence:
- Crochet one single crochet and mark this stitch.
- In the next stitch, make an increase.
- Repeat the sequence: single crochet and increase.
- You should have 24 stitches at the end of this round.
Round 4: Working with the Sequence of Three Single Crochets and an Increase
- Sequence:
- Make three single crochets, followed by an increase.
- Repeat six times.
- You should have 30 stitches at the end of this round.
Round 5-9: Progressing Stitches and Incorporating Color Changes
Round 5:
- Crochet two single crochets, followed by an increase.
- Continue with four single crochets and one increase.
- Repeat five times.
- Finish with two remaining single crochet stitches.
- You should have 36 stitches at the end of this round.
Round 6:
- Make five single crochets followed by an increase.
- Repeat six times.
- You should have 42 stitches at the end of this round.
Round 7:
- Crochet three single crochets followed by an increase.
- Continue with six single crochets and one increase.
- Repeat five times.
- Finish with three remaining single crochet stitches.
- You should have 48 stitches at the end of this round.
Round 8:
- Make seven single crochets followed by an increase.
- Repeat six times.
- You should have 54 stitches at the end of this round.
Round 9:
- Crochet 12 single crochets and mark the first stitch.
- Follow with three increases (two single crochets in the same space).
- Continue with 24 single crochets.
- Make three increases again.
- End with 12 single crochets.
- You should have 60 stitches at the end of this round.
Rounds 10-15: Working with Single Crochets
- Sequence:
- Crochet stitches over stitches (60 single crochets in each round through to round 15).
- At the end of round 15, your work should be even and uniform.
Round 16: Decreasing Stitches
- Sequence:
- Crochet 12 single crochets and mark the first stitch.
- Make three decreases.
- Continue with 24 single crochets.
- Make three decreases.
- End with 12 single crochets.
- You should have 54 stitches at the end of this round.
Round 17-21: Continue Decreasing While Alternating Colors
Round 17:
- Sequence of seven single crochets and a decrease.
- Repeat six times.
- You should have 48 stitches at the end of this round.
Round 18:
- Sequence of six single crochets and a decrease.
- Change color (light blue) before closing the decrease.
- Repeat the sequence six times while alternating colors.
- You should have 42 stitches at the end of this round.
Round 19:
- Sequence of five single crochets and a decrease.
- Repeat six times.
- You should have 36 stitches at the end of this round.
Round 20:
- Sequence of four single crochets and a decrease.
- Repeat six times.
- You should have 30 stitches at the end of this round.
Round 21:
- Sequence of three single crochets and a decrease.
- Repeat six times.
- You should have 24 stitches at the end of this round.
Round-by-Round Progression and Filling
Round 22:
- Make a single crochet and mark it.
- Crochet two decreases.
- Continue with the sequence of single crochet and a decrease for five times.
- Finish by making two decreases.
- You should have 15 stitches at the end of this round.
Round 23-28:
- Work stitches over stitches but only taking the back strand to create texture (15 single crochets per round).
- At the end of round 28, the piece should look textured and well-defined.
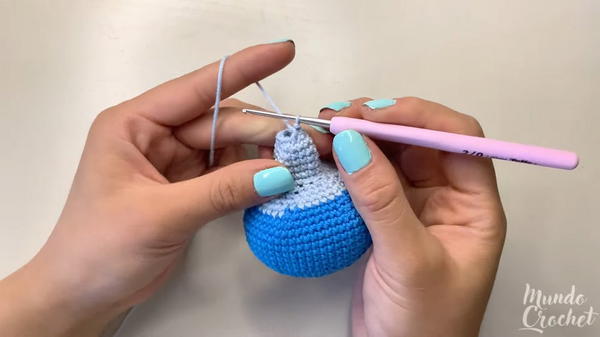
Adding Details and Final Seam
- Round 29:
- Crochet one single crochet.
- Make seven decreases.
- You should have 8 stitches left.
- Fasten off by weaving through the front strand only and hide the ends inside the fabric.
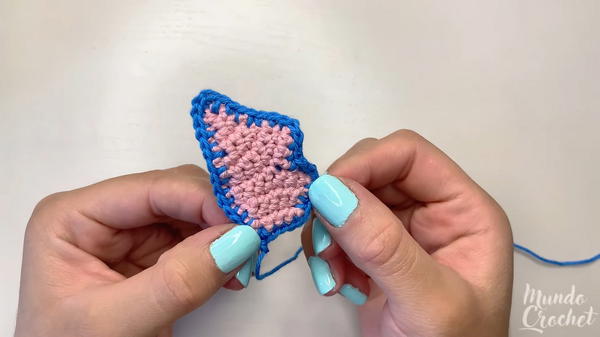
Crafting Ears
Left Ear (Pink and Calypso Color):
- Crochet multiple single crochets, increases, decreases, and chains based on provided instructions.
- Join the pink ear on top of the calypso colored ear.
- Work single stitches around the ear.
Right Ear (Pink and Calypso Color):
- Repeat the crafting process for the ear as mentioned.
- Finish by positioning the pink ear on top of the calypso colored ear.
- Work single stitches around the ear.
Crafting Eyes and Nose
Eyes:
- Use light blue thread and vary single crochets, decreases, and chains accordingly.
- Add black felt for eye details and acrylic paint or felt for eye shine.
Nose:
- Use navy blue thread and follow single crochets and increases.
- Work single stitches around, adding details with navy blue felt.
Adding Facial Details
- Embroidery:
- Use black thread to add facial details.
- Follow specific points and count stitches to place the embroidery accurately.

Special Features
- Multi-colored: Incorporates different colors like calypso, pink, light blue, and navy blue.
- Detailed Sections: Includes shaping elements like ears, eyes, and nose, making the piece versatile and engaging.
- Texture: Using back strands and color changes, enhances the visual texture and appearance.
Level of Difficulty
Beginner to Intermediate:
- The tutorial guides through basic to slightly advanced techniques including increasing, decreasing, working in rounds, and color changing.
- Intermediate crocheters will find the shaping and texture techniques particularly useful.
Tutor’s Suggestions
- Mark the First Stitch: Always mark the first stitch to avoid losing track.
- Consistent Tension: Ensure your tension remains consistent throughout to avoid uneven stitches.
- Neat Color Changes: When changing colors, carefully manage the strands to ensure smooth transitions.
Uses
- Stuffed Animal: Craft adorable crochet pieces that can be given as gifts.
- Decorative Items: Use the crafted piece for home decor, adding unique charm to the space.
- Craft Design: Incorporate the techniques into larger projects like blankets, pillows, or wall hangings.
Final Tip
When marking the first stitch in rounds where increases and decreases occur, double-check counting to ensure accurate stitch sequences are maintained, which will result in a clean and consistent final product.
Conclusion
This comprehensive crochet tutorial guides you through creating a beautiful and intricately detailed project. By following the clear and structured steps, you can master a variety of crochet techniques that will enhance your crocheting skills.


