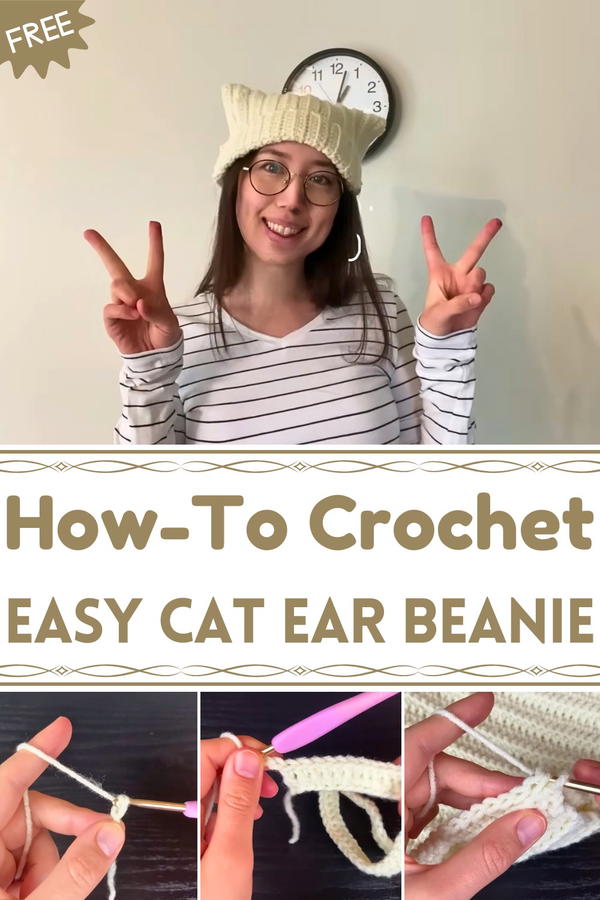
Pounce into style with this Free Crochet Cat Ear Beanie Pattern, designed to keep you warm while adding a cute and quirky touch to your wardrobe.
Chilly mornings and brisk evenings often call for cozy accessories that provide warmth while reflecting personality. The Free Crochet Cat Ear Beanie Pattern turns a simple hat into a playful statement piece, combining comfort with charm. With its soft yarn and whimsical cat-ear accents, this beanie adds a touch of fun to everyday outfits, making it appealing for both young wearers and adults who enjoy a lighthearted accessory. Its snug fit ensures warmth without compromising comfort, while the carefully crafted ears maintain their shape and character.
Playful Crochet Cat Ear Beanie Pattern for Everyday Wear
Beyond its playful appearance, this beanie is highly practical. It protects the head and ears from cold weather, making it ideal for outdoor walks, commuting, or casual outings. The crochet construction allows for gentle stretch, accommodating different head sizes while providing a secure fit. Its handmade quality ensures durability and longevity, while the unique cat-ear feature makes it a conversation starter and a standout accessory.
Additionally, the Free Crochet Cat Ear Beanie Pattern offers an opportunity to gift something thoughtful, stylish, and cozy for birthdays, holidays, or special occasions. This pattern combines function, comfort, and personality, resulting in a beanie that keeps wearers warm while adding a playful charm to every look.

Materials Required
- Yarn: Medium-weight yarn (use your preferred color).
- Crochet Hook: The video does not provide a specific size, but use a hook that complements your yarn (e.g., 5mm or 6mm).
- Stitch Markers or Bobby Pins: To mark key points like the beginning or end of rows.
- Yarn Needle: For weaving in loose ends.
- Scissors: To trim excess yarn.
Step-by-Step Instructions
1: Creating the Base Chain
- Start with a Slip Knot: Make a slip knot by holding the yarn with two fingers and twisting it to create a loop, then insert your hook and pull to secure it.
- Chain 20 Inches: Yarn over and pull through the loop repeatedly to create a chain that measures about 20 inches. Keep the chains loose to make it easier to work into them later.
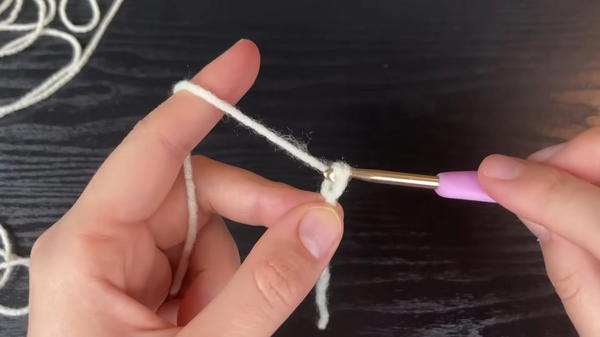
- Tip: If your chain is too tight, it will make the project harder to work on. Aim for loose, consistent stitches.
2: First Row - Double Crochet
- Chain 2 for the Edge: Add two extra chains to create a clean edge for your row.
- Work Double Crochets: Start in the third bump from your hook:
- Yarn over, insert your hook into the third bump, yarn over again, pull through, and create three loops on your hook.
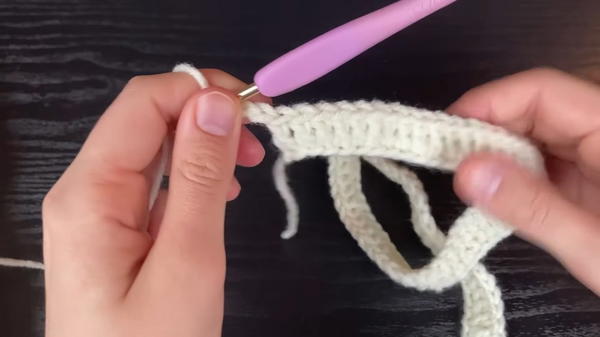
- Yarn over, pull through the first two loops, yarn over again, and pull through the remaining two loops. This completes one double crochet.
- Yarn over, insert your hook into the third bump, yarn over again, pull through, and create three loops on your hook.
- Continue Double Crochets: Repeat the double crochet process into each bump along the rest of the chain.
- Count Your Stitches: At the end of the row, count the total number of double crochets, including the starting chain. This ensures no stitches were missed.
3: Second and Subsequent Rows - Back Loop Double Crochet
- Chain 2 and Turn: Chain 2 for the edge, then turn your work to the opposite side.
- Work in the Back Loop Only: At the top of each double crochet, there are two loops. Instead of inserting your hook under both loops, work only into the back loop (the loop furthest from you).

- Double Crochet Again: Create double crochets as before but only through the back loops.
- Mark the First Stitch: Use a bobby pin or stitch marker on the first stitch of the row to keep track of where you started.
- Repeat Rows: Continue working double crochets through back loops for each row until the length of your work is half the circumference of your head. For example, if your head circumference is 22 inches, work to 11 inches.
4: Joining the Sides
- Fold the Work in Half: Once you've reached your desired length, fold the work and align the sides.
- Slip Stitch the Edges:
- Insert your hook into the back loop of the front piece and the back loop of the back piece. Yarn over and pull through all loops to secure the edges together.
- Repeat this process along the entire edge to create a seamless join. Keep the stitches loose to avoid puckering.
- Finish Off: Once you’ve slip-stitched the whole length, cut the yarn, leaving a small tail. Pull the final loop through to secure the end.
5: Creating the Ears
- Repeat on the Opposite Side: If the second end isn’t joined yet, take a new yarn strand and repeat the slip stitching process as described above.
- Adjust the Ears: After both sides are joined, shape the ears by turning the work inside out. This small adjustment gives the ears a more rounded and natural look.
6: Weaving in Loose Ends
- Thread the Yarn Needle: Insert your leftover yarn tails into the yarn needle.
- Secure the Ends: Weave the loose ends in and out of your stitches, going in multiple directions to ensure they’re secure.
- Trim Excess: Use scissors to cut off any remaining tails.
7: Folding the Brim
- Turn the Beanie Right Side Out: Flip the work back to its original side.
- Fold the Brim: Roll up the brim for a snug and stylish finish. The folded brim also adds warmth and showcases the texture of your stitches.

Special Features
- Cat Ear Design: The triangle-shaped ear effect forms naturally from the folded design, adding a cute and playful touch.
- Cozy Fit: Made with 20-inch circumference sizing, the hat holds snugly while remaining comfortable.
- Texture: Working double crochet into the back loops creates a ribbed texture that's both functional and decorative.
- Customizable: You can adjust the size, use different yarn types for various effects, and explore different colors.
Level of Difficulty
Beginner-Friendly:
- The tutorial uses simple stitches like chaining, double crochet, and slip stitch, making it accessible for beginners.
- The most challenging part may be keeping stitch tension consistent, but the step-by-step guidance ensures success.
Tutor’s Suggestions
- Loose Stitches Are Key: Keep your chain and slip stitches loose to avoid tightness, which may make the joining process difficult or result in uneven edges.
- Count Stitches Regularly: The tutor emphasizes counting stitches after each row to ensure no stitches are accidentally added or skipped.
- Be Patient: Take your time while learning to work into back loops, as this technique can initially feel tricky.
Uses
- Winter Accessory: A cozy and stylish addition to your winter wardrobe.
- Gift Idea: Perfect handmade present for friends and family.
- Costume Addition: Great for cosplay or adding a whimsical touch to an outfit.
Final Tip
For a polished finish, block your beanie after weaving in all loose ends. This helps even out the stitches and refine the shape of the cat ears for a neater look.
Conclusion
This cat ear beanie crochet tutorial takes you through a fun and straightforward project that showcases creativity and functionality. Its beginner-friendly approach ensures that anyone can create a playful and charming hat, even if they're new to crochet.


