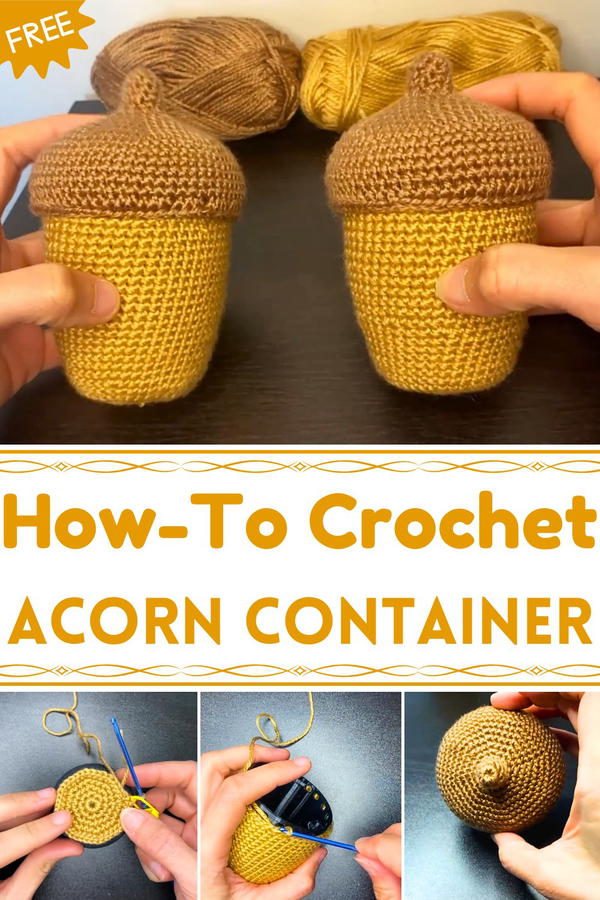
Bring autumn vibes to life with the Free Crochet Acorn Container Pattern, a charming and functional piece ideal for décor, storage, or cozy accents.
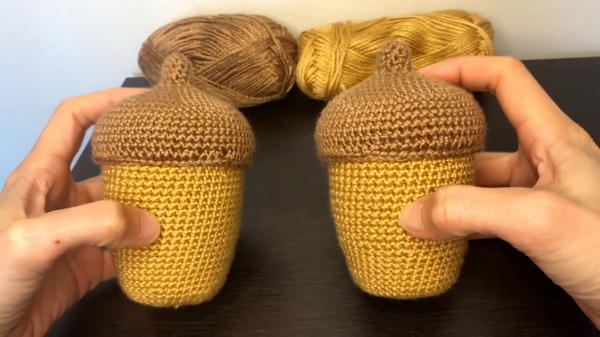
Small storage solutions can add both charm and functionality to any space, turning everyday organization into a delightful experience. The Free Crochet Acorn Container pattern transforms simple yarn into a playful yet practical container that holds small items while brightening a room with its whimsical form. Its compact, rounded shape makes it perfect for storing office supplies, jewelry, keys, or other tiny essentials, keeping surfaces tidy while adding a handcrafted touch.
Adorable Crochet Acorn Container Pattern for Fall Decor
This acorn-inspired container offers versatility beyond storage. It can serve as a seasonal décor accent, a thoughtful gift, or a creative way to display trinkets on shelves, desks, or bedside tables. Working through the project encourages focus and patience, providing a calming, mindful activity as each stitch contributes to a functional and charming result.
The Free Crochet Acorn Container pattern balances utility and visual appeal, producing a piece that is both durable and aesthetically pleasing. Personal touches, such as color choices or subtle embellishments, allow each container to reflect individual style. Completing this project delivers satisfaction, enhancing spaces with a playful, organized, and handmade accent that combines practicality with gentle charm, making it a unique addition to any home or workspace.
Materials Needed
Plastic Acorn Container:
- The acorn container serves as the base of this project. The tutorial recommends downloading free 3D printable files from Thingiverse to create the container using a 3D printer.
- If you don’t own a 3D printer, you can send the files to a local 3D printing service for production.
Yarn:
- Thin yarn is necessary for tight stitches to avoid the plastic showing through. Choose acorn-like colors for a cohesive look.
Crochet Hook:
- Use a 2.5 mm hook for tight stitches and proper coverage over the plastic container.
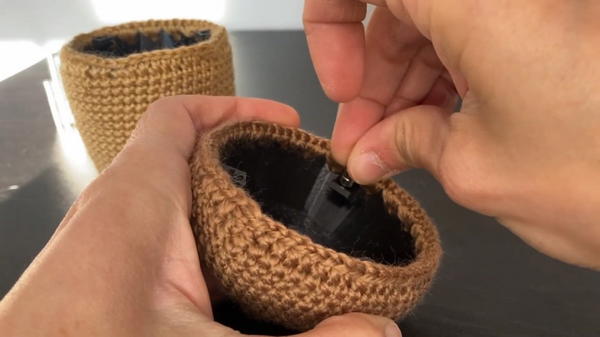
Magnets:
- Small rare earth magnets of approximately 5 mm diameter and 3 mm height for securing the lid firmly.
Super Glue:
- For fixing the magnets within the container.
Scissors:
- To cut yarn neatly.
Special Features
- Functional Container: The acorn crochet hugs a sturdy plastic container, making it both decorative and functional.
- Magnets for Security: Magnets ensure the lid stays firmly in place, even when holding weighty items.
- Beginner-Friendly Stitches: Uses basic crochet techniques—chains, single crochet, and increases.
- Customizable Design: Easily adapt the dimensions based on yarn thickness or thread tension.
- Polished Finish: Attaching the crochet directly to the container ensures a professional and neat look.
Level of Difficulty
Beginner to Intermediate
- The stitches and concepts are simple, making the project suitable for beginners. The attachment of the crochet to the container requires accuracy, and working with magnets can be slightly fiddly, so experienced crafters may enjoy refining these details.
Step-by-Step Instructions
Part 1: Crochet the Container Base
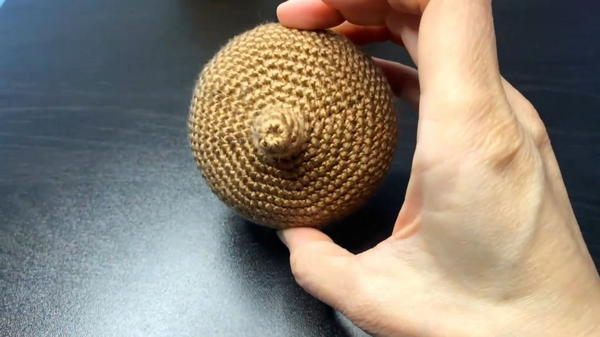
Step 1: Start the Circle Base
- Create a magic ring or chain four, then slip stitch into the first chain to form a ring.
- Round 1: Chain one and make 8 single crochets (SC) into the center of the ring.
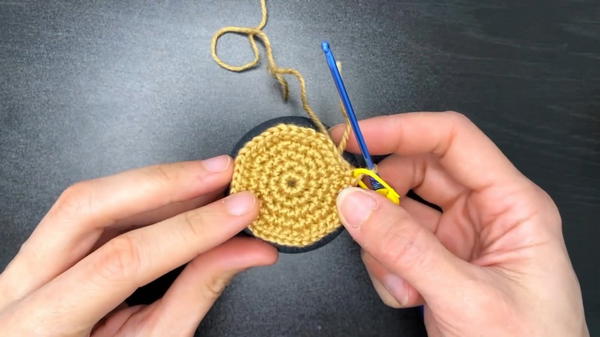
Step 2: Crocheting in Spirals
- To avoid a visible seam, work continuously in spirals without slip stitching after each round.
- Round 2: Increase by crocheting two SCs into each stitch, resulting in 16 stitches.
- Round 3: Alternate between one SC and one increase across the round. End with 24 stitches.
- Round 4: Crochet one SC into the first two stitches, then do an increase in the third stitch. Repeat this pattern for 32 stitches.
- Round 5: Do one increase into every fourth stitch to finish with 40 stitches.
Step 3: Checking the Diameter
- Place your crochet circle onto the base of the container to ensure the diameter matches. Adjust the number of stitches in earlier rounds if necessary.
Step 4: Taper the Container Base
- For rounds 6–13, create a gradual taper to fit the container’s curve:
- In each of these rows, add one increase spaced evenly around.
- For rows 6–13, increase in stitches at positions 5th, 11th, 17th, 23rd, 29th, 35th, 41st, and 47th, respectively.
Step 5: Crochet Straight Rows
- For rounds 14–25, simply single crochet (SC) all around without any increases, ensuring it fits snugly onto the container.
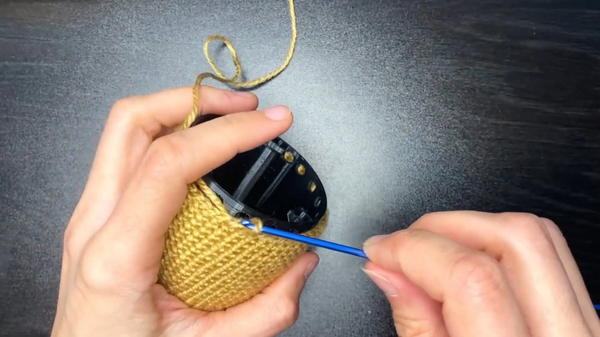
Step 6: Attach Crochet to the Container
- With the final loop on your hook, insert it into one of the holes in the container near the edge.
- Treat each hole as a stitch space:
- Work approximately three stitches into each hole around the container’s edge. Adjust to fit (each hole can take 2–4 stitches).
- Ensure the magnet holders are unobstructed when crocheting near them.
Part 2: Crochet the Lid Cover
Step 7: Start the Lid Cover
- Make a loop by chaining 4, slip stitching into the first chain, and chaining 1 (or create a magic ring).
- Round 1: Crochet 8 SC into the ring.
Step 8: Build the Lid Shape
- Crochet continuously in spirals for rounds 2–5, adding stitches gradually to match the lid's size.
- Round 6: Work an increase into each stitch to create 16 stitches.
- Round 13–18: Crochet evenly around until the cover fits snugly onto the lid, just meeting the rim.
Step 9: Attach Crochet to the Lid
- Attach the lid covering in the same way you attached the base. Work into the lid holes, ensuring the crochet sits tightly.
- Cut the yarn, secure the tail, and hide it neatly between your crochet and the container.
Part 3: Insert the Magnets
- Place rare earth magnets into the designated magnet holders in the container and lid.
- Glue them in with super glue, ensuring they are aligned correctly to attract each other.
Tutor’s Suggestions
- Yarn Selection: Thin yarn allows for tight stitches, preventing the plastic container from showing through.
- Check Fit Regularly: Ensure your crochet closely matches the container shape throughout the process.
- Magnet Alignment: Double-check polarity before gluing magnets to ensure they attract, not repel.
- Adapt for Different Sizes: Adjust increases or row counts if using slightly different materials or container dimensions.
Uses for the Acorn Container
- Storage: Perfect for small treasures like jewelry, coins, or dice.
- Decorative Piece: Adds a unique touch to your desk or shelf.
- Gift Idea: A handmade acorn box makes a thoughtful and charming gift for nature lovers or crochet enthusiasts.
Conclusion
The acorn container project combines crochet artistry with functional design. From crafting the base and lid to learning neat attachment techniques, you’ll be amazed at how seamlessly your handiwork enhances the printed acorn. Adding magnets creates extra functionality while maintaining a polished look. Whether you're making it for personal use or as a gift, this adorable project promises not just creativity but also practicality.
Final Tip
When working in spirals, use a stitch marker to track the beginning of each round. This ensures neatness and allows you to count stitches accurately, avoiding alignment issues in your increases.


