Freshen your projects with this Free Crochet Puff Stitch Daisy Flower Pattern, adding charming floral accents perfect for accessories, decor, or gifts.
A single daisy often catches the eye in a field because of its bright petals and cheerful center, standing out with a beauty that feels effortless. This natural charm is perfectly echoed in the Free Crochet Puff Stitch Daisy Flower Pattern, where each stitch builds soft, textured petals that bring the bloom to life in a lasting form. With its playful puff detailing and timeless appeal, the daisy becomes more than just a floral accent, it turns into a versatile piece that can brighten countless projects.
Charming Crochet Puff Stitch Daisy Flower Pattern for Decor

One of the greatest strengths of these flowers lies in their adaptability. They can be attached to bags, hats, or scarves for a lively touch, arranged into garlands for festive occasions, or added to home décor for a subtle nod to spring. Their compact size makes them ideal for accessories such as brooches or hair clips, while their durability ensures they remain as vibrant as the day they were made.
Beyond personal use, they also carry sentimental value when shared as gifts, offering a handmade symbol of joy and thoughtfulness. The Free Crochet Puff Stitch Daisy Flower Pattern captures the freshness of spring in a way that lasts through every season.

Materials
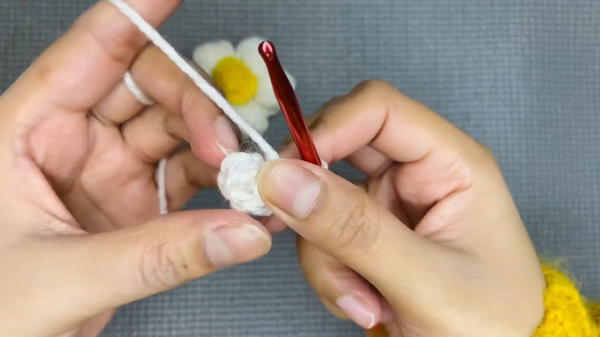
- 4.5mm Crochet Hook: A hook with a long neck is recommended, as this allows working with the multiple loops needed for puff stitches without difficulty.
- Yarn: Two colors are required—one for the petals (e.g., white) and another for the flower's center (e.g., yellow). While thicker yarns make puff stitches look more prominent, thinner yarns also work well.
- Scissors: For cutting yarn ends.
Special Features of Puff Stitch Daisy
- 3D Design: The textured puff stitches create a striking three-dimensional effect, making these flowers stand out.
- Versatile Usage: These daisies can be used as buttons, appliqués on hats, beanies, sweaters, or as beautiful decorative pieces on almost anything.
- Customizable: Both the size and color of the daisies can be easily adjusted to match any theme or aesthetic.
Step-by-Step Instructions
1: Start with a Magic Ring
- Wrap the yarn around your fingers to form a magic ring.
- Insert the hook, pull the yarn through, and secure it with a single crochet. This creates the starting base for your flower.

2: Create Half Double Crochet Stitches for Petals
- Decide the number of petals you’d like (e.g., five petals).
- For each petal, create half double crochet (HDC) stitches inside the magic ring:
- Yarn over, insert the hook into the circle, pull through the yarn, and pull through all three loops on the hook.
- Complete the desired number of HDCs (e.g., five for five petals). Pull the loo
 se end of the yarn to close the ring.
 - Join the final stitch to the first stitch with a slip knot to secure the base.
3: Create Puff Stitches for Petals
- Chain three stitches from the base of the first petal.
- Create a puff stitch in the same starting stitch:
- Yarn over, pull through the loop, and stretch the loop outward. Repeat this process nine times to form the puff. (If using a short-neck hook, reduce loops to five for easier handling.)
- Once nine loops are on the hook, yarn over and pull through all the loops except the last one. Yarn over again and pull through the final two loops.
- Chain three stitches, then secure the puff stitch with a slip stitch in the same base stitch.
- Continue this process for each petal, moving to the next stitch in the base for each puff.

4: Create the Yellow Center
- Using the yellow yarn, attach it to the base by inserting the hook into any chain space at the petal's base.
- Tie a knot to secure the yarn, then pull the loose end to the back of the flower using a needle or your hook.
- Chain four stitches and create a single puff stitch:
- Yarn over, pull through the loop, and repeat until you have nine loops (or more for a thicker center).
- Pull through all loops except the last one, secure with a chain, and cut the yarn.

5: Secure and Finalize
- Tie the loose ends of the white and yellow yarn together at the back of the flower. Ensure the knots are tight to prevent unraveling.
- Trim any extra yarn—leave longer tails if the flower will be sewn onto fabric or garments, or hide them for standalone decorations.
Level of Difficulty
- Difficulty Level: Beginner-Friendly
The step-by-step approach ensures that even novice crocheters can try their hand at this project. The magic ring and puff stitches might require some practice, but they are well-explained and achievable for beginners. Intermediate crocheters will find the process quick and enjoyable, with a stunning result.
Tutor's Suggestions
- Use a Long-Neck Hook: A long-neck crochet hook is strongly recommended for creating puff stitches, as it allows you to handle multiple loops with ease.
- Stretch Your Loops: Keep the loops on your puff stitch stretched and even. This trick makes it easier to accumulate multiple loops without tangling or uneven tension.
- Secure the Loose Ends: Always weave in or tie all loose ends securely to prevent the flowers from unraveling during use.
Uses
These puff stitch daisies are incredibly versatile:
- Sew them onto hats, beanies, sweaters, or blankets as decorative accents.
- Use them as standalone appliqués for headbands, hair clips, or brooches.
- Incorporate them into home décor items such as cushions, curtains, or table runners.
- Create a bouquet of colorful daisies as a long-lasting handmade gift.
Tip
When creating puff stitches, ensure consistent tension by gently pulling the loops to the same height while forming the stitch. This maintains an even and polished look.
Conclusion
The puff stitch Daisy crochet flower is a delightful project that combines beauty, versatility, and simplicity. With minimal materials and a beginner-friendly approach, this project is perfect for those looking to enhance their crochet skills while creating something visually elegant. The 3D effect, customizable design, and wide range of uses make these daisies a must-try for any lover of crochet.


