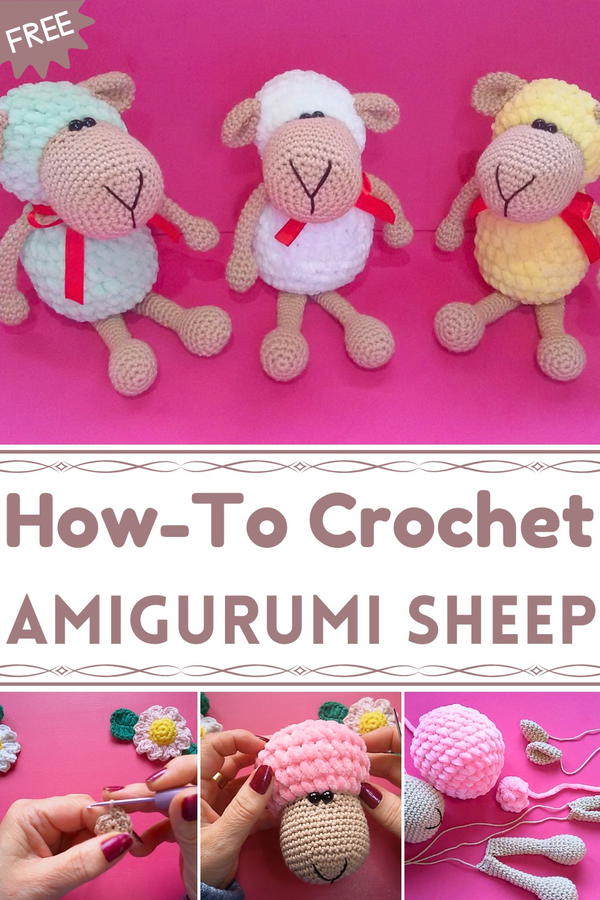
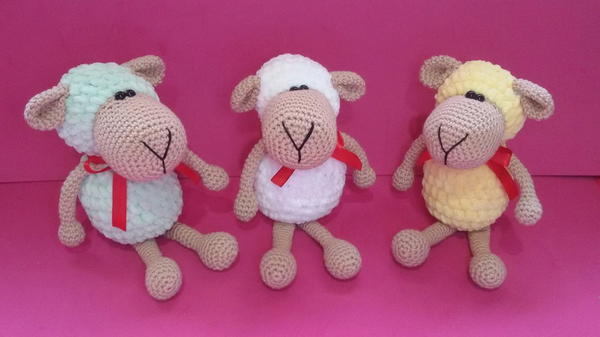
Cuddle up with whimsy using this Free Crochet Amigurumi Sheep Pattern, a charming creation that adds soft charm, playful character, and cozy appeal to any space.
Soft toys are often used to comfort children, stimulate imaginative play, and provide decorative charm in nurseries or playrooms. Among these, a sheep-shaped amigurumi stands out for its gentle appearance, tactile softness, and universal appeal. The Free Crochet Amigurumi Sheep Pattern allows crafters to create a small, cuddly figure that can serve multiple purposes. Its plush texture makes it ideal for holding, hugging, or displaying, while its compact size allows easy placement on shelves, desks, or as part of gift sets.
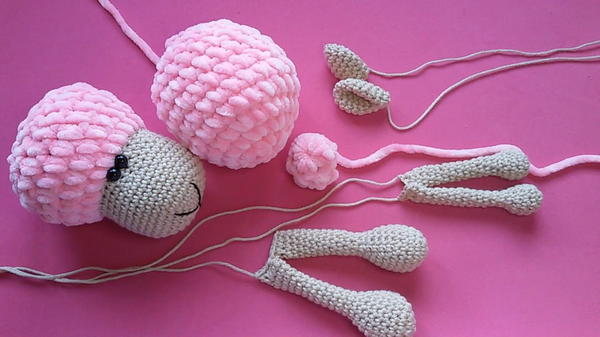
Charming Crochet Amigurumi Sheep for Cute Desk Decor
Beyond its visual appeal, making this sheep encourages patience and fine motor skills, offering a rewarding experience for both beginners and experienced crocheters. The pattern’s flexibility allows for variations in color and detailing, enabling personalization that makes each finished piece unique. Parents and caregivers can use the sheep as a comforting object for children, while collectors or enthusiasts may appreciate it as a charming handmade accent.
Lightweight yet durable, it retains its shape through handling and washing, ensuring longevity and continued enjoyment. This amigurumi combines functionality, creativity, and aesthetic charm, resulting in a versatile piece that adds warmth, personality, and a playful touch to any environment.
Materials Required
Yarn:
- Thick wool (Melissa brand or any yarn suitable for a 4 mm hook) for the body and tail.
- Beige cotton yarn for the head, arms, legs, and ears.
- Pastel colors optional for customization.
Hooks:
- 2.5 mm for the finer material (e.g., head details).
- 4 mm for the thicker yarn.
Accessories:
- 8 mm safety eyes.
- A wool needle (longer if possible).
- Scissors.
- Stitch markers.
- Stuffing material.
- Ribbon (around 2 cm) for a decorative bow.
Additional Tools: Plenty of love and patience!
Step-by-Step Guide
1. Head
- Begin with a magic ring using beige yarn.
- Round 1: Crochet 6 single crochets (SC) into the ring.
- Round 2: Increase each stitch (12 stitches).
- Round 3: Alternate 1 SC and 1 increase (18 stitches).
- Round 4: Work 2 SC, then increase (24 stitches).
- Round 5: Work 3 SC, then increase (30 stitches).
- Round 6: Work 4 SC, then increase (36 stitches).
- Rounds 7–12: 1 SC in each stitch (36 stitches per round).
- Round 13: Work 4 SC, then decrease (30 stitches).
- Rounds 14–15: 1 SC in each stitch (30 stitches per round).
- Round 16: Work 3 SC, then decrease (24 stitches).
- Switch to the thick yarn for the woolly effect and increase the hook size to 4 mm.
- Rounds 17–20: 1 SC in each stitch.
2. Add Eyes and Finish the Head
- Place the safety eyes in the last row of beige yarn.
- Add stuffing to the head as you close it.
- Rounds 21–23: Decrease stitches gradually.
- Finish off and thread closed using a darning needle.
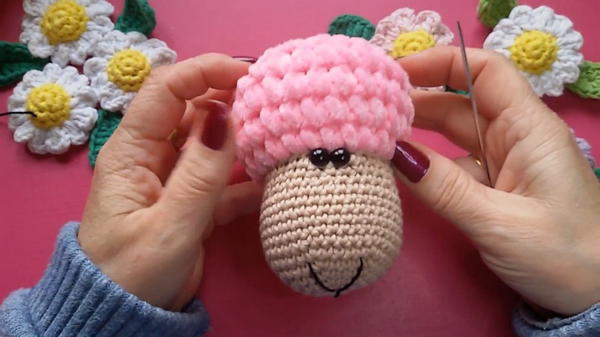
- Use black yarn to embroider the nose with small, centered stitches.
3. Body
- Use the thick wool and 4 mm hook.
- Start with a magic ring and crochet 8 SC.
- Round 2: Increase every stitch (16 stitches).
- Round 3: Alternate 1 SC and 1 increase (24 stitches).
- Rounds 4–9: 1 SC in each stitch (24 stitches per round).
- Add stuffing gradually.
- Round 10: Work 1 SC, then decrease (16 stitches).
- Round 11: Work decreases all around (8 stitches).
- Finish off the body, leaving a long thread for sewing.
4. Ears
- Use beige yarn and a 2.5 mm hook.
- Start with a magic ring and crochet 6 SC.
- Round 2: Increase every stitch (12 stitches).
- Round 3: Alternate 1 SC and 1 increase (18 stitches).
- Rounds 4–6: 1 SC in each stitch (18 stitches per round).
- Round 7: Work 1 SC, then decrease (12 stitches).
- Round 8: 1 SC in each stitch (12 stitches).
- Finish off, leave a thread, and sew later onto the head.
5. Arms and Legs
- Arms: Follow similar steps as the ears but stop at 9 stitches without stuffing beyond the hand section. Work even rows for length (up to Row 18).
- Legs: Similar to arms but work increases up to 18 stitches, then taper down. Only add stuffing to the base, leaving the legs flexible for movement.
6. Tail
- Use thick wool and 4 mm hook.
- Create a magic ring and crochet loosely to prevent thread breaks.
- Work 6 SC in the ring for Rounds 1–3.
- Lightly stuff the tail and sew onto the body between Rounds 3–4.
Assembly
- Head and Body: Align the head with the body using pins and sew in place using a wool needle.
- Arms and Legs: Sew the arms near the body’s top and the legs at the bottom, ensuring firm attachment.
- Ears: Attach evenly behind the eyes with small, invisible stitches.
- Tail: Center the tail and attach securely.

Special Features
- The use of thick fur-textured yarn for the body adds realism and cuddliness.
- Compact size makes it ideal for gifting, nursery decor, or even as a curtain tieback with customizable arm lengths.
- Whimsical details like close-set eyes and embroidered features enhance its charm.
Level of Difficulty
This project suits beginners with some experience in basic crochet techniques such as increases, decreases, magic rings, and working in the round. The tutor’s clear guidance makes it achievable for most skill levels.
Tutor’s Suggestions
- Use appropriate hook sizes for different yarn textures to keep the shaping consistent.
- If thick yarn isn’t available, substitute with multiple strands of thinner yarn or increase your stitches slightly.
- Sew pieces carefully to ensure even and symmetrical placement.
Uses
- Gifts: For baby showers, holidays, or loved ones.
- Decor: Perfect for nurseries, children’s rooms, or themed crafts.
- Customizable: Create different sheep colors or add accessories like hats or scarves.
Tip
When working with thick or furry yarn, crochet loosely and double-check stitch counts, as the texture can make stitches harder to see.
Conclusion
Making this adorable crochet sheep is a rewarding project that combines creativity and skill. With its lovable appearance and practical uses, it’s both a fun activity and a delightful keepsake.


