Strum joy into your collection with the Free Crochet Mini Guitar Amigurumi Pattern, a charming and playful miniature perfect for décor or gifts.
Music has a way of inspiring creativity, and even the smallest instruments can spark big ideas. Translating this inspiration into crochet, the Free Crochet Mini Guitar Amigurumi Pattern allows crafters to create a tiny, detailed guitar that captures the charm of the real thing. This miniature amigurumi is not only visually appealing but also functional as a decorative piece, keychain, or thoughtful gift for music lovers.
Crochet Mini Guitar Amigurumi Pattern for Music-Themed Decor

Beyond aesthetics, this project offers multiple benefits. It improves fine motor skills, encourages patience and focus, and provides a satisfying sense of accomplishment when the miniature guitar is complete.
Lightweight yet durable, this tiny amigurumi instrument demonstrates how crochet can merge artistry with thematic detail, producing a creation that delights both the eyes and the hands while celebrating the joy of music in miniature form.


The pattern is suitable for crocheters with basic amigurumi experience. Construction begins with creating the guitar body, working in rounds to form a smooth, rounded shape.
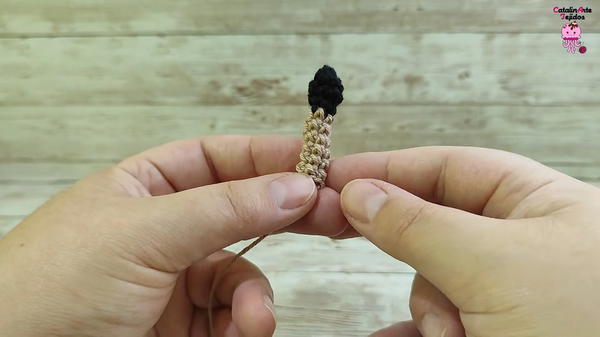
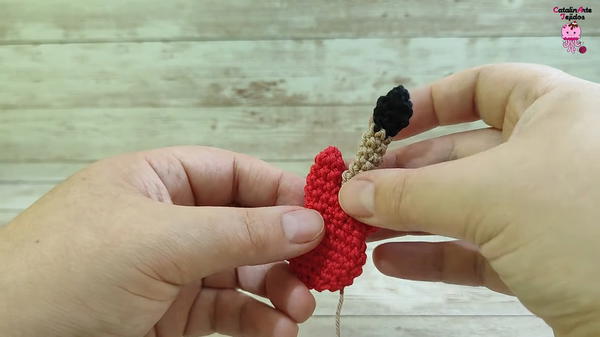
The neck is then crafted separately and attached securely, followed by the addition of the headstock and fine details like frets and strings.
Using single crochet and slip stitches, the pattern guides each step with precision, while clear visuals and instructions make it easy to follow.
The finished piece can be used as a playful decoration, a keychain charm, or a unique gift that celebrates a love for music.
Materials and Tools
Yarn: Acrylic or cotton yarn suitable for amigurumi. You'll need three colors:
Color A (Headstock/Neck): Black or Dark Brown.
Color B (Neck): Beige or Light Brown.
Color C (Body): The main color for the guitar body (e.g., Red).
Crochet Hook: A small hook (often 2.5 mm or 3.0 mm) to ensure tight, dense stitches.
Stuffing: Polyester fiberfill.
Needles: A Yarn Needle (Tapestry Needle) for sewing and a regular sewing needle for the strings.
Scissors.
Details:
Acrylic Paint (Black): For painting the bridge and pickup details.
Thin Tool: A small stick or toothpick for precise paint application.
Thread: Thin white or grey sewing thread (or a single ply of embroidery floss) for the guitar strings.
White Glue or Fabric Glue: To secure the strings and prevent them from loosening.
Level of Difficulty: Intermediate
This project is best suited for Intermediate crocheters. While it uses only basic single crochet stitches, the difficulty comes from:
Tiny Scale: The initial rows use very small stitch counts (starting with 5 SC), which require excellent tension control and patience.
Complex Shaping: The body requires careful counting of increases and decreases, along with joining two separate pieces to form the unique "horn" shape.
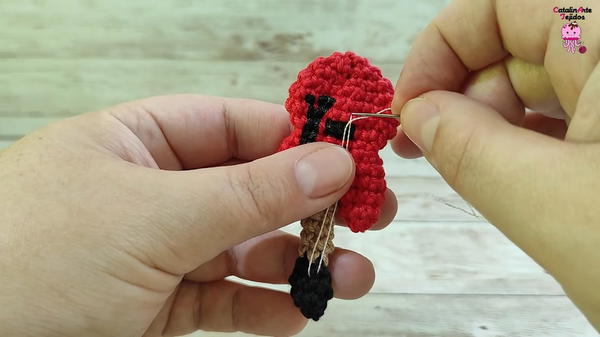
Detailed Finishing: Final assembly involves sewing, painting, and accurately stringing the guitar with thread.
Special Features and Uses
Special Features
Realistic Micro-Design: The guitar achieves a convincing miniature shape, including the neck, headstock, and curved body.
Three-Part Construction: The body is cleverly started with two small pieces that are joined to form the distinctive double-curve shape of the top.
Detailed Strings: The use of real thread and strategic glue application to create straight, taught strings is a clever finishing technique.
Uses
Amigurumi Accessory: The primary use is as a prop for amigurumi dolls, completing a character's look.
Personalized Keychain: Its size and sturdy construction make it a perfect, customized keychain or backpack charm.
Ornament: It can be used as a tiny ornament or decorative item.
Tutor's Suggestions
Customization is Key: Feel free to personalize the guitar's colors and painted details to match any real-life or fictional guitar design you like.
Don't Forget to Stuff: Even the small horn sections of the body should be lightly stuffed before final decreases to help them hold their shape.
Shape the Pieces: The finished body must be flattened and shaped by hand after closing to create the proper profile of a guitar. The tutor emphasizes manually pushing the two top "horns" apart.
Step-by-Step Details
This tutorial guides you through creating a charming, miniature guitar. This small project is perfect for using as an accessory for amigurumi dolls or keychain or pendant. The finished piece is small, detailed, and requires precise assembly.
Conclusion
Your miniature amigurumi guitar is now complete. This project successfully combines Amigurumi shaping, detailed embroidery, and basic painting techniques to create a unique and realistic accessory. The versatile finished product is ready to be added to any doll or used as a fun decorative item.
Tip
Since the strings are made of thin thread, use your nail to apply the glue on the back. This stops the knots from unraveling and keeps the strings perfectly straight without making the glue visible on the front.


