Dress toys in cozy style with this Free Crochet Stuffed Animal Cardigan Pattern bringing warmth and charm to every plush friend’s wardrobe.
A beloved stuffed animal often holds a special place in the heart, and what better way to enhance its charm than by adorning it with a handmade accessory. The Free Crochet Stuffed Animal Cardigan Pattern offers a delightful opportunity to turn an ordinary plush companion into a stylishly dressed treasure. This simple yet versatile project is designed for all skill levels, giving beginners the confidence to try something new while allowing seasoned crocheters to add their unique touch.
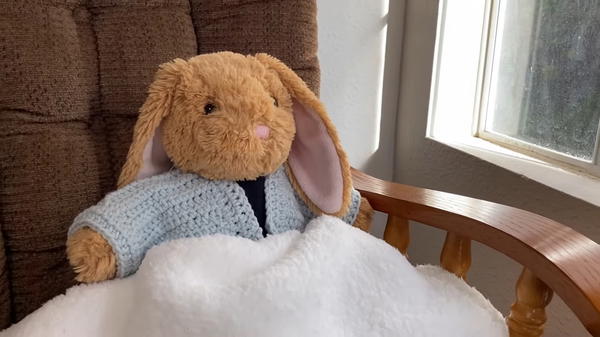
Adorable Crochet Stuffed Animal Cardigan to Dress Toys in Style
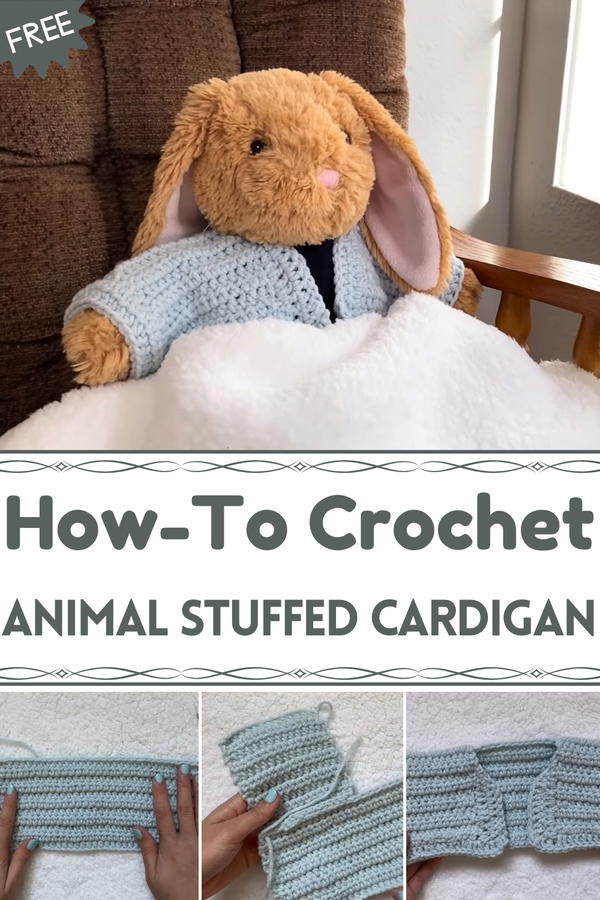
This cardigan isn’t just practical; it’s a beautiful piece that highlights personality and warms your beloved plush companion. Whether for playful display, heartfelt gifting, or creative satisfaction, the cardigan can upgrade your stuffed animal’s look significantly. Each carefully placed stitch builds not just a garment but a story, showcasing your care and skill while providing something unique and memorable.
The process is straightforward: begin by measuring the stuffed animal’s proportions to ensure a perfect fit. From there, crochet the back and front panels using basic stitches like half double crochet and double crochet.
The sleeves, sides, and finishing touches come together seamlessly, resulting in a snug, adorable cardigan.
The pattern is entirely adjustable, accommodating a variety of stuffed animals by customizing dimensions.
How to Crochet a Cardigan for Your Stuffed Animal
Introduction
Creating a miniature cardigan for a stuffed animal is a fun and beginner-friendly crochet project. Tailored to fit any size or type of stuffed animal, this project uses simple, repeatable stitches and basic techniques, making it accessible for crochet enthusiasts of all skill levels. In this step-by-step guide, you will learn how to create a custom-fitted cardigan, from taking measurements to final assembly. The cardigan features a clean and polished look, with options for adjusting fit and style along the way.
Materials Needed
- Yarn: Thin or medium-weight yarn (the video uses thinner yarn for a neater finish)
- Crochet Hook: 3.75mm or size matching your yarn
- Measuring Tape
- Stitch Markers or safety pins
- Yarn Needle (for sewing and weaving in ends)
- Scissors
- Stuffed Animal for reference
Steps to Crochet the Cardigan
Step 1: Taking Measurements
- Measure around the stuffed animal’s chest and note the measurement (in the video, a 38 cm Build-A-Bear is used).
- Add 6 cm to the measurement to ensure the cardigan isn’t too snug. Divide this total by 2 (e.g., 44 cm becomes 22 cm) — this will determine the length of your starting chain for the back panel.
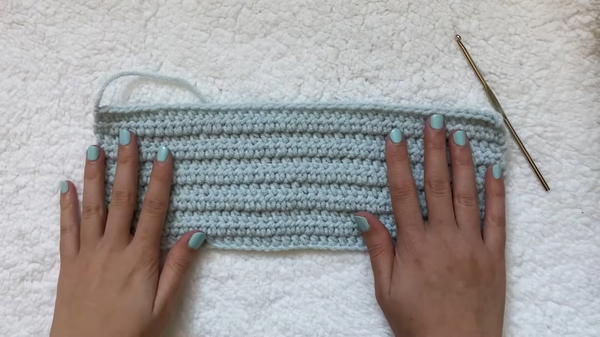
Step 2: Creating the Back Panel
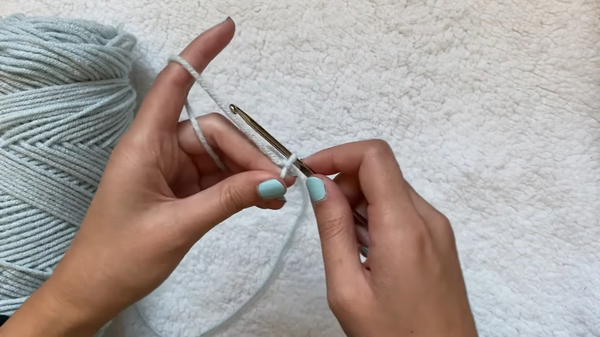
- Create a slip knot to start.
- Chain stitches until the chain’s length matches your calculated measurement (in this case, 22 cm). Stretch the chain slightly to ensure accuracy.
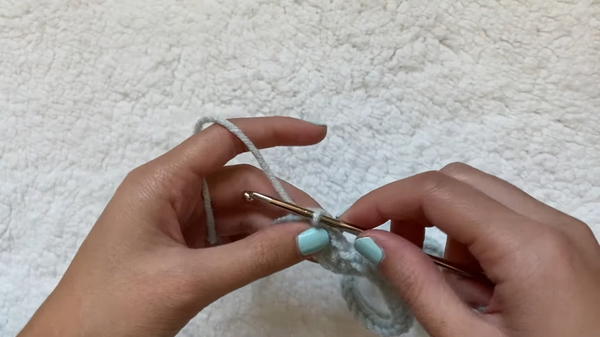
- Work half double crochet (HDC) stitches across the row:
- Yarn over, insert the hook into the next stitch, yarn over again, and pull through. You should have three loops on the hook. Yarn over and pull through all three loops.
- At the end of each row, chain 1, turn your work, and repeat the HDC across the next row.
- Continue until the back panel reaches the desired length for the cardigan (e.g., 11 rows).
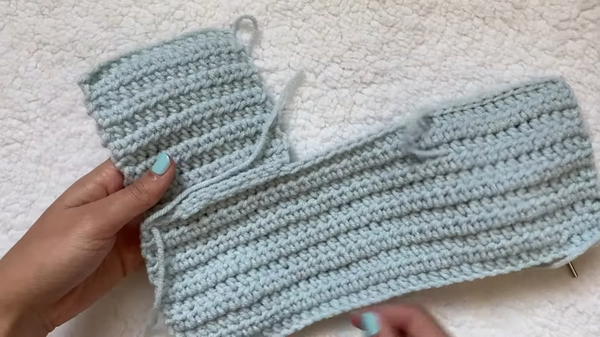
Step 3: Creating the Front Panels
- Measure the stuffed animal’s neck width (e.g., 8 cm). Subtract this from the back panel’s width and divide the result by 2. This gives the width for each front panel (e.g., if the total back panel width is 28 cm: 28 - 8 = 20 cm; 20 ÷ 2 = 10 cm per front panel).
- Chain stitches to correspond to the front panel width (e.g., 10 cm).
- Repeat the HDC process for 11 rows, just as in the back panel.
- Create the second front panel following the same steps.
Step 4: Assembly - Joining Shoulders
- Align the front panels with the back panel, good sides facing in.
- Use a slip stitch to join the top edges (shoulders) of the front panels to the back panel:
- Insert the hook through both pieces at each stitch, yarn over, pull through both layers, and then pull through the loop on the hook.
- Repeat for the other shoulder seam.
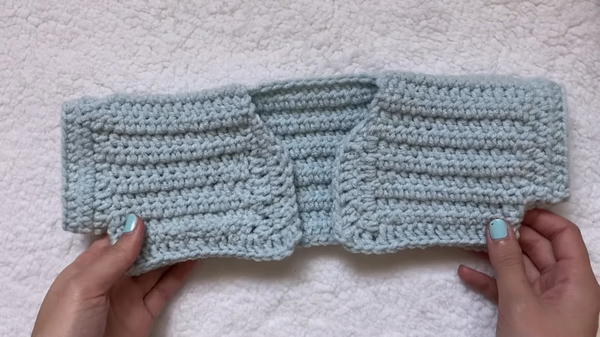
Step 5: Joining the Sides
- With the wrong side still facing out, align the side seams.
- Join the edges using slip stitches, leaving openings for armholes. Measure enough space for the armholes (e.g., 3 rows high).
Step 6: Adding the Sleeves
- Attach yarn to the underarm of the sleeve opening using a slip knot.
- Work HDC stitches evenly around the armhole. If the stitches become too tight, add extra stitches as needed.
- Chain 1, turn the work, and continue HDC rows until the sleeves are the desired length.
- Repeat the process for the second sleeve.
Step 7: Extending and Shaping the Front Edges
- To close the gaps at the front, attach yarn near the bottom edge of one panel.
- Work double crochets (DC) along the edge, tapering to single crochet (SC) stitches as you approach the neckline. Slip stitch to finish the edge.
- Repeat on the other front panel.
Step 8: Adding a Bottom Border (Optional)
- Attach yarn to the bottom edge of the cardigan.
- Work DC stitches evenly along the edge to create a subtle border. If desired, repeat additional rows for a thicker border.
Step 9: Weaving in the Ends
- Use a yarn needle to weave in all loose ends. For extra durability, secure the ends by weaving them in multiple directions within the stitches before trimming the excess yarn.
Special Features
- Customizable Fit: You can adjust the size easily by altering the initial measurements.
- Simple Stitch Pattern: The project is beginner-friendly, mainly using half double crochet stitches with some double crochet and single crochet stitches for shaping.
- Tapered Front Design: Subtle adjustments using different stitches create a polished, tailored look.
Tutor’s Suggestions
- While chaining, keep your stitches loose to make it easier to work into them later.
- Stretch measuring chains slightly to get a more realistic estimate of the final dimensions.
- If the armpits look loose after assembly, sew or crochet over these areas to tighten them up.
Uses
- Stuffed Animal Clothing: A perfect decorative and functional accessory for stuffed animals of various sizes.
- Gift Idea: Handmade clothes for children’s toys make thoughtful and personal gifts.
- Practice Project: Ideal for practicing basic crochet stitches while working on a small-scale garment project.
Tip
For a professional finish, use stitch markers to evenly space stitches when working along edges or attaching sleeves. This ensures cleaner seams and consistent shaping.
Conclusion
This crochet cardigan is an enjoyable and creative project designed to transform any stuffed animal into a stylish companion. Its customizable features make it suitable for a variety of sizes, and the use of simple stitches ensures accessibility for all skill levels.


