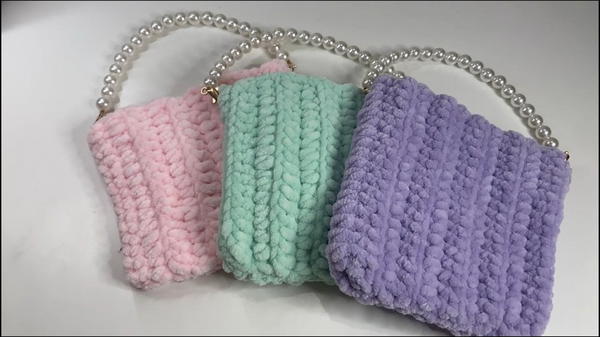
Flaunt cozy style with this Free Crochet Fluffy Bag Pattern, bringing soft texture and a trendy handmade touch to your everyday look.
A cozy afternoon outing often calls for something light yet stylish to carry the day’s essentials. The Free Crochet Fluffy Bag pattern captures that need perfectly, offering softness, texture, and elegance in one beautiful accessory. Made with plush yarn, this bag stands out for its fluffy surface that feels gentle to the touch while maintaining a sturdy form. Its simple shape makes it versatile, perfect for casual wear, shopping trips, or adding charm to a winter outfit.
Fluff Crochet Fluffy Bag Pattern to Add Cozy Texture
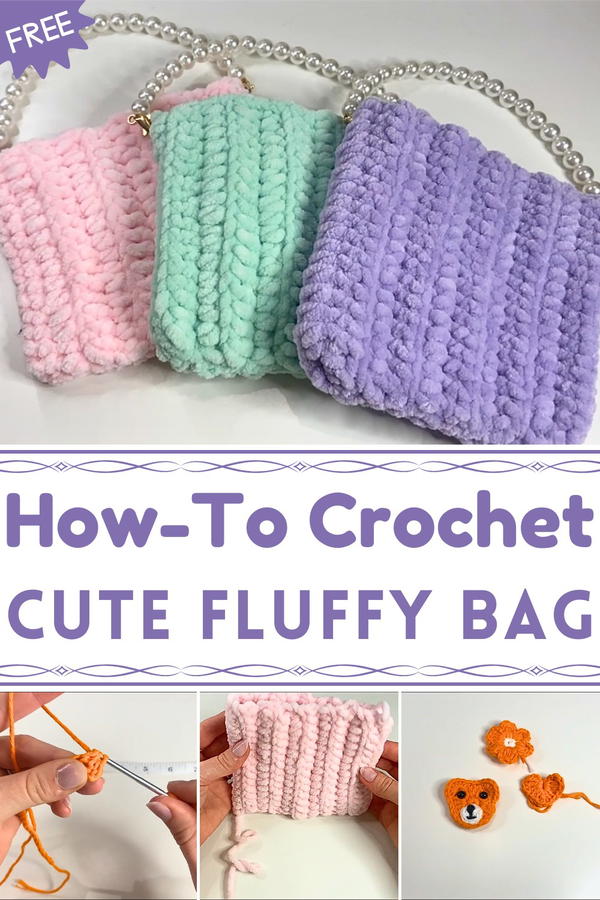
The gentle fluff adds depth and dimension, giving the bag a fashionable yet cozy appearance. Despite its soft feel, it’s surprisingly durable, holding essentials securely without losing shape. The lightweight structure ensures comfort for all-day use, while the wide handle provides ease and balance. Its neutral or pastel tones work seamlessly with different outfits, making it both practical and stylish.
The pattern also allows for variations in size and color, giving flexibility to personalize the look. Beyond daily use, it makes a thoughtful handmade gift that carries warmth and care. Combining charm, comfort, and function, this crochet bag is more than an accessory, it’s a soft statement piece that adds elegance and joy to every outing.
Special Features
- Compact Size: The finished bag measures 5 inches in height and length (approximately 13 cm), making it ideal as a small purse or storage pouch.
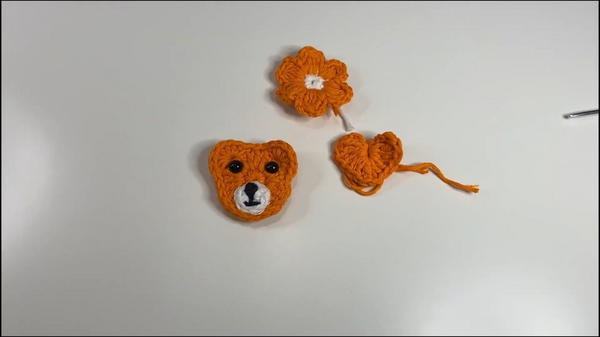
- Optional Decorations: Add embellishments such as crocheted flowers, a bear face, or a heart for a personalized touch.
- Functional Options: Include snap buttons or a zipper to securely close the bag.
- Ribbed Texture: The back-loop-only crochet technique creates a stylish ribbing effect on the bag.
- Beginner-Friendly: The instructions use fundamental crochet techniques and explain each step in detail.
Level of Difficulty
This project is beginner-friendly! It uses basic crochet stitches, such as chains, half-double crochets, and slip stitches. Additional decorative elements may require basic knowledge of single and double crochets but are explained in a way that beginners can follow.
Materials Needed
- Fluffy Yarn: Himalaya Dolphin Baby Yarn (or any fluffy yarn).
- Optional Practice Yarn: Orange cotton yarn (mentioned in the video for better visibility of stitches).
- Crochet Hook: 4 mm.
- Measuring Tape: To ensure the correct dimensions.
- Scissors: For cutting yarn.
- Darning Needle: To sew pieces together.
- Bag Handle: Purchased handles (available on Amazon).
- Optional Closures: Snap buttons or a zipper.
For decorative elements:
- White Yarn: For the bear muzzle.
- Colored Yarn: For flowers, hearts, or other decorations.
- Safety Eyes: 6 mm size suggested, but customizable.
Step-by-Step Details
1. Crocheting the Bag Base
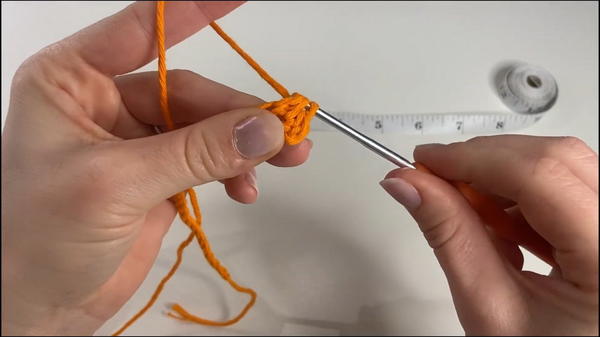
a) Create the Foundation Chain:
- Start with a slip knot and place it on your hook.
- Crochet a foundation chain up to 5 inches long. Use a measuring tape to ensure the correct length.
- Add two extra chains at the end of the foundation to create turning space.
b) First Row of Half Double Crochets:
- Yarn over and insert the hook into the 3rd chain from the hook.
- Yarn over, pull through the chain, then pull through all three loops to make a half double crochet (HDC).
- Repeat this process for each chain across the foundation row.
c) Ribbing Effect with Back Loop Only HDCs:
- At the end of the row, chain 2 for the turning chain, then turn your work.
- For the second row, make all HDCs in the back loop only to create the ribbing effect.
- Continue this pattern of back-loop-only HDCs until the piece is 10 inches long.
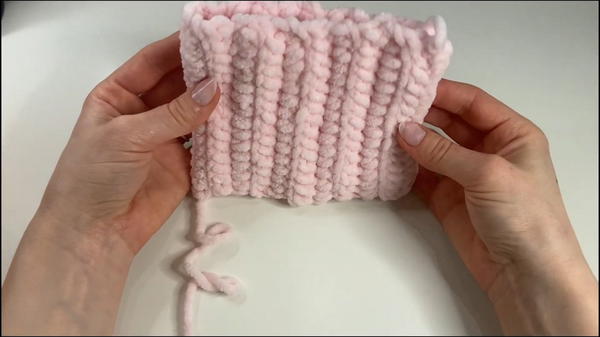
2. Sewing the Bag Together
- Secure the Yarn: Fasten off the yarn by chaining 1 and cutting a long tail for sewing.
- Fold the Crochet Piece: Fold the completed 10-inch-long rectangle in half.
- Sew the Sides:
- Use a darning needle and whip stitch the edges together.
- Align the sides evenly to ensure a clean finish.
- Weave in Ends: Hide loose yarn tails by threading them through random stitches with the darning needle.
3. Adding the Handle and Closure
- Attach the Handle: If using pre-purchased handles, secure them to the bag according to their instructions (e.g., hook threads).
- Secure the Closure (Optional):
- Sew snap buttons or a zipper into the bag’s opening based on your preference and functionality.

- Sew snap buttons or a zipper into the bag’s opening based on your preference and functionality.
4. Optional Decorations
Flower Decoration
- Magic Ring Base:
- Create a magic ring and crochet 12 single crochets into the ring.
- Pull the tail to close the ring and slip stitch into the first single crochet.
- Puff Stitch Petals:
- Using a second color, chain 3 and crochet 6 puff stitches into the magic ring.
- Chain 3 at the end of each petal and slip stitch to secure in the same spot.
Bear Face
- Main Face:
- Create a magic ring and crochet 10 single crochets into it.
- Slip stitch to close the ring into a flat circular face shape.
- Ears:
- Half-double crochet into stitches to create rounded ears on the top.
- Muzzle:
- Repeat the magic ring process for a smaller circle and sew it to the face.
Heart Shape
- Magic Ring Base:
- Start with a magic ring and crochet three triple crochets, three double crochets, and a chain.
- Shape the Heart:
- Repeat the stitches in reverse to replicate the other half of the heart.
- Finishing Touches:
- Pull the yarn tail to close the magic ring and tighten the heart’s shape.
- Pull the yarn tail to close the magic ring and tighten the heart’s shape.
Tutor’s Suggestions
- Practice with Visible Yarn: Use cotton yarn to practice stitches before switching to fluffy yarn to see the stitches more clearly.
- Stitch Consistency: Keep your tension consistent to avoid uneven edges.
- Add Personal Flair: Experiment with different yarn colors and patterns to make the bag uniquely yours.
Uses of the Bag
- Everyday Purse: The compact design makes it ideal for carrying small essentials.
- Gift Bag: Use it as gift packaging for a thoughtful personal touch.
- Storage Bag: Great for holding small craft supplies or accessories.
Tip
If you're using fluffy yarn, avoid pulling your stitches too tightly, as it can become difficult to see the loops. Practice first with simple yarn before switching to fluffy yarn for smoother results.
Conclusion
This fluffy crochet bag is a satisfying, beginner-friendly project perfect for both functional use and creative personalization. With step-by-step guidance, you'll not only learn how to construct the bag but also explore decorative options to make it uniquely your own.


