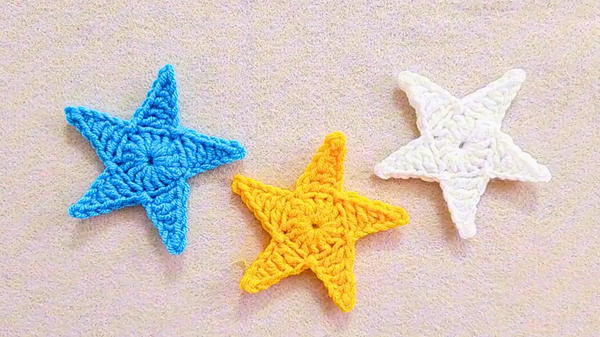
Shimmer with joy using this Free Crochet Star Ornament Pattern, lovely for tree décor, holiday displays, or adding sparkle to festive celebrations.
During the quiet glow of winter evenings, a simple ornament can hold the warmth of countless memories. A tiny star hung on a Christmas tree often carries more meaning than grand decorations, it symbolizes joy, light, and the comfort of shared traditions. That same sentiment shines through the Free Crochet Star Ornament pattern, which turns soft yarn into a charming piece of holiday art.
How to Crochet Star Ornament Pattern Step by Step
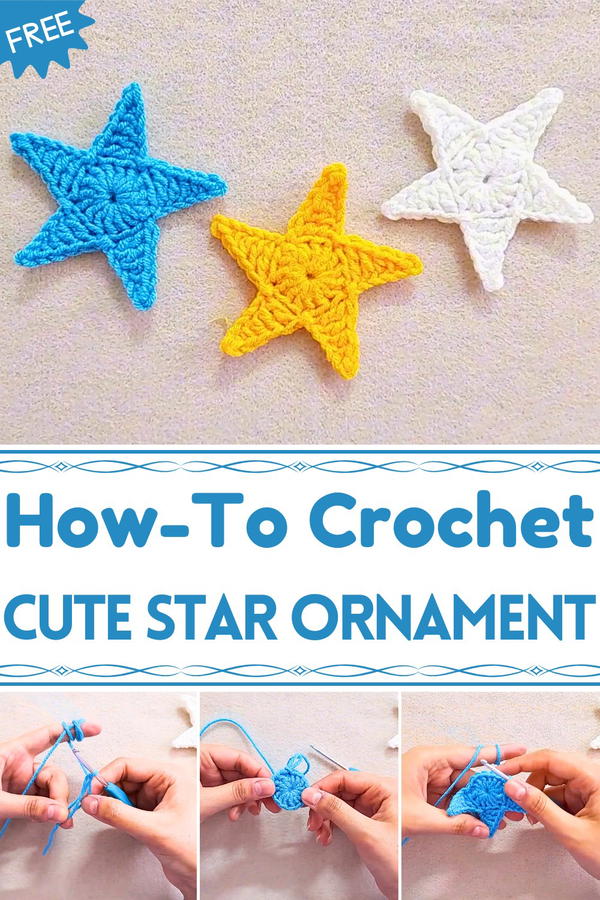
Each stitch shapes a delicate star that looks lovely strung across garlands, attached to gift packages, or displayed as part of handmade home décor. This crochet ornament is lightweight yet durable, making it a timeless addition to your festive collection. Whether you prefer a classic white or a sparkling gold finish, it beautifully complements any Christmas theme.
The pattern is ideal for those who love quick crochet projects that bring instant holiday cheer. It’s also perfect for using leftover yarn while producing something meaningful and delightful. Add a touch of handmade magic to your holiday decorations and let your crochet star ornament shine as a heartfelt expression of creativity and warmth during the most joyful season of the year.
Materials Needed
- Yarn: Any color of your choice.
- Crochet Hook: 3.5mm crochet hook.
- Scissors: For cutting the yarn at the end.
Step-by-Step Details
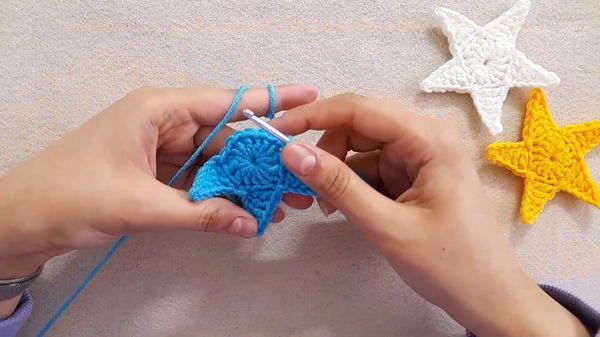
Step 1: Starting with the Magic Ring
- Create the Magic Ring: Hold the yarn tail between your fingers and loop the yarn to form an "X". Insert the crochet hook under the bottom thread, grab the top thread, and pull it through.
- Secure the Ring: To secure the magic ring, chain 3 stitches. This is the starting point for your star.
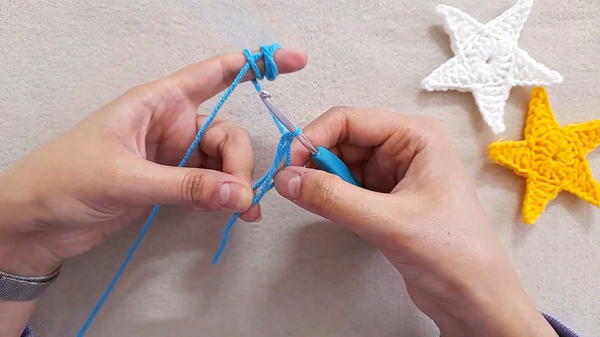
- Open the Magic Ring: Use your fingers to slightly open the loop of the ring.
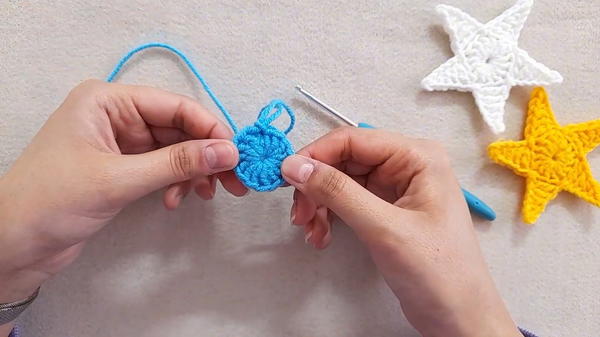
Step 2: Crochet the First Circle (Star’s Base)
- Make 14 Double Crochets:
- Yarn over, insert the hook into the magic ring, and pull through.
- Yarn over again and pull through 2 loops, then yarn over and pull through the remaining 2 loops. This creates one double crochet.
- Continue this process to make 14 double crochets in total within the magic ring.
- Slip Stitch to Close the Circle:
- Locate the first double crochet (next to the chain 3 stitches) and make a slip stitch in that stitch to close the circle.
- Tighten the Magic Ring: Gently pull the tail of the yarn to close the ring. This forms a tight and secure center for the star.
Step 3: Forming the Star’s Petals
- Chain Stitches for the Petal:
- Chain 6 stitches to start creating the first petal.
- Work the Petal Shape:
- Skip the first chain and make a slip stitch in the second chain.
- In the next chain, make a single crochet.
- In the following chain, make a half double crochet.
- In the fourth chain, make a double crochet.
- In the last chain, make a triple crochet. This gives the petal its distinct pointed shape.
- Attach the Petal to the Base:
- Around the base circle, skip 2 stitches and make a slip stitch in the third stitch to attach the petal to the circle.
- Around the base circle, skip 2 stitches and make a slip stitch in the third stitch to attach the petal to the circle.
Step 4: Repeat for All 5 Petals
Repeat Step 3 for the remaining four petals:
Petal 2:
- Chain 6 stitches, skip the first chain, and work the slip stitch, single crochet, half double crochet, double crochet, and triple crochet in the same sequence.
- Skip 2 base stitches and attach with a slip stitch.
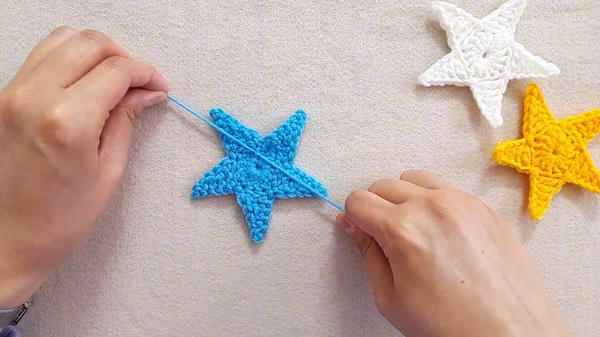
Petals 3, 4, and 5: Follow the same steps as above to create all five points of the star. After attaching the fifth petal, you should have a completed star shape.
Step 5: Weaving and Securing the Ends
- Bring the Yarn Tails to the Back: Using your hook, pull both yarn tails (the central magic ring tail and the finishing tail) to the back of your work.
- Tie a Knot: Tie the two yarn tails together in a secure knot to keep the work intact.
- Trim Excess Yarn: Use scissors to cut off the excess yarn for a neat finish.
Key Features of the Crochet Star
- Versatile Design: The star can be used as decorations, embellishments on hats, cards, blankets, or even as keychains.
- Quick to Make: The entire process takes less than 5 minutes, ideal for beginners or last-minute projects.
- Starfish Aesthetic: The star also resembles a starfish, making it suitable for ocean-themed crafts.
Level of Difficulty
Beginner-Friendly. This crochet project is suitable for beginners as it uses basic stitches like the magic ring, double crochet, slip stitch, single crochet, half double crochet, and triple crochet. The steps are simple enough to practice and master these foundational crochet skills.
Tutor’s Suggestions
- Use a Stitch Marker: If you’re new to working in the round, you may add a stitch marker to track your starting point.
- Customize the Size: Experiment with different yarn weights and hook sizes to make larger or smaller stars. Lightweight yarn and a smaller hook size will create daintier stars, while chunky yarn makes bold, oversized decorations.
- Don’t Skip Pulling the Magic Ring Tight: Ensure your magic ring is closed tightly to avoid any gaps in the center of your star.
Uses of the Crochet Star
- Holiday Decorations: Use as hanging ornaments for Christmas trees or garlands.
- Home Décor: Add to pillows, blankets, or curtains.
- Gift Accents: Use as embellishments on gift wraps or as part of handmade cards.
- Fashion Accessories: Work into keychains, pendants, or as appliqués on hats and bags.
Final Tip
When transitioning from one petal to the next, double-check that you’re skipping the correct number of stitches on the base circle. Skipping the wrong number can make the star look uneven.
Conclusion
This crocheted star is a quick, easy, and versatile project, perfect for beginners and advanced crocheters alike. With just a few materials and 5 minutes of your time, you can create a beautiful embellishment that can be used in several creative ways.


