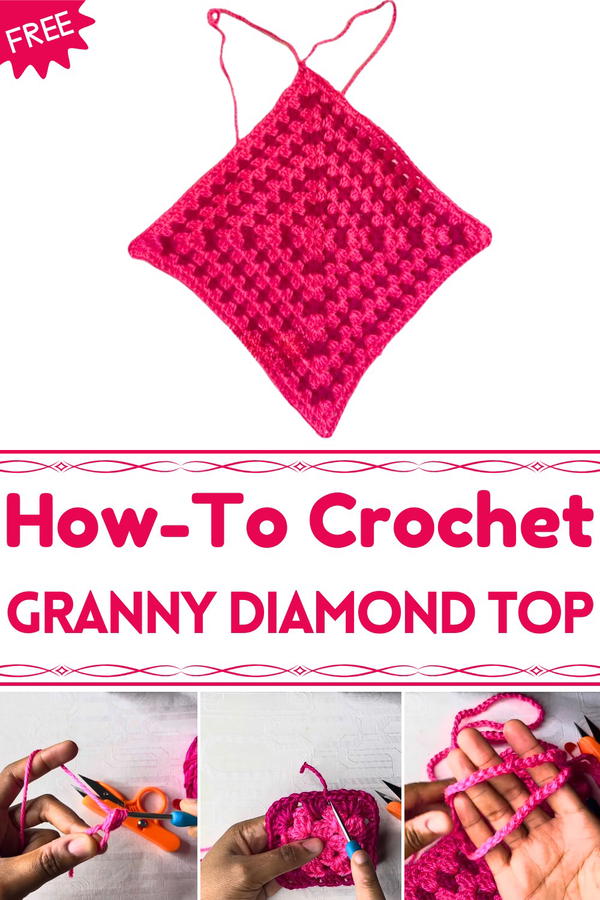
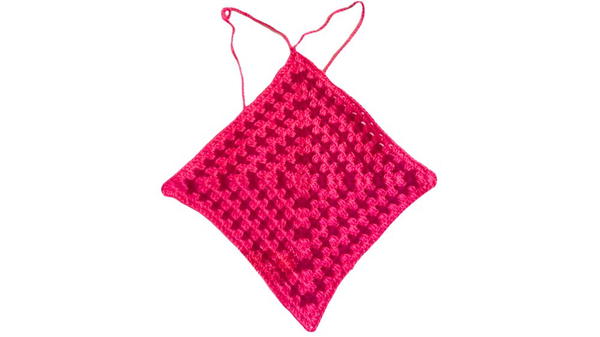
Brighten your wardrobe with the Free Crochet Granny Square Diamond Top Pattern, a stylish, breathable, and versatile piece perfect for sunny days.
A burst of color and texture can completely refresh a wardrobe, and handmade garments offer a personal touch that mass-produced items often lack. This “Free Crochet Granny Square Diamond Top pattern” brings together the charm of classic granny squares with a modern, geometric twist, forming a diamond-shaped layout that is both flattering and visually captivating. Lightweight yet sturdy, this top is perfect for layering over casual outfits during warm spring and summer days, adding a playful yet sophisticated element to any look.
Modern Crochet Granny Square Diamond Top You’ll Love to Flaunt
Its breathable crochet structure ensures comfort without compromising style, making it ideal for strolls in the park, casual meet-ups, or relaxed evenings at home. Beyond its aesthetic appeal, this piece encourages mindfulness and patience while creating, providing a calming, rewarding experience for anyone who enjoys hands-on creativity. The versatility of this diamond top allows it to pair effortlessly with jeans, skirts, or shorts, turning simple ensembles into statement outfits.
Additionally, the handmade nature promotes sustainability, as it can be cherished for years and passed down or gifted with meaning. Lightweight, airy, and stylishly structured, this top combines timeless charm with functional wearability, offering a unique garment that is practical, eco-friendly, and delightfully expressive.
Materials Needed
- Yarn: Any yarn color of your choice (thicker yarn recommended for faster results).
- Hook Size: 4.0 mm hook (adjust based on your yarn weight).
- Stitch Marker: Helps keep track of your starting points in each row.
- Scissors
- Optional: Darning needle for weaving loose ends.
Step-by-Step Instructions
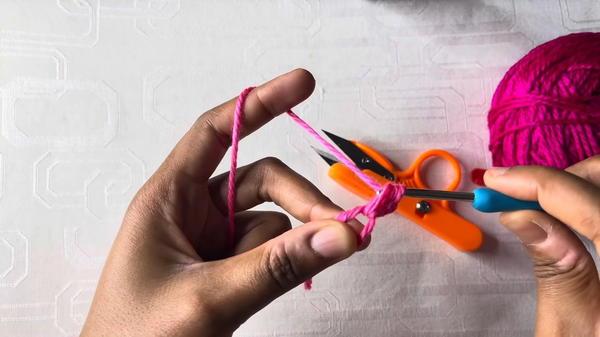
1: Begin With a Magic Ring
- Create a Magic Ring:
- Form an X shape with the yarn, insert your hook, pull through, and secure with one chain followed by an extra chain.
- Make Double Crochets:
- Crochet 3 double crochets (DC) into the ring.
- Mark the first stitch with a stitch marker because the initial chain doesn’t count as a stitch.
- Create Corners:
- Chain 2 (this forms the corner), then add another 3 double crochets into the magic ring.
- Repeat this sequence until you have 4 clusters of 3 double crochets, separated by chain 2 corners.
- Complete the Round:
- Chain 2 after the final cluster, remove the stitch marker, and make a slip stitch into the marked stitch.
- Tighten the center by pulling the tail of the ring to close the hole.
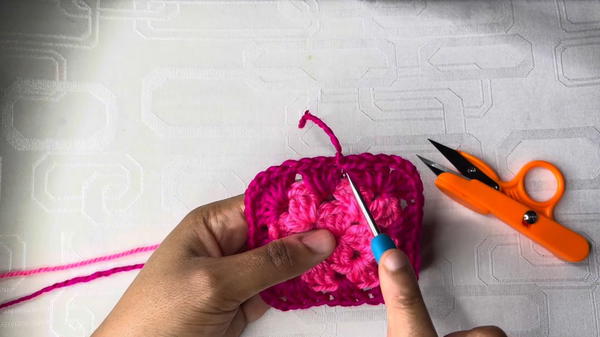
2: Build Row Two
- Chain 3:
- Chain 3 to start row two—this counts as the first double crochet.
- Skip the next space and move to the nearest corner.
- Work Into the Corners:
- For every corner space (the gaps created by chains in the previous row):
- Crochet 3 double crochets, chain 2, and add another 3 double crochets into the same corner space.
- For every corner space (the gaps created by chains in the previous row):
- Continue Around the Square:
- Move to the next corner and repeat the corner sequence: 3 double crochets, chain 2, 3 double crochets.
- For spaces between corners, simply crochet 3 double crochets into the gap.
- Complete the Row:
- Add 2 double crochets after the last corner.
- Slip stitch into the third chain of the initial chain-3 to finish the row.
- Add 2 double crochets after the last corner.
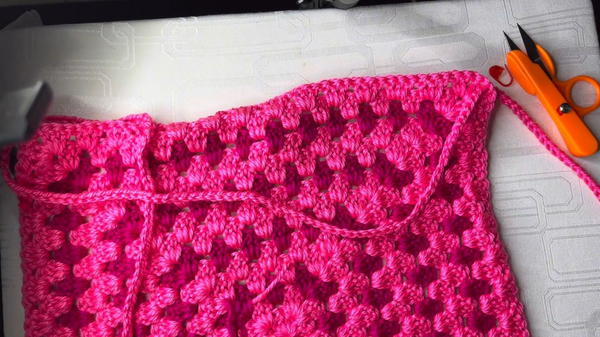
3: Expand the Square
- Change Colors (Optional):
- If desired, cut the current yarn and join a new color by slip stitching into the last stitch of the previous row.
- Repeat the Pattern:
- For every new row, repeat the same structure:
- Crochet 3 double crochets in side spaces.
- In corners, crochet 3 double crochets, chain 2, and 3 double crochets into the same space.
- The side gaps will increase as your rows expand, where you simply add 3 double crochets each time before reaching the corners.
- For every new row, repeat the same structure:
- Adjust Size:
- Continue expanding until the square is wide enough to fit your bust or desired size. For example, the tutor completed 14 rows to fit her measurements.
4: Create the Crisscross Straps
- Pick a Corner:
- Choose one of the square’s four corners to begin the crisscross straps.
- Attach Yarn:
- Insert your hook into the corner space and secure the yarn with a slip knot. Chain 1 to secure it, then chain another stitch.
- Chain Desired Length:
- Crochet 150–200 chains (or adjust based on your preference).
- Cut off your yarn and pull tightly to secure the end.
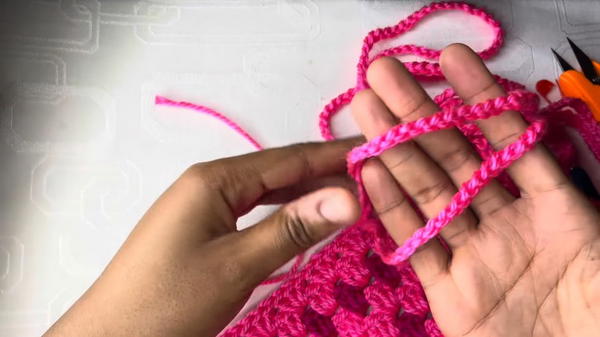
- Optional (Reinforced Straps):
- If your yarn texture is too thin, work single crochets across the entire chain to make the straps sturdier.
5: Attach the Straps
- Organize Straps:
- Turn the crochet square to the wrong side (inside-facing).
- Insert one strap into the opposite corner, threading it through from the inside to the outside.
- Tie Off:
- Knot the straps together securely to create a crisscross effect.
- Ensure the knots are firm but not bulky.
- Weave in Loose Ends:
- Use a darning needle or the "hook hack" demonstrated by the tutor to sew in loose ends neatly.
- If any tail ends persist, use a lighter to gently burn them for a clean finish.
Special Features
- Customizable Fit: The tutorial allows you to adjust the size of the square to your measurements, ensuring a perfect fit.
- Crisscross Straps: Adds a trendy design element while making it adaptable to different body shapes.
- Scalable Rows: You can use any number of rows depending on your yarn thickness and desired top size.
Level of Difficulty
Beginner to Intermediate:
- Basic stitches such as magic ring, double crochet, chain, single crochet, and slip stitch are used.
- The repetition makes it beginner-friendly, but some focus is required for consistent stitch counts and corner spacing.
Tutor’s Suggestions
- Use a Stitch Marker: Mark the first stitch of each row to avoid losing track of your starting point.
- Work Along Loose Ends: While crocheting, bring the yarn tails along to weave them in seamlessly instead of sewing them afterward.
- Test Yarn Texture: If your straps look too thin, reinforce them with single crochets for durability.
Uses
- Casual Summer Wear: Ideal for beach trips or casual outings.
- Layering Top: Perfect as a crop top or as part of a layered outfit.
- Gift Item: A trendy and customizable handmade piece to gift loved ones.
Conclusion
The Granny Square Diamond Top is a fun and versatile project for anyone looking to create wearable art. The expandable square design, paired with stylish crisscross straps, makes it perfect for customizing your own unique fit and color combinations. With easy-to-follow steps and the ability to adjust for various sizes, this top is an excellent project for beginners and intermediate crocheters alike.
Tip
When working with multiple colors, seamlessly change yarns by pulling the new color through the loop of the previous one, and weave the ends along as you work. This reduces extra sewing later.


