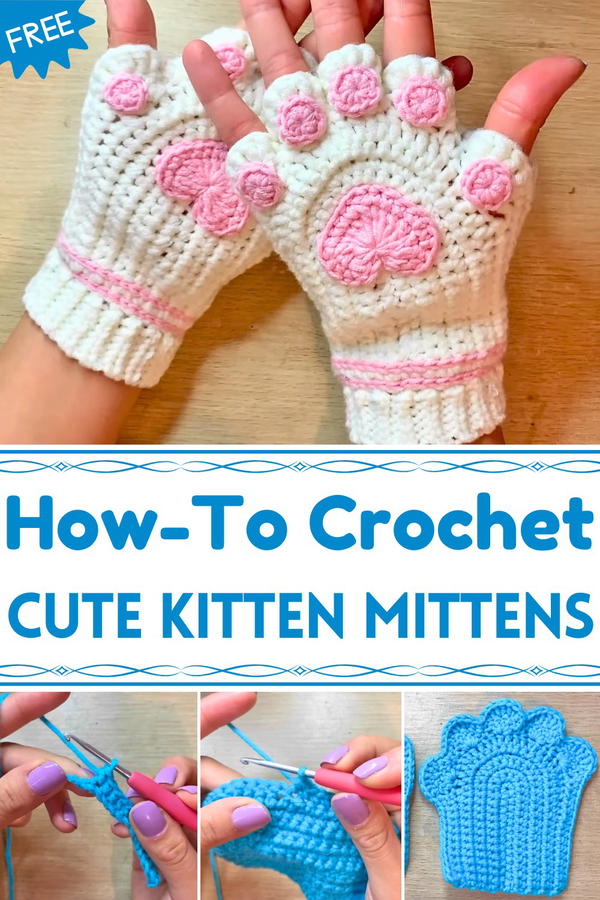
Add cozy charm to your winter wardrobe with this Free Crochet Kitten Mittens Pattern, perfect for warm, adorable, handmade accessories.
On a chilly morning, a pair of tiny, warm mittens once brought comfort to a curious little kitten, inspiring a playful take on winter wear. The Free Crochet Kitten Mittens pattern transforms simple yarn into cozy, whimsical hand coverings that combine practicality with charm. Each stitch forms a soft, flexible fabric that keeps hands warm while allowing comfortable movement, making them perfect for daily use during cold seasons.
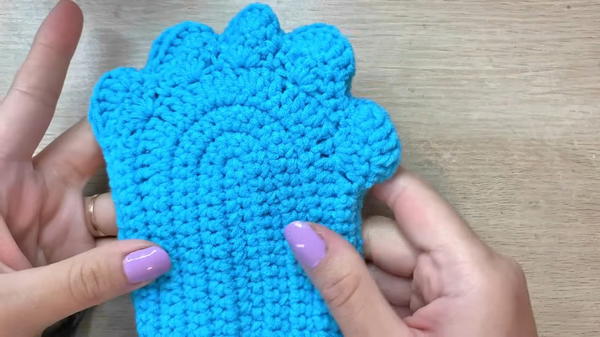
How to Crochet a Crochet Kitten Mittens Pattern Step by Step
Beyond warmth, these mittens offer a creative outlet, encouraging crocheters to experiment with textures, colors, and small details, resulting in items that are both functional and visually appealing. Their petite size and thoughtful construction make them ideal gifts for loved ones, especially children, adding a touch of personalization to every pair. Working on the mittens enhances fine motor skills and patience, turning a relaxing pastime into a rewarding sense of accomplishment.
Multiple pairs can be crocheted for coordinating outfits, holiday presents, or themed collections, providing endless versatility. Lightweight yet durable, the finished mittens maintain their shape while offering practical protection from the cold. The Free Crochet Kitten Mittens pattern is an engaging way to transform ordinary yarn into delightful, functional accessories, bringing warmth, creativity, and a sense of cozy charm to everyday life.

Materials Required
- Yarn:
- The instructor uses a specific yarn with a calypso color for better stitch visibility and suggests a yarn thickness that complements the mitten's dimensions.
- Crochet Hook:
- A 3 mm crochet hook is used in the tutorial, but for larger mittens, you can opt for a larger-sized hook.
- Scissors:
- To neatly cut the yarn where required.
- Yarn Needle:
- For weaving in yarn ends after completing the project.
Step-by-Step Instructions
1: Beginning the Base of the Mitten
- Slip Knot and Chains:
- Start with a slip knot and chain 15 stitches.
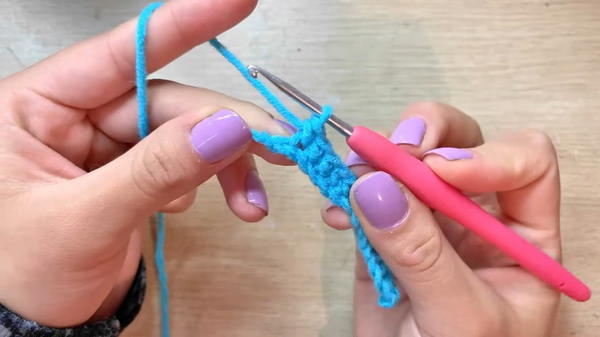
- Start with a slip knot and chain 15 stitches.
- Single Crochets in the Chain:
- Skip the first chain and work 13 single crochets into the next chains. Leave one chain at the end.
- Increase at the End:
- In the last chain, make 3 single crochets into the same space. This creates a rounded corner for the mitten.
- Crochet on the Opposite Side:
- Work 13 single crochets down the other side of the chain to complete the foundation row.
- Starting the Second Round:
- Chain 1, turn the fabric, and continue with 13 single crochets followed by 3 increases (2 stitches in the same space) at the rounded corner.
2: Shaping the Mitten with Increases
- Round 3:
- Work 13 single crochets, then alternate between a single crochet and an increase in the rounded corner. End with 13 single crochets.
- Round 4:
- Work 13 single crochets, followed by the sequence single crochet, increase, single crochet, repeated 3 times. End with 13 single crochets.
- Round 5:
- Add more increases by using the pattern 3 single crochets, 1 increase, repeated 3 times, ensuring the mitten grows larger.
- Add more increases by using the pattern 3 single crochets, 1 increase, repeated 3 times, ensuring the mitten grows larger.
- Round 6:
- Continue shaping with the pattern 2 single crochets, 1 increase, repeated across, and finish with single crochets on both edges.
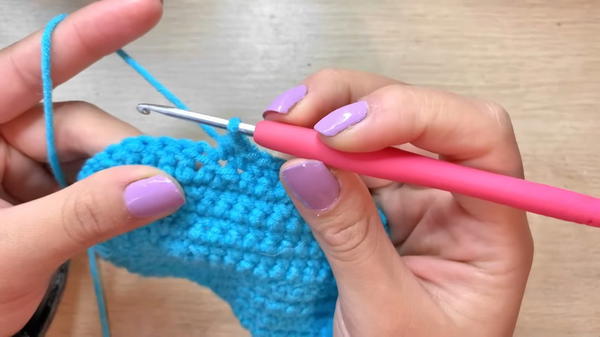
3: Adding Height and Texture to the Mitten
- Round 7:
- After completing the flat base, start adding texture. Begin with 10 single crochets, followed by 2 half-double crochets, and then 3 double crochets and an increase.
- Repeat the sequence across the row, transitioning back to single crochets for the edges.
- Round 8:
- Introduce decorative ridges with the sequence: skip one stitch, work 5 double crochets in the next stitch (shell pattern), and then a single crochet. Repeat this sequence across the mitten.
- Ensure you have 5 shell ridges and finish with single crochets on the sides.
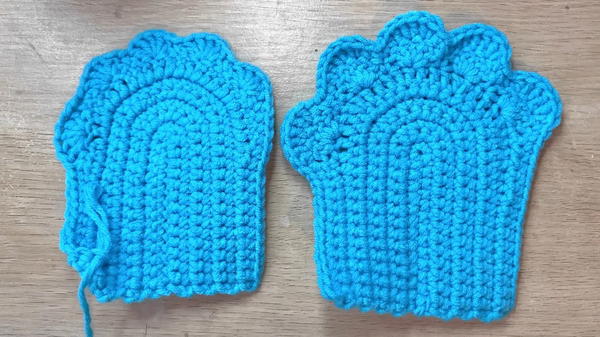
4: Preparing the Second Piece
- Duplicate the Piece:
- Make a second mitten piece following the same steps as above.
- Shorten the Second Piece:
- Stop at Round 6 when working the second piece, as it will act as the inner or smaller part of the mitten.
5: Joining the Two Pieces
- Position the Pieces:
- Place the larger piece on top of the smaller one. Align the sides carefully.
- Joining with Single Crochets:
- Use single crochet stitches to join the two pieces together, alternating between the edges of the larger and smaller pieces.
- Shaping the Thumb Section:
- Focus on creating a hole for the thumb by leaving spaces on specific sides. Add 3 double crochet increases to shape around the thumb area.
- Focus on creating a hole for the thumb by leaving spaces on specific sides. Add 3 double crochet increases to shape around the thumb area.
6: Finalizing the Mitten
- Continue and Finish:
- Keep crocheting around the edges with increases, paying attention to symmetry.
- Work 17 single crochets as the final row before fastening off your yarn.
- Weave in the Ends:
- Use a yarn needle to carefully hide any loose ends from the project.
- Use a yarn needle to carefully hide any loose ends from the project.
Special Features
- Adorable Design: The mitten mimics the look of a kitten, making it perfect for kids or animal lovers.
- Textured Finish: Decorative ridges and shell stitches add interest to the overall piece.
- Adjustable Size: The video demonstrates how to adapt the size of the mitten by using a different crochet hook or varying the number of starting chains and rounds.
Level of Difficulty
Beginner to Intermediate
- The tutorial is beginner-friendly and focuses on basic techniques like chaining, single crochet, and double crochet.
- Intermediate crocheters will enjoy the shaping techniques for the thumb and decorative edge details.
Tutor’s Suggestions
- Use Markers: Mark the first stitch of each row to avoid losing track during the increases.
- Maintain Tension: Crochet with consistent tension to ensure even shaping.
- Rewind for Details: Go back to specific steps in the video (as suggested by the tutor) if needed.
Uses
- Practical Use: These mittens are cozy, warm, and ideal for winter.
- Gifts: A thoughtful handmade gift for friends or family.
- Craft Sales: Adorable and functional, these mittens can be sold at craft fairs or online shops.
Final Tip
When joining the two pieces, double-check the alignment to ensure the two sides match perfectly. This prevents uneven edges and improves the overall appearance of the mitten.
Conclusion
This video tutorial provides a detailed and fun way to create kitten mittens, combining practicality with a delightful design. By practicing the basic techniques and following the sequence of increases, you can create a beautiful piece suitable for gifts or personal use.


