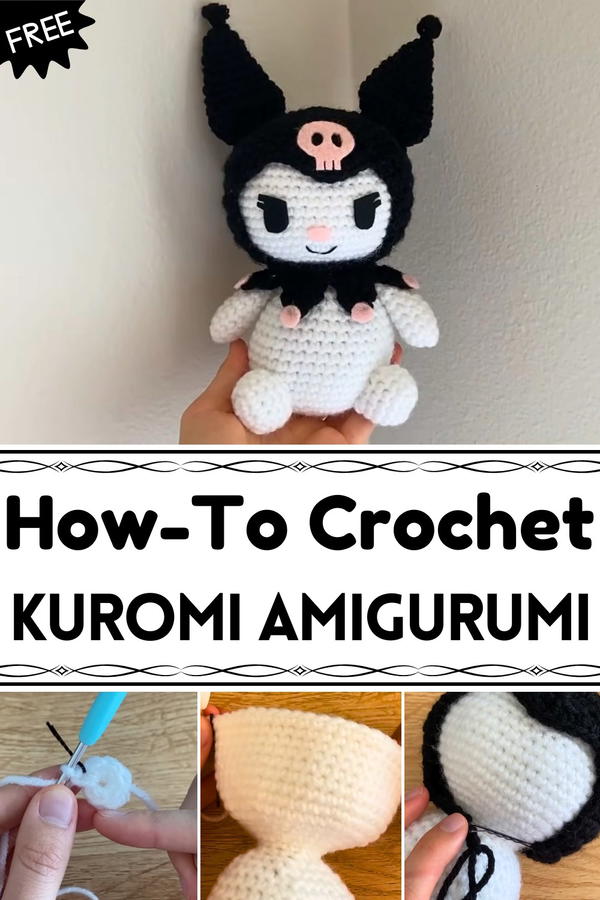
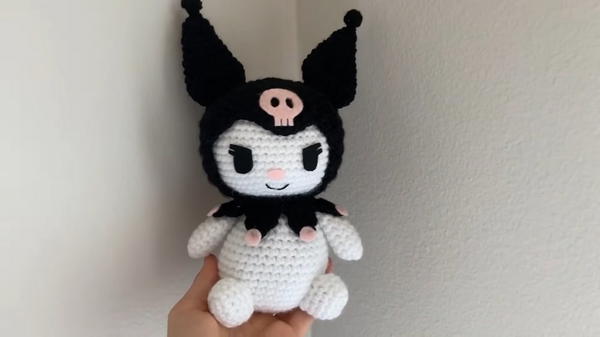
Bring cute mischief to life with this Free Crochet Kuromi Amigurumi Pattern, ideal for making charming handmade toys that brighten any collection.
Small characters with mischievous charm often capture hearts far beyond their original stories, becoming symbols of fun, personality, and whimsy. Kuromi, with her playful devilish hat and confident attitude, has become a beloved figure for fans of cute and quirky collectibles. The Free Crochet Kuromi Amigurumi Pattern transforms this iconic character into a soft, huggable figure, combining personality, texture, and handcrafted appeal in one charming piece.
Soft Crochet Kuromi Amigurumi Pattern for Home Decor
This amigurumi serves multiple purposes beyond being a decorative collectible. It makes a delightful toy for children, inviting imaginative play while remaining soft and safe to hold. For adults and collectors, it provides a nostalgic touch to desks, shelves, or display areas, adding personality and charm to living spaces. Its compact size makes it portable and perfect for gifting, offering a thoughtful, hand-crocheted present that communicates care and attention to detail.
The Free Crochet Kuromi Amigurumi Pattern also delivers the satisfaction of a rewarding crocheting experience, resulting in a figure that balances whimsy with tactile appeal. This Kuromi creation brings both charm and versatility, making it a treasured addition to any collection or handmade gift.
Materials Required
- Yarn: Black, red, or other colors based on your preferences.
- Crochet Hooks: Suggestion from the tutorial includes both 3.5mm and 4mm hooks.
- Polyfill Stuffing: You can use regular polyfill or even inexpensive pillow stuffing for the figure’s body.
- Stitch Markers/Bobby Pins: Essential for tracking and marking stitches.
- Scissors: For cutting yarn.
- Tapestry Needle: To sew and weave in loose ends.
- Felt: Pink and black felt for the eyes, nose, and skull decoration.
- Hot Glue Gun: To attach felt pieces.
- Black Thread: For embroidering the mouth.
Step-by-Step Instructions
1. Creating the Body
- Start the Base: Begin with a magic circle and place 6 single crochets into it. Alternatively, chain 2 and work 6 single crochets into the second chain from the hook.
- Round 2: Work 2 single crochets in each stitch (6 increases) to make 12 stitches total.

- Round 3: Single crochet in the first stitch, then increase in the next. Repeat 5 times (18 stitches total).
- Round 4: Work 2 single crochets, then perform an increase. Repeat until you have 24 stitches.
- Round 5: Work 3 single crochets before performing an increase. Repeat (30 stitches total).
- Round 6: Work 4 single crochets and then an increase (36 stitches).
- Rounds 7–15: Single crochet evenly around (36 stitches per round).
- Decreasings: Gradually shape the body:
- Start with 4 single crochets then a decrease.
- Move to 3 single crochets then a decrease.
- Continue until reaching 1 single crochet, then a decrease.
- Stuff the Body: Use polyfill to fill the body firmly.
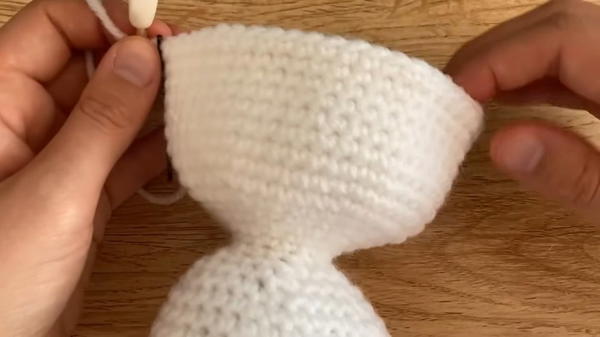
2. Creating the Head
- Repeat Body Base Steps: Use the same pattern for starting and increasing stitches for rounds until you reach 48 stitches at round 6.
- Rounds 26–33: Make 48 single crochets even across all rounds to shape the head.
- Decreasing and Closing the Head: Perform decreases similar to the body pattern until the top of the head is closed.
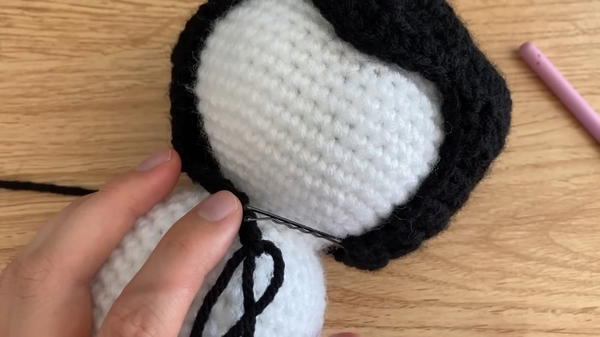
3. Creating the Bonnet
- Magic Circle Start: Place 6 single crochets into the magic circle or chain two, then work 6 single crochets into the second chain.
- Increase Rounds: Gradually increase until reaching 48 stitches at round 8.
- Triangle Detail:
- Start Triangle: Crochet 8 single crochets and chain 1.
- Work decreases and single crochets symmetrically across rows to form a triangular shape.
- After completing the triangle, reinsert yarn into the circle and single crochet around the edges to smooth out the shape.
- Attach the Bonnet: Place it on the head and secure it, ensuring it fits snugly over the top.
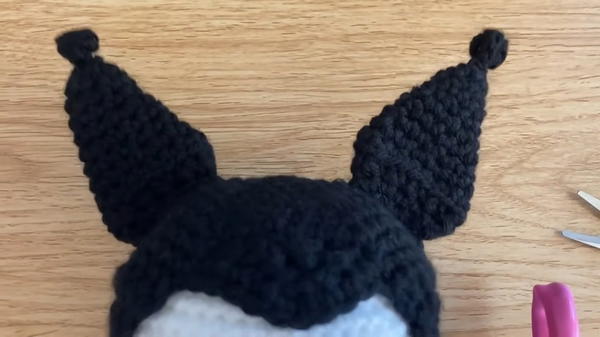
4. Adding the Ears
- Base Ear Shape:
- Use a magic ring and work 4 single crochets into it.
- Gradually increase and build up rounds for shaping.
- Add a Puff Detail:
- Use a puff stitch to create the curved detail at the top of the ear.
- Sew the puff onto the ear and attach the ears to the bonnet.
5. Creating the Arms and Legs
- Arms: Follow the instructional screen or pattern to create small cylindrical shapes using single crochets and decreases.
- Legs:
- Chain 4 and work single crochets around the chain, increasing and decreasing to shape a rounded foot.
- Stuff each leg lightly and sew them onto the body.
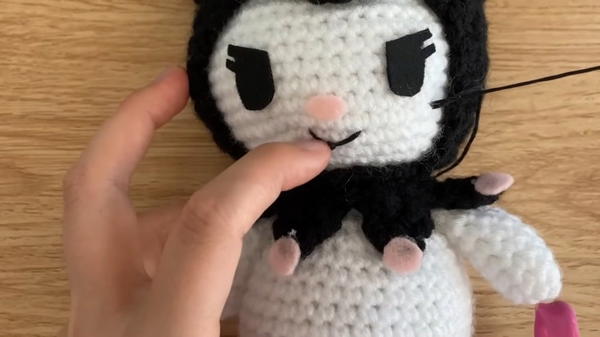
6. Adding Facial Features (Felt Work)
- Cutting Felt Shapes:
- Use pink and black felt to cut out circles for cheeks, the nose, and a small skull design for detail.
- Cut carefully, as precision is critical for the visual appeal.
- Attach Felt: Use a hot glue gun to attach the felt pieces to the head and bonnet.
- Add Details: Embroider the mouth details with black thread to complete the face.
Special Features
- Alternative Starts: Offers flexible methods for starting crochet (magic circle or chaining).
- Layered Design: Combines multiple crochet techniques to create a visually unique piece.
- Personalized Felt Design: Adds distinct personality to the finished figure.
Level of Difficulty
The project is intermediate-friendly, combining various techniques such as shaping, increasing, decreasing, working with felt, embroidery, and color switching. Beginners can attempt it but may find the felt and head/bonnet detailing slightly challenging.
Tutor’s Suggestions
- Working with Black Yarn: Black yarn visibility improves with natural light.
- Polyfill Tip: Using inexpensive pillow stuffing (like $4 ones from Target) can save costs compared to standard craft stuffing.
- Mark Stitches: Always use stitch markers or bobby pins to keep track of rounds and ends, especially when crocheting complex shapes.
Uses
- Decorative Item: Can be used as a cute display piece.
- Gift: Perfect to give as a thoughtful handmade present.
- Toys: Works well as a soft toy for children or collectors.
Pro Tip
When creating felt designs, sketch the shapes lightly on paper first to ensure precision and symmetry before cutting them out of felt.
Conclusion
This crochet tutorial provides an engaging and rewarding project that combines creativity and craftsmanship. By following the detailed instructions, you’ll end up with a charming crochet figure that showcases your skill and effort.


