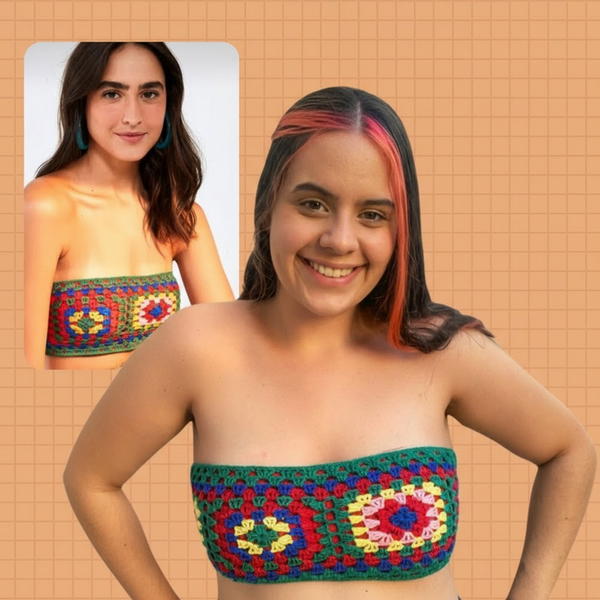
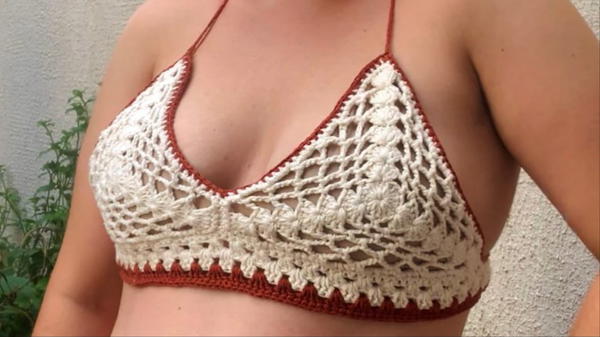
Unwind with this playful crochet cropped top pattern that brings effortless charm and a touch of sunshine to your everyday wardrobe.
Short shirts that end above the waist are perfect for warm weather, offering both style and comfort. When these shirts are crocheted, they become even more special with their beautiful open weave that keeps you cool and airy. The soft, lightweight texture makes them easy to wear all day long, while adding a unique, handmade charm to any outfit.
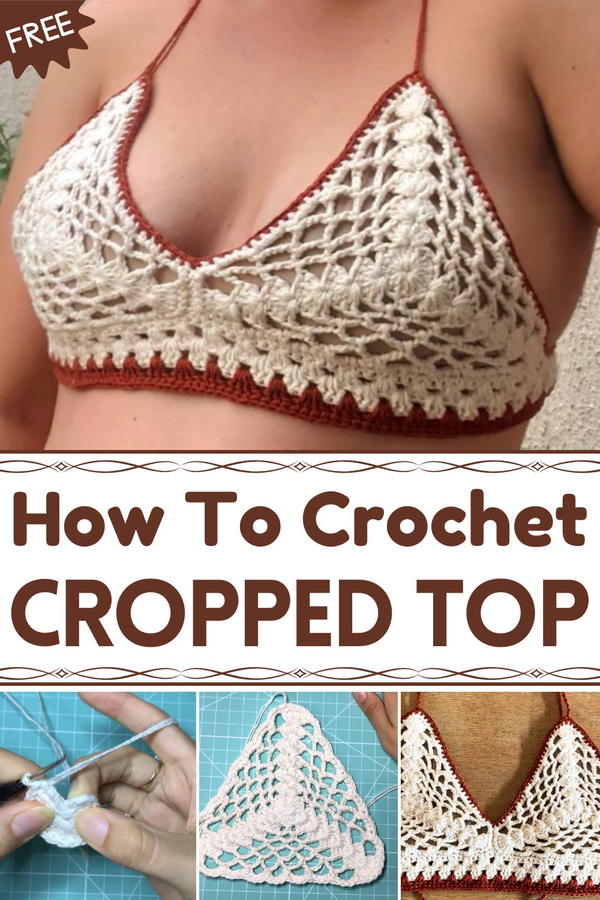
Effortless Crochet Cropped Top Pattern for a Fresh Look
Whether paired with jeans, shorts, or skirts, this kind of top brings a fresh, playful look that matches your mood and personality. Available in a variety of colors and patterns, it suits casual days at the beach, relaxed outings, or fun parties. It’s a stylish way to show a little skin while feeling comfortable and trendy. Wearing this handmade piece feels personal and special, making every day a bit brighter and more fashionable.
Crochet Cropped Top: Step-by-Step Detailed Pattern
Materials
- Crochet thread or yarn (as preferred)
- Crochet hook size suitable for your yarn (the tutor uses a 2 mm and a double needle)
- Scissors
- Tapestry needle for finishing
Difficulty Level
Intermediate – Requires knowledge of chains, slip stitches, single crochet (low stitch), double crochet (high point), increases, and crocheting in rounds and rows to shape the garment.
Pattern Features
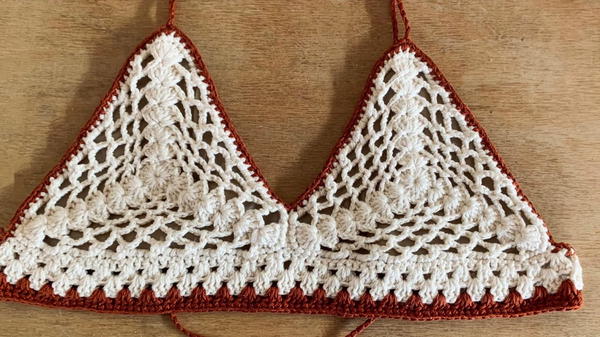
- Triangle cups made of fans of 7 double crochets
- Classic "Zinhos" (V-shaped increases) for shaping
- Open lace look with expanding chain spaces
- Adjustable straps tailored to your preference (thin or thick)
- Option to add lining for coverage
Pattern Instructions
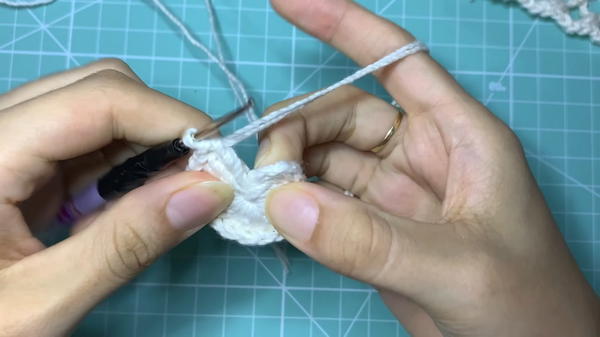
Step 1: Begin the Magic Ring
- Make a magic ring using three fingers as a guide on your hand.
- Secure the ring with a tight chain stitch to hold the circle closed.
- Chain 2 to count as your first double crochet height.
Step 2: Round 1 – Form the Base of Triangle Cup
- Work 17 double crochet stitches inside the magic ring (including the chain from Step 1, total 18 stitches).
- Pull the yarn tail on the ring to close it tightly.
- Close the round with a slip stitch in the third chain of the starting chain 2.
Step 3: Round 2 – Create the First Fan (7 double crochets)
- Chain 3 (counts as first double crochet height).
- Make 6 additional double crochets in the same stitch (where you joined the ring) to create a fan of 7 double crochets total.
- Chain 2 (this will create space around the fan).
- Skip 2 base stitches on your previous round.
- Make 1 single crochet stitch in the next (third) stitch.
- Chain 2.
- Repeat the fan pattern: 7 double crochet stitches in the next stitch.
- Continue with (chain 2, skip 2 stitches, single crochet in next) until the round ends.
- Finish the round with slip stitch at the third chain of the initial chain 3.
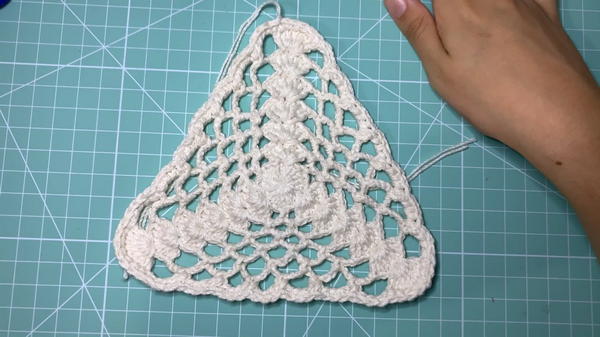
Step 4: Rounds 3 and Onward – Triangle Expansion with Fans and Spaces
- Always start each new round by chaining 3 to lift (counts as first double crochet).
- At each "Zinho" corner (fan), make 7 double crochets in the same stitch to increase the triangle’s size.
- Between fans, chain an increasing number of stitches starting from 2 chains in early rounds, increasing by 1 chain each successive round (2, 3, 4, 5, etc.) to create larger lace openings.
- In between chain spaces, work a single crochet stitch as per previous round pattern, skipping the base stitches as before.
- Repeat rounds following this pattern of fans, chain spaces, and single crochets to expand the triangle.
Step 5: Adjusting for Fit
- After approximately 6 rows, if the piece feels too loose or open, repeat the previous row’s chain count instead of increasing to maintain alignment and control looseness.
- Continue as needed to reach the desired cup size for the cropped top.
Step 6: Join Both Cups
- Once two identical triangular cups are made, join them by chaining 15 stitches for the bridge between cups.
- Single crochet across the bottom edges of the two cups and the chained bridge to connect them firmly.
- Optionally add rows of single crochet along the bottom edge for stability.
Step 7: Adding Straps
- From each top corner of the cup, chain desired length of chain stitches for the straps.
- You may crochet straps thin with single chains or thicker by working double crochet rows over the chain.
- Attach straps to back or tie as preferred.
Step 8: Edging and Finishing
- Switch to a slightly larger hook size for finishing rounds if preferred (the tutor uses a size 3 mm hook).
- Work single crochet rounds evenly around the entire piece to even out edges (making single crochet stitches in base stitches and slip stitches over chain spaces).
- For corners, make extra single crochet stitches to create smooth curves.
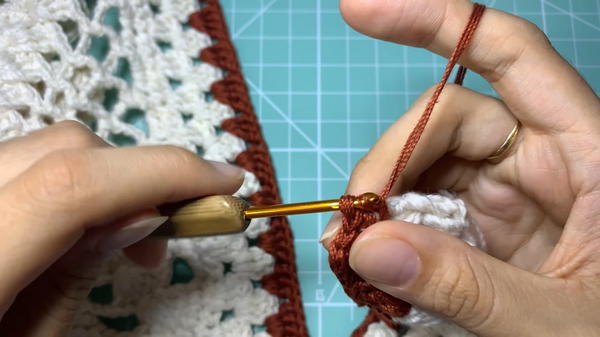
- Fasten off, weave in all ends carefully.
Step 9: Optional Lining
- Add a nude or coordinating lining beneath the crochet top for coverage.
- The tutor suggests watching another video on her channel for instructions on lining.
Tutor’s Suggestions
- Always work the first stitch of each round into the correct chain space to keep the shape symmetrical and avoid crookedness.
- Adjust chain space length if you want a tighter or looser fit; more chains = more openness.
- Make straps to suit your comfort — thinner for delicate look, thicker for more support.
- Change colors for a stylish multi-colored effect.
- Block your finished pieces for better shaping.
Special Features
- Elegant triangle cup design flattering to many body types.
- Open lacework ideal for summer and beachwear.
- Expandable sizing through increase rounds.
- Can be worn solo or under jackets, shirts, or with a lining for coverage.
Conclusion
This crochet cropped top project skillfully combines simple crescent-shaped fans and chain increases resulting in a stylish, feminine garment with lots of versatility. You will learn to increase triangles creatively and manage lace spaces for beautiful effects and great fit. With customization for strap thickness and cup size, this top is both pretty and practical. Enjoy making a summer staple that’s uniquely yours!
Bonus Tip
When increasing chain spaces to create lace, increment the number of chains by one per round to keep the fabric expanding evenly and prevent puckering. If you want to keep the stitch density consistent, repeat the previous row’s chain count for a tighter fabric.