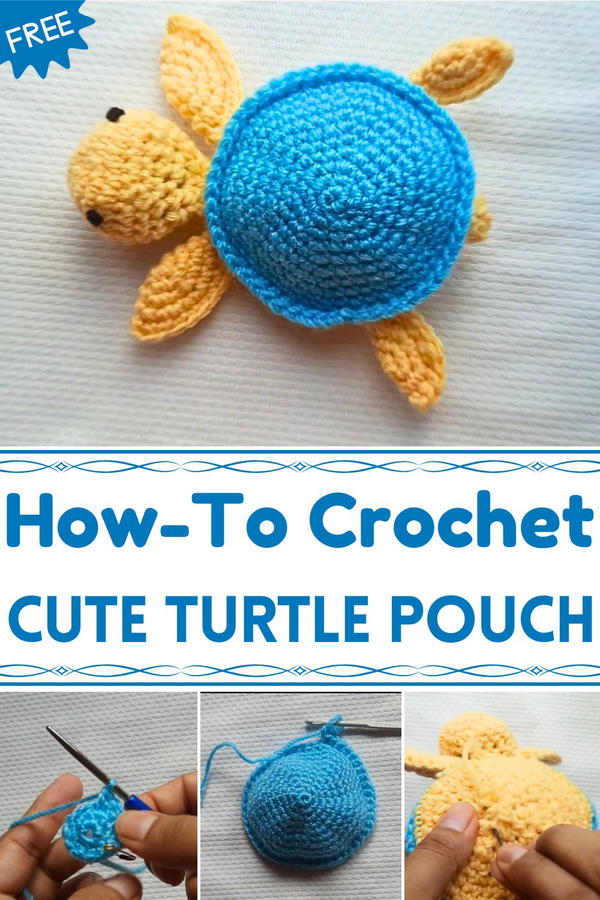
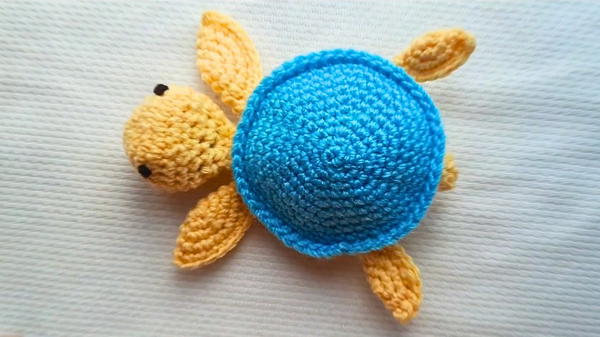
Carry ocean charm wherever you go with this Free Crochet Turtle Pouch Pattern, a cute and handy way to store tiny treasures with style.
A soft hint of coastal charm finds its way into this adorable Crochet Turtle Pouch Pattern, turning a simple accessory into something both useful and endearing. Shaped like a tiny turtle, this pouch combines sweetness with purpose—perfect for holding coins, earbuds, lip balm, or other little treasures that need a safe spot. Its textured body and gentle color choices give it an ocean-inspired appeal, making it a thoughtful keepsake or gift for anyone who adores sea life.
Simple Yet Stunning Free Crochet Turtle Pouch Pattern
The turtle pouch isn’t just practical—it’s an instant mood-lifter, adding a playful accent to bags or shelves. Whether carried as a cute organizer or used as a fun storage piece at home, it brings a touch of creativity to daily life.
This Free Crochet Turtle Pouch Pattern also makes a relaxing project for those who enjoy stitching small items that blend charm with everyday utility. Each stitch builds character, forming a pouch that symbolizes care, calm, and the beauty of simple handmade treasures meant to last and be loved.
Materials Needed
To create the Turtle Pouch, you will need:
- Yarn: Two colors of your choice (e.g., one for the shell and another for the head/flippers).
- Crochet hook: Suitable for the yarn thickness (used in the video: standard hook).
- Scissors: For cutting the yarn.
- Needle: For weaving in ends and adding details like the eyes.
- Elastic stitch marker (optional): A safety pin or similar object (to help keep track of stitches efficiently).
3. Step-by-Step Process
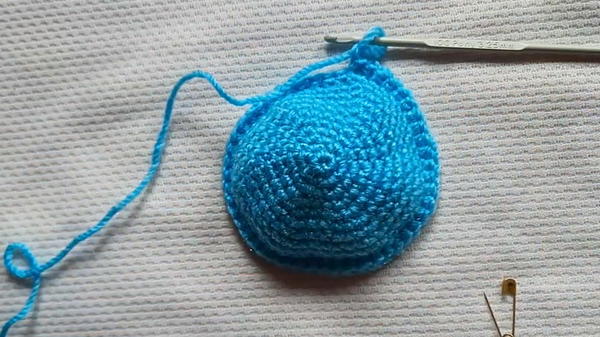
A. Making the Turtle Shell
Start with a Magic Circle:
- Form a magic ring. Create a slip knot but don’t tighten the end.
- Chain 1, and crochet 6 single crochets into the magic circle.
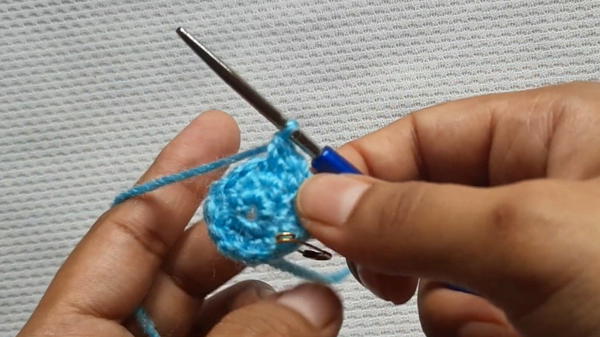
Tighten the Magic Circle:
- Pull the yarn end to close the circle.
Round 2 - First Increase Round:
- Crochet 2 single crochets in each stitch around the circle (12 stitches in total).
- Use the “yarn under” technique for tighter stitches.
- Don’t forget to mark the first stitch!
Round 3 - Increase in Every Other Stitch:
- Pattern: Crochet 1 single crochet, then 1 increase (2 single crochets in the same stitch) in the next stitch.
- Repeat this pattern around to create 18 stitches.
Round 4 - Add More Single Crochets:
- Pattern: Crochet 2 single crochets, then 1 increase.
- Repeat and complete the round (24 stitches).
Round 5 - Continue Expansion:
- Pattern: Crochet 3 single crochets, then 1 increase.
- Complete the round (30 stitches).
Round 6 and Beyond:
- Continue expanding using the formula: Add one additional single crochet before each increase.
- Round 6: 4 single crochets + 1 increase (36 stitches).
- Round 7: 5 single crochets + 1 increase (42 stitches).
- Repeat this pattern to make the shell as large as desired.
- Continue expanding using the formula: Add one additional single crochet before each increase.
Round 8 - Solid Shell Surface:
- Work one single crochet in each stitch without any increases (48 stitches in total).
Final Round - Creating the Edged Shaping:
- Crochet through only the front loops of each stitch. This creates a ridge that mimics a turtle shell edge.
- No increases in this round, just single crochets.
Slip Stitch and Fasten Off:
- Finish the shell with one slip stitch and chain one. Cut the yarn and weave the ends.
B. Making the Front Flippers (Make Two)
Start with a Magic Circle:
- Make a magic circle with 6 single crochets.
Increasing Rounds:
- Round 2: Increase every stitch (12 stitches).
- Round 3: Crochet 1 single crochet, 1 increase repeatedly (18 stitches).
Shape with Fewer Rows:
- Round 4: Crochet 5 single crochets, 1 increase, repeat this pattern to make 21 stitches.
Fold and Join:
- Fold the flipper in half and crochet the edges together to close the flipper.
- Secure the shape by joining with single crochets.
C. Making the Rear Flippers (Make Two)
Start as Before:
- Make a magic circle with 6 single crochets.
Smaller Structure:
- Round 2: Increase every stitch (12 stitches).
- Round 3: Crochet 1 single crochet, 1 increase to make 18 stitches.
Fold and Join:
- Close the shape like the front flippers, using single crochets.
- Close the shape like the front flippers, using single crochets.
D. Making the Turtle Head
Start with a Magic Circle:
- Create 6 single crochets in a magic circle.
Build Length and Depth:
- Round 2: Increase every stitch (12 stitches).
- Round 3: Work 1 single crochet, 1 increase repeatedly (18 stitches).
- Round 4: Work 2 single crochets, 1 increase repeatedly (24 stitches).
- Round 5: Work 3 single crochets, 1 increase repeatedly (30 stitches).
Maintain Shape:
- Rounds 6–7: Crochet one single crochet in each stitch (30 stitches per round).
Decrease Rounds to Shape the Head:
- Begin to decrease from Round 8:
- Round 8: 3 single crochets, 1 decrease.
- Round 9: 1 single crochet, 1 decrease.
- Round 10: Decrease every stitch until you close the opening.
- Begin to decrease from Round 8:
Stuff the Head:
- Use scrap yarn or fiberfill as stuffing before closing completely.
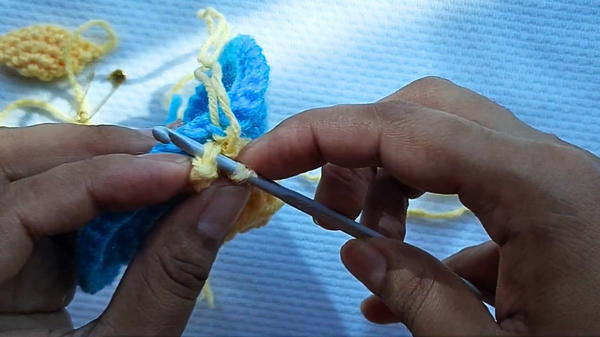
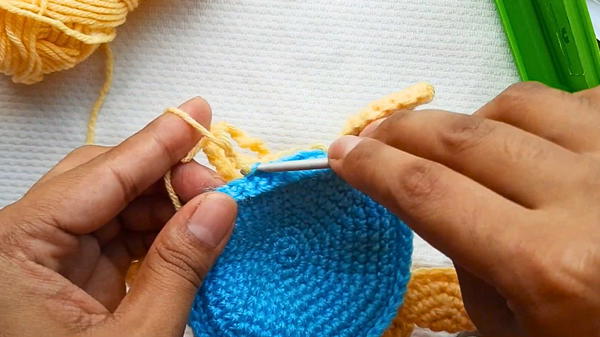
E. Assembling the Turtle
Attach the Flippers and Head:
- Use matching yarn and single crochet to join the front and rear flippers to the shell.
- Position the head and join it the same way.
Create an Opening for the Pouch (Optional):
- Chain 31 stitches where you want the opening and skip a section of stitches.
- Resume single crochets around the shell.
Optional Details:
- Add a small slip knot loop as a handle.
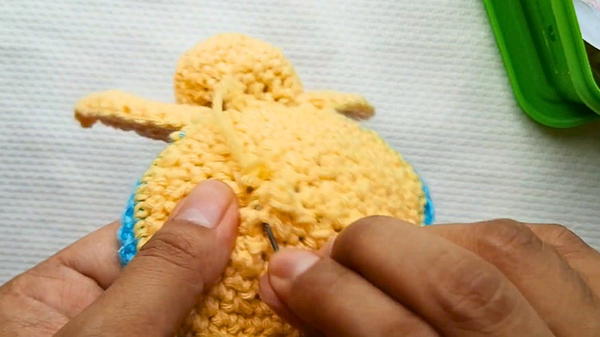
Add Eyes:
- Create embroidered eyes using yarn and a needle. Wrap the yarn twice to form knots, then secure.
- Create embroidered eyes using yarn and a needle. Wrap the yarn twice to form knots, then secure.
4. Special Features
- Functional Storage: Can store earbuds, small accessories, or even tiny gifts.
- Customizable: Vary the yarn colors and sizing for unique designs.
- Realistic Design: Includes flippers, a shell, and a cute head, resembling a real turtle.
5. Level of Difficulty
Beginner-Friendly: Uses basic stitches (magic circle, single crochet, increases, and decreases) with simple shaping techniques.
6. Tutor’s Suggestions
- Use a Stitch Marker: Since there are no slip stitches to end rounds, stitch markers help track rows.
- Take Your Time with Assembly: Carefully position flippers and the head for symmetry.
- Weave Ends Before Assembly: This can save time and reduce mess during assembly.
7. Uses of the Turtle Pouch
- Storage: Ideal for small items like lip balms, earbuds, or trinkets.
- Gifting: Makes for a thoughtful, handmade gift.
- Decorative Item: Cute as a display piece on desks or shelves.
8. Tip
For a sturdy and shapely pouch opening, consider using a tighter tension when crocheting the chain section for the pouch access.
9. Conclusion
The crochet turtle pouch is a fun and functional project that combines creativity and practicality. Whether for personal use or gifting, it’s a delightful handmade accessory that’s both unique and charming.


