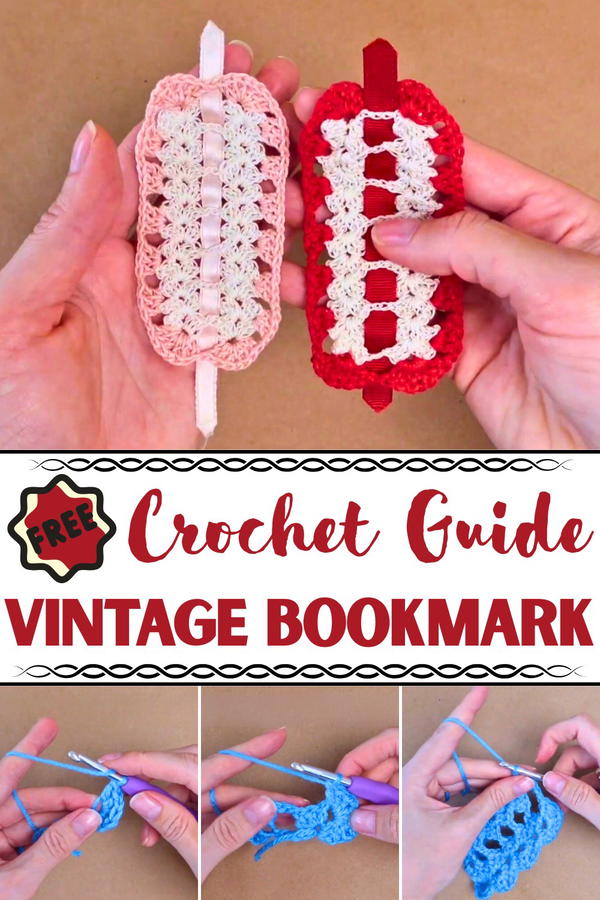
Mark your pages with charm using this Free Crochet Vintage Bookmark Pattern, perfect for adding a playful touch to your favorite reads.
Before digital bookmarks and e-readers, thoughtful readers relied on tangible keepsakes to mark their favorite passages—often handmade and full of charm. This vintage-style piece brings that sentiment into today’s world with elegance and practicality. Featuring a delicate stitch structure and soft finish, the Free Crochet Vintage Bookmark Pattern offers a refined way to personalize the reading experience. It’s more than just a placeholder; it’s a graceful companion for paperbacks, journals, or heirloom editions.
Make a Chic Vintage Bookmark with This Free Crochet Pattern and Minimal Yarn
Slim enough to rest comfortably between pages without wear, yet sturdy enough to last through repeated use, its structure balances function with quiet beauty. The lace-like detail adds texture without bulk, making it ideal for thoughtful gifting or personal indulgence. From literature lovers to students and note-takers, this bookmark fits naturally into any reading routine.
Whether shared in a book club swap or tucked inside a letter, it carries a timeless feel that readers of any age can appreciate. With every stitch offering both durability and charm, this piece transforms a simple object into a lasting accessory. Keep one in your favorite novel or make several to share, its vintage touch turns every read into a more mindful experience.
Materials Required
- Yarn: Lace-weight yarn (as suggested by Aunt M) for a delicate finish; worsted-weight yarn is used in the demonstration.
- Hook: A 5 mm hook (H hook).
- Ribbon: 1 cm or ¼ inch wide, depending on the bookmark’s size.
- Scissors: For trimming the edges of the ribbon.
Step-by-Step Instructions
1: Beginning the Bookmark
Start with a slip knot and chain 8.
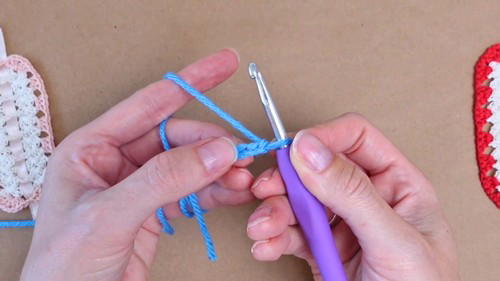
- Ensure chain tension is consistent, as tight chains can affect the project’s outcome.
- Adjust by stretching your chain if necessary.
Work a double crochet stitch into the third chain from the hook.
Add two more double crochets into the same chain space.
Chain 1.
Work three more double crochets into the same space.

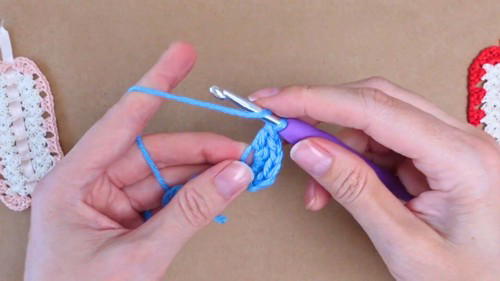
2: Second End of the Bookmark
- Chain 2 and locate the last chain (or the first chain from the starting row).
- Work three double crochets, chain 1, and three more double crochets into the same chain space.
- Chain 2 and turn the work.
3: Building the Main Pattern
- Begin working into the chain 1 space created from the previous row:
- Add three double crochets, chain 1, and three double crochets into the space between the six double crochets.
- Chain 2 and move to the next chain 1 space, working the same pattern.
- Repeat this process until you achieve the desired bookmark length (recommended: 12 rows).
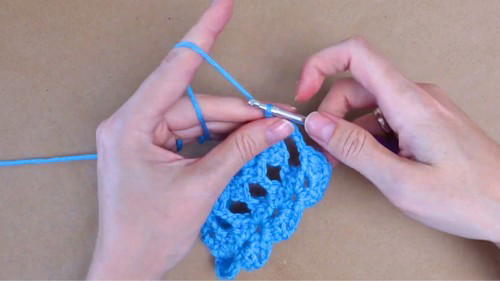
4: Finishing the Bookmark Base
- Skip the chain 2 process for the final row.
- Change to a different color if desired for the trim.
Completing the Trim
1: Top Section
- Work into the chain 1 spaces from the previous row:
- Add three double crochets, chain 1, and three double crochets in each space.
- Chain 1 and move to the next chain 1 space; repeat the same pattern.
2: Sides of the Bookmark
- Work into the chain 2 spaces along the sides of the bookmark:
- Chain 1, then work three double crochets into each chain 2 space.
3: Repeat for All Edges
- Continue working around the bookmark’s edges using the same technique, finishing with a slip stitch into the first double crochet at the top.
- The base of the bookmark is now complete.
Adding the Ribbon
- Select a ribbon that matches the size of your bookmark.
- Weave the ribbon through the center of the bookmark, following an over-under pattern.
- Trim the ribbon at an angle for an elevated look.
Special Features
- Timeless Design: The vintage crochet bookmark gives a nod to classic lace patterns for a refined and delicate appearance.
- Personalization: Customize with ribbon colors, yarn types, and trim details per preference.
- Practical Use: Mark your books with elegance and pass on unique handmade gifts to fellow readers.
Tutor’s Suggestions
- Yarn Choice: Aunt M’s method uses lace-weight yarn for a delicate finish, but worsted-weight yarn is recommended for beginners as it is easier to work with. Shift to finer yarns once comfortable.
- Consistency: Pay attention to chain tension to avoid pulling and distortion in the finished piece.
- Focus on Simplicity: The tutor emphasizes using the basics of double crochet stitches and chain spaces, keeping it accessible for crocheters of varying skill levels.
Level of Difficulty
This project is suitable for beginners who are comfortable with basic crochet techniques like double crochet and slip stitch. Though the lace-weight version may pose a challenge, working with larger yarn first provides a good starting point.
A Handy Tip
Use stitch markers to identify chain spaces and track rows as you progress, especially if you’re a beginner or working on a longer bookmark. It minimizes mistakes and keeps your pattern aligned.
Conclusion
Delicate yet versatile, vintage crochet bookmarks are a beautiful way to enhance the charm of your reading experience or provide thoughtful, handmade gifts for loved ones. Though lace crochet might seem intimidating for beginners, the tutorial ensures accessibility by demonstrating with thicker yarn. Once mastered, you can confidently tackle finer yarns and customize your bookmarks to match your unique style.


