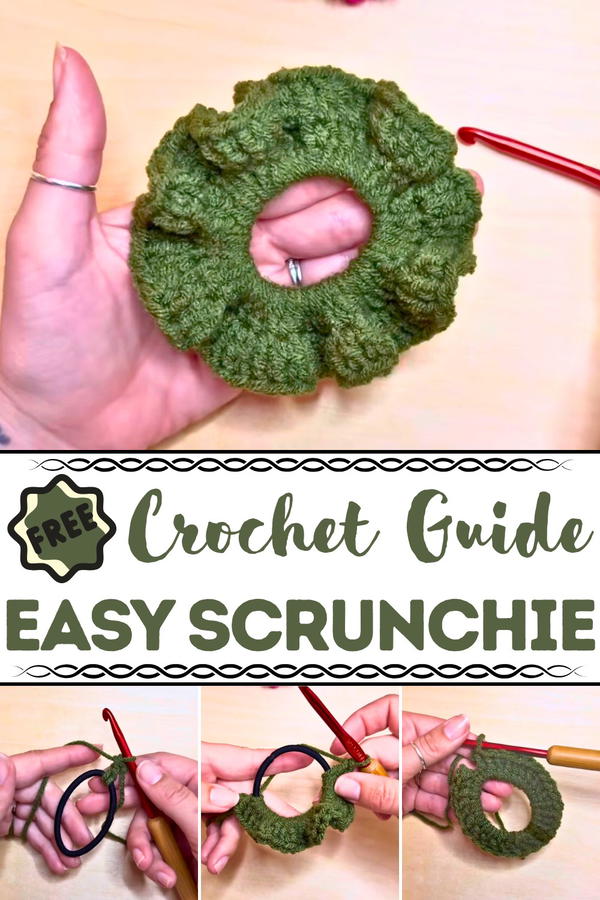
Jump into a whirl of color and creativity with our Free Crochet Scrunchie pattern, turning every hairstyle into a playful fashion statement.
A trendy and practical accessory, crochet scrunchie has made a delightful comeback, offering a perfect marriage of style and function. For those who enjoy handmade projects, crochet scrunchies open up endless possibilities for customization. This particular free crochet pattern stands out for its ease of execution and forgiving design, making it an excellent choice for beginners while still being fun for more experienced crocheters. Ideal for leftover yarn in a variety of weights and textures, it lets you transform small scraps into charming, rippled accessories for your hair or even as stylish wrist adornments.
Quick & Easy Free Crochet Scrunchie Ideas for Beginners
Not only is this project quick and hassle-free, but it's also incredibly versatile. These scrunchies are perfect for everyday wear, festive occasions, or even as thoughtful handmade gifts. Their benefits go beyond looking good, they’re gentle on your hair, reducing breakage compared to tighter elastic bands.
With the ability to experiment with colors, yarn types, and stitch counts, each piece feels like a small, personalized triumph. Whether you prefer something subtle and understated or bold and textured, this crochet scrunchie pattern allows you to upgrade both your skillset and personal style.
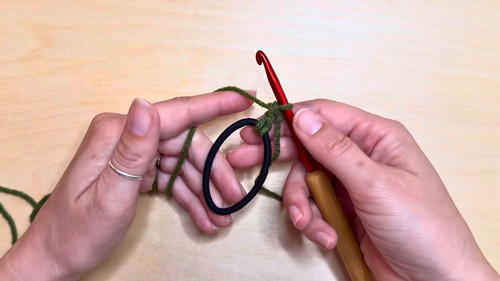
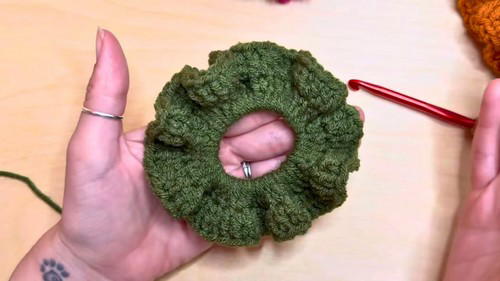
The pattern begins with a basic hair tie, forming the foundation for the scrunchie. Starting with a slipknot and a standing double crochet (or a chain-three alternative), the first round is built by working double crochets entirely around the hair tie.
It’s important to add enough stitches—typically between 40 and 60—to produce the desired ripple effect. A smaller stitch count creates subtle folds, while more stitches result in dramatic, voluminous waves. The flexibility of the pattern means you can adjust it to your liking, making each scrunchie entirely unique.
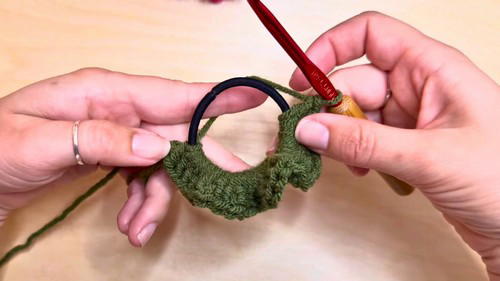
In the second round, the key to creating the iconic fullness lies in doubling the stitches. By working two double crochets into each stitch, you add layers and texture, giving the scrunchie its characteristic bouncy appearance.

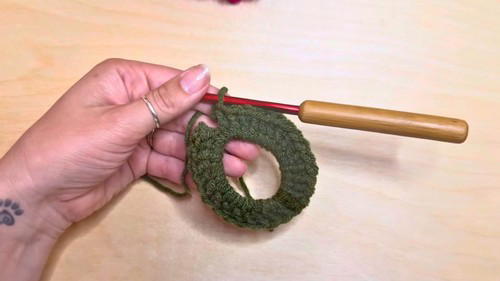
The ripple effect grows with every stitch, and the forgiving nature of the pattern means even slight imperfections blend beautifully into the design. You complete the round with a slip stitch for a clean finish, followed by weaving in the ends. A vertical weave helps maintain the scrunchie's stretchiness.
Materials Needed
To get started, you’ll need the following:
Yarn Options:
- Textured Yarn: Examples include Homespun yarn in "Tulips" or Bernat chunky textured yarn in "Fall Shades." These are great for adding depth and color.
- Worsted 4-weight yarn: For clearer stitch definition, such as the yarn in "Burnt Pumpkin" from Hobby Lobby.
Hook:
- The recommended hook size varies depending on the yarn used. For the tutorial:
- 5.5 mm was used for all projects despite some yarn suggesting a different size.
- Hook size can be flexible based on your preference and the yarn’s texture.
- The recommended hook size varies depending on the yarn used. For the tutorial:
Hair Ties:
- Any kind will work—whether thin ones, t-shirt-style fabric ties, or simple hair ties from a dollar store.
Other Tools:
- Yarn needle for weaving in ends.
- Scissors.
Special Features of This Project
- Beginner-Friendly Design:
- No need for precise stitch counting. Minor errors are concealed naturally within the rippled, scrunched-up design.
- Flexible Yarn and Hook Choices:
- Any yarn weight or texture can be used for a variety of looks. Textured yarns are especially suited for this project since stitch definition isn’t as critical.
- Customizable Ripple Effect:
- The number of double crochets in each round determines the ripples’ density. You can adjust for your preferred look.
- Quick and Fun:
- The project is relatively fast, making it ideal for gifting or experimenting with different colors and textures.
Tutor’s Suggestions
- Ideal Yarns for Beginners:
- The tutor struggles with textured yarns in other projects because they hide stitch definition. However, they recommend textured yarn for scrunchies since any missed stitches are not noticeable.
- Experiment with Ripples:
- Customize the ripple intensity by adjusting the number of initial double crochets. Use even numbers, multiples of 5 or 10, or any number that gives you your desired look.
- Flexible Stitch Counting:
- Stitch counting is optional. Add as many as you need to fully cover the hair tie and create the ripples.
- Weaving in Ends:
- Weave the yarn ends vertically rather than horizontally to ensure the scrunchie stretches properly.
- Make it less tedious by setting weaving ends as a fun activity (e.g., pair with music, a show, or a timer for motivation).
Uses and Applications
- Hair Accessory: Perfect for ponytails, buns, or making a simple hairstyle pop.
- Gifts: Make them for birthdays, holidays, or handmade swaps.
- Scrap Yarn Projects: A wonderful way to use yarn leftovers in varying colors and textures.
Extra Tip
For extra durability, make sure your double crochets are tight enough to fully cover the hair tie. This ensures a neater finish and maximizes the accessory's longevity.
Step-by-Step Instructions
This tutorial walks you through how to crochet a scrunchie from start to finish. It’s beginner-friendly, quick, and fun—perfect for personal use or as a thoughtful handmade gift. With the flexibility to adapt the design to different yarn types and styles, this project is both creative and forgiving for errors.
Conclusion
Crocheting a scrunchie is a rewarding and highly customizable project suitable for all skill levels. With a forgiving pattern, the ability to play with different yarns, and the sheer versatility of the finished product, this makes an excellent go-to project for both beginners and experienced crafters. Dive into the creative process and enjoy showcasing your unique style!


