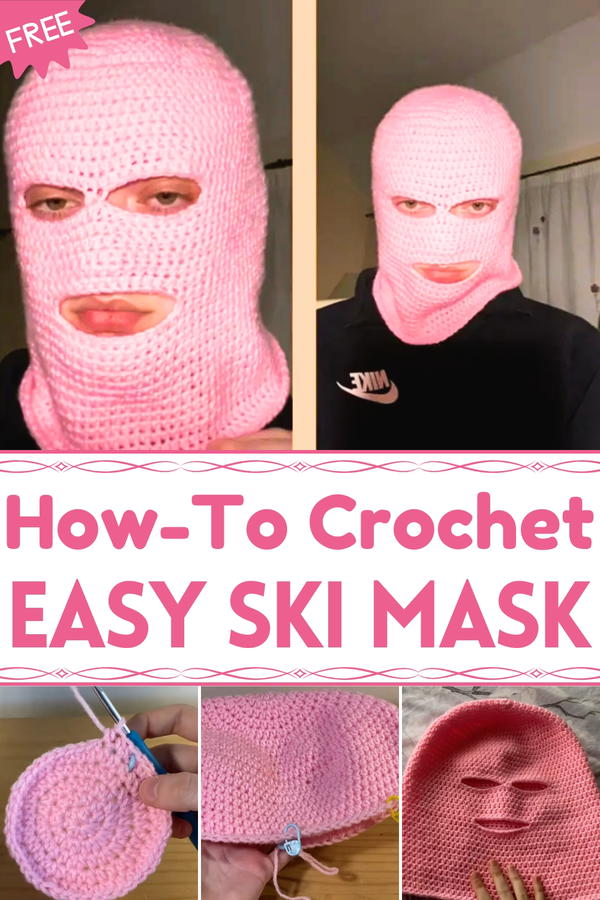
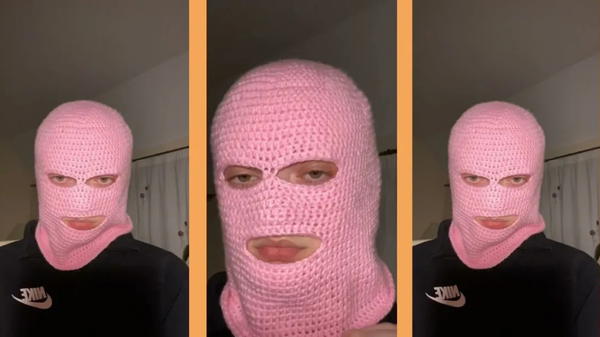
Hit the cold in style with this Crochet Ski Mask pattern, a bold design that blends warmth, comfort, and flair for winter days or fun outings.
Cold weather often calls for accessories that balance warmth with practicality, and few items meet that need as effectively as a ski mask. The Crochet Ski Mask pattern delivers both comfort and protection, offering full coverage while remaining soft and breathable. Its snug fit helps shield the face, head, and neck from harsh winds, making it ideal for winter sports, outdoor adventures, or simply braving frosty mornings. The flexibility of yarn ensures ease of movement, while the carefully placed openings provide comfort without restricting visibility or breathability.
Edgy Crochet Ski Mask for Unique Styling
Lightweight yet insulating, it keeps warmth in without feeling bulky, allowing it to be worn for extended periods. Beyond function, it carries a versatile appeal, available in subtle tones for a classic look or bold colors for a playful style statement. Its durability makes it a reliable companion through multiple seasons, with easy care that ensures long-lasting use.
Whether gifted to outdoor enthusiasts or kept as a personal winter essential, this mask balances utility with comfort in a way few accessories can. The Crochet Ski Mask pattern is more than just seasonal wear—it is a dependable layer of warmth and resilience for life’s coldest days.
Materials Needed
To complete the crochet ski mask, you will need the following materials:
- Yarn: A few skeins of yarn in your preferred color; the tutorial doesn't specify the type, but a medium-weight yarn would be suitable.
- Crochet Hook:
- The video does not specify a size, but a commonly used size for similar projects is a 5mm hook.
- Stitch Marker: Essential, especially for beginners, to keep track of stitch counts and row beginnings.
- Scissors: For cutting yarn.
- Tapestry Needle: For weaving in ends.
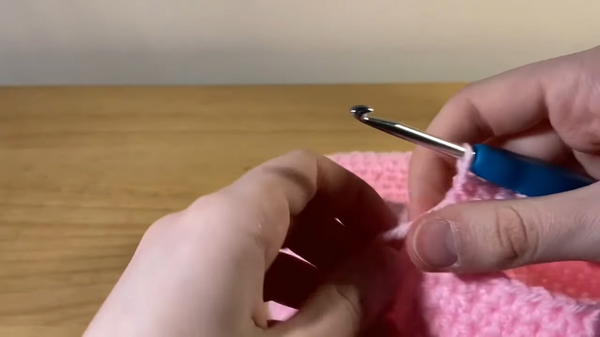
Step-by-Step Instructions
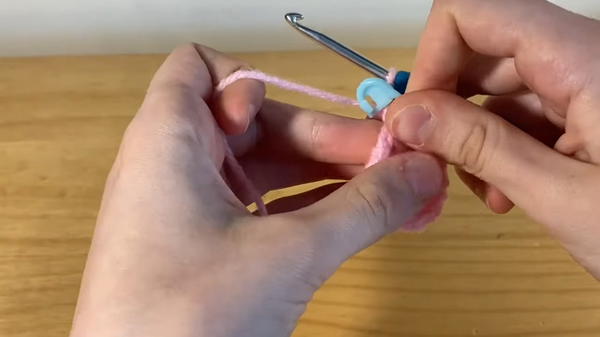
Step 1: Create the Foundation
- Make a Slip Knot: Start with a standard slip knot.
- Chain Four:
- Chain four stitches.
- Form a Ring:
- Insert your hook into the first chain, ensuring both loops are on the hook.
- Pull the yarn through the first two loops, then the last loop, to create a slip stitch ring resembling a small donut with a center hole.
- Half Double Crochets:
- Yarn over, insert the hook into the center hole, yarn over again, pull through the loop, yarn over, pull through all three loops to complete a half double crochet (HDC).
- Perform this process to make eight half double crochets in the ring.
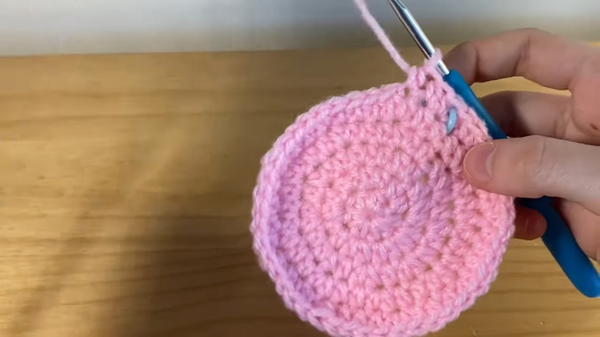
2: Build the Body of the Ski Mask
- Tighten the Center:
- Pull the tail end of the starting yarn to close the center hole.
- Start Second Row:
- Place two half double crochets in each stitch from the previous row. Use a stitch marker to track the start of the row.
- Place two half double crochets in each stitch from the previous row. Use a stitch marker to track the start of the row.
- Third Row Pattern:
- Follow a pattern of one HDC followed by an increase in the next stitch. Continue this pattern around the row.
- Fourth Row Pattern:
- Alternate between two HDCs and one increase (two HDCs in the same stitch).
- Fifth Row Pattern:
- Alternate between three HDCs and one increase.
- Sixth Row Pattern:
- Alternate between four HDCs and one increase.
3: Continue to Grow the Mask
- Increase Rows as Needed:
- For rows seven through ten, continue increasing the number of HDCs between increases. For example, row seven uses five HDCs, row eight uses six, and so on.
- Switching to Normal Half Double Crochets:
- At row eleven, switch to making normal half double crochets (without increases) in the back loops only for one row.
- For rows twelve to twenty, work normal half double crochets through both loops.

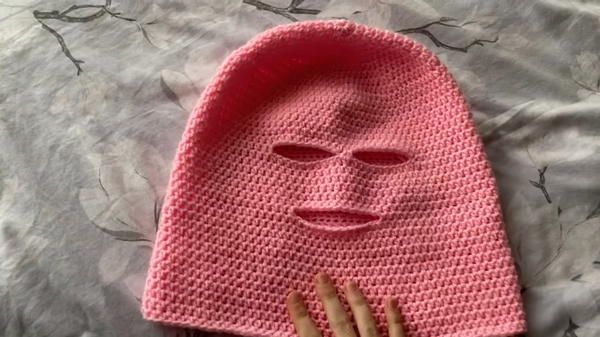
4: Form Eye Holes
- Determine Eye Hole Positions:
- Place stitch markers 34 stitches to the right and left of the row's starting point, leaving 22 stitches in the middle for the eye holes.
- Create Eye Hole Spaces:
- Work HDCs up to the first stitch marker, then chain ten and skip to the next marker, joining with a slip stitch (or preferably a HDC for smoother results). Repeat for the second eye hole.
- Continue HDC Rounds:
- Crochet HDCs in continuous rounds, including through the chain stitches of the eye holes.
- Crochet HDCs in continuous rounds, including through the chain stitches of the eye holes.
5: Form the Nose Hole and Complete the Mask
- Form Nose Hole:
- After a few more rows of HDCs, mark stitches 35 apart to form the nose hole, similar to eye hole formation but with a chain 12 space.
- Finish the Lower Part:
- Crochet 14 rows of HDCs to complete the lower part of the mask.
- Weave in Ends:
- Weave in all yarn ends or tuck away any excess pieces.
- Weave in all yarn ends or tuck away any excess pieces.
Special Features
- Custom Fit: The mask is adjustable as you go, ensuring a perfect fit to various head sizes by trying it on throughout the process.
- Versatile Design: Incorporates both standard and back-loop only stitches for texture and fit.
- Eye and Nose Holes: Specially designed spaces for eyes and nose to ensure comfort and functionality.
Level of Difficulty
Beginner to Intermediate: The pattern is detailed enough for beginners to follow along but includes steps (like creating and positioning eye and nose holes) that require careful attention.
Tutor’s Suggestions
- Stitch Markers: Use stitch markers to keep track of rows and increases, significantly simplifying the process.
- Try On Frequently: To ensure a perfect fit, try on the mask at different stages.
- Adjust Stitches: Feel free to adjust the chain lengths or number of rows to better fit your facial structure.
Uses and Benefits
- Warmth and Comfort: Perfect for cold weather, keeping the face warm while still allowing visibility and breathability.
- Fashion Statement: A unique, handmade accessory that can reflect personal style through color and design variations.
- Gift Idea: Makes a thoughtful and personalized gift.
Tip
For the best fit, use a flexible tape measure to measure around your head and adjust the initial stitches and increases accordingly. This ensures that the ski mask fits perfectly and remains comfortable throughout extended use.
Conclusion
The crochet ski mask patteren provides a thorough, engaging guide to crocheting a versatile and stylish winter accessory. With detailed instructions and useful tips, this pattern is accessible to beginners and offers room for creative adjustments. Whether for yourself or as a gift, this project is both practical and enjoyable, blending function with fashion seamlessly.


