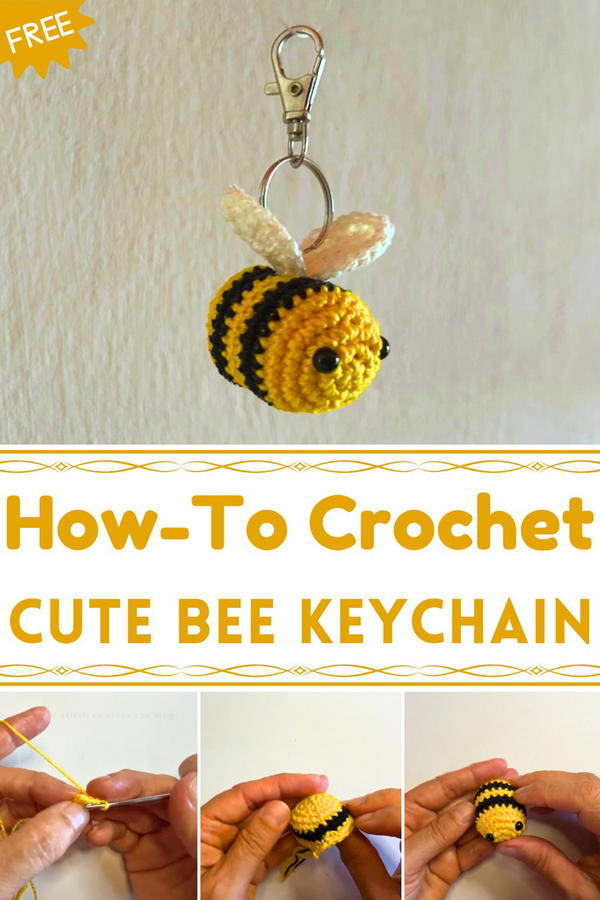
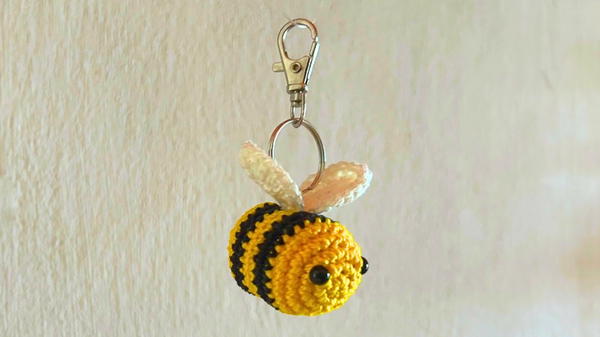
Buzz with charm using this Free Crochet Bee Keychain Pattern, ideal for making adorable handmade accessories that add a playful touch to keys or bags.
Bees have long fascinated people for their industrious nature and vibrant appearance, symbolizing hard work, community, and the sweetness of life. Capturing that charm in a miniature form, the Free Crochet Bee Keychain Pattern transforms these beloved insects into a playful, handheld accessory that combines whimsy with practicality. Its striped body, tiny wings, and cheerful expression create a lively charm that makes this keychain instantly eye-catching, while the soft yarn ensures it is pleasant to hold and carry.
Playful Tiny Crochet Bee Keychain Pattern to Gift Friends
This keychain is both functional and delightful. It helps keep keys organized while adding a touch of personality to bags, backpacks, or purses, making it easy to spot essentials at a glance. Its lightweight construction ensures it won’t weigh down personal items, and the sturdy attachment provides security for everyday use.
Beyond practicality, the bee keychain makes a thoughtful and charming gift, perfect for friends, family, or colleagues who appreciate handmade details and symbolic meaning. Creating this tiny companion also offers a satisfying crafting experience, resulting in a piece that spreads joy long after it’s finished. The Free Crochet Bee Keychain Pattern turns a familiar insect into a versatile accessory, combining cuteness, functionality, and a touch of playful energy that brightens daily routines.
Materials Required
- 100% Cotton Yarn: Three colors are required — yellow (main body), black (stripes), white (wings). Ensure the yarn is lightweight for portability.
- 2 mm Crochet Hook: Choose the hook size based on your yarn’s weight for precision and neat stitches.
- Stitch Markers: Essential for keeping track of rounds.
- Safety Eyes: Small safety eyes help add personality and charm to the bee.
- Keyring: A simple hardware attachment for turning your bee into a keychain.
- Polyfill: Soft stuffing material to give shape and volume to the bee.
- Scissors: For cutting yarn ends and tails.
- Tapestry Needle: Useful for sewing, weaving in ends, and attaching the wings.
Step-by-Step Instructions
1. Crochet the Bee Body
Round-by-Round Breakdown:
Round 1:
- Begin with a magic ring and chain 1.
- Work 6 single crochets (sc) into the ring.
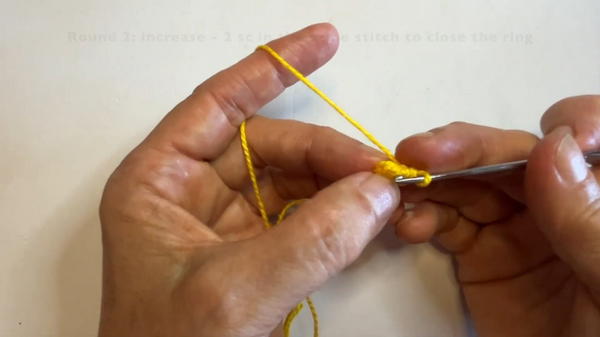
Round 2:
- Work an increase: Place 2 sc in each stitch around (12 stitches total).
- Close the ring and place a stitch marker in the first stitch for tracking.
Round 3:
- Alternate 1 sc, 2 sc in the next stitch across the round (18 stitches total).
Round 4:
- Alternate 1 sc, 1 sc, 2 sc for the round (24 stitches total).
Round 5:
- Work 1 sc in each stitch with no increases (24 stitches total).
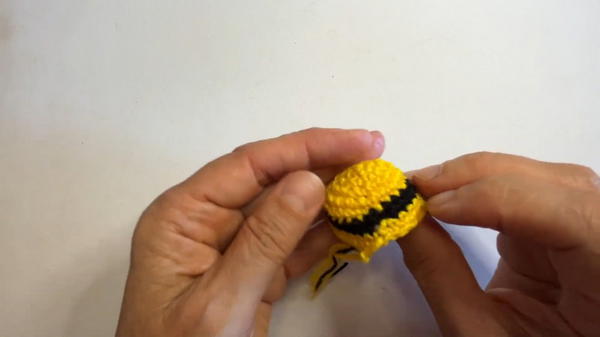
Round 6 (Black Stripe):
- Switch to black yarn and crochet 1 sc in each stitch (24 stitches total).
Round 7:
- Slip stitch into the first stitch of the previous round with black yarn.
- Chain 1, work 1 sc in the same stitch, and crochet 1 sc in each stitch all around (24 stitches total). Slip stitch back with yellow yarn.
Round 8:
- Chain 1 and repeat the same process in yellow yarn, creating another round of 24 sc.
Round 9:
- Slip stitch into the first stitch, chain 1, and crochet 1 sc in each stitch all around (24 sc).
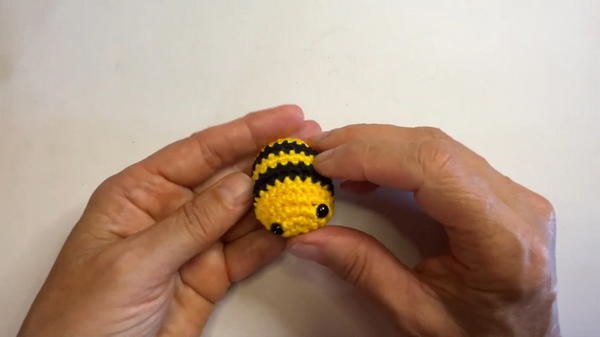
Add the Eyes:
Place safety eyes evenly on the bee’s body, near the front side. Align them so the color joins are at the back.
Rounds 10 & 11 (Black Stripe):
- Switch back to black yarn and crochet 1 sc in each stitch around for 2 rounds (24 stitches total).
- Switch back to black yarn and crochet 1 sc in each stitch around for 2 rounds (24 stitches total).
Round 12:
- Change back to yellow yarn and crochet 1 sc in each stitch (24 stitches total).
Round 13:
- Begin decreasing to shape the bee:
- Alternate 1 sc, 1 sc2tog (single crochet two stitches together) throughout the round (18 stitches total).
- Begin decreasing to shape the bee:
Round 14:
- Continue decreasing: Alternate 1 sc, 1 sc2tog (12 stitches total).
Round 15:
- Work 6 sc2tog, leaving 6 stitches in total.
Finishing the Body:
- Pull up a long yarn tail, cut it, and sew around the closing edge.
- Stuff the body with polyfill before stitching it closed.
2. Crochet the Wings
Each wing is crocheted separately:
Wing Instructions:
Round 1:
- Start with a magic ring and chain 1.
- Work 10 half-double crochets (hdc) into the ring.
Round 2:
- Chain 1 and work the following sequence:
- 2 hdc, 2 hdc in next stitch × 2, 2 double crochets (dc), 2 treble crochets (tr) × 2, 2 dc, 2 hdc in next 3 stitches.
- Slip stitch into the first hdc and pull up a long yarn tail.
- Chain 1 and work the following sequence:
Weave in Ends:
- Complete the wing by weaving in any loose ends using a tapestry needle.
- Repeat the process for the second wing.
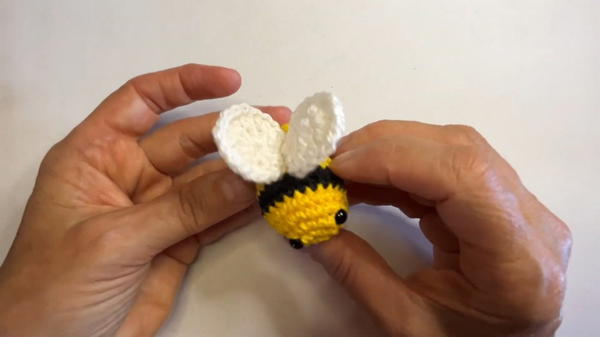
Attach the Wings:
- Position the wings symmetrically on the center of the bee’s back.
- Use the long yarn tails to sew them securely. If needed, adjust the wings slightly for a better appearance.
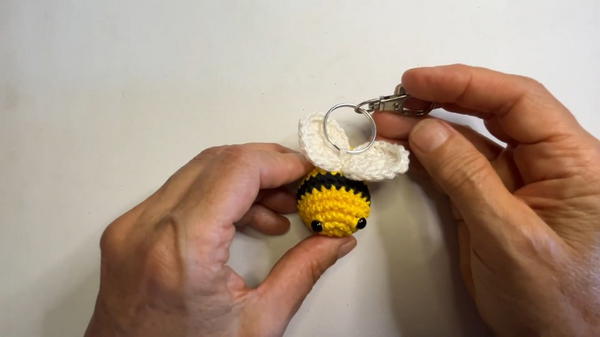
3. Attach the Keyring
- Tie or sew the keyring onto the top of the bee using your tapestry needle or crochet hook. Ensure it’s firmly attached to prevent any slipping or tearing.
Special Features
- Compact and Portable: The small size makes this bee perfect for a keychain or bag accessory.
- Personalizable: You can select different yarn colors to create unique variations.
- Durable Design: Made with 100% cotton yarn for longevity and functionality.
Tutor’s Suggestions
- Use Safety Eyes Carefully: Position them before securely fastening, as safety eyes are difficult to adjust once attached.
- Take Your Time with the Magic Ring: If you’re new to magic rings, practice beforehand to ensure a tight and neat center.
- Stuff Firmly but not Overly: The polyfill should give the bee shape without distorting its stitches.
Level of Difficulty
This project is beginner-friendly, as it uses basic stitches such as single crochet (sc), half-double crochet (hdc), and simple increases and decreases. Perfect for those looking to learn amigurumi techniques!
Uses
- Keychain: Add to your keys for a cute handmade companion.
- Bag Decoration: Attach to purses, backpacks, or handbags.
- Gift: A fun and personalized gift for friends or family.
Pro Tip
To make the wings sturdier, double up the white yarn or crochet two identical wings and sew them together before attaching. This adds structure for a neater, cleaner look.
Conclusion
The Crochet Bee Keychain is a simple and rewarding project that combines practicality with charm. Crocheting this adorable bee allows you to explore beginner-friendly amigurumi techniques while creating something unique and customizable. With its compact size, versatility, and whimsical design, this bee is perfect for personal use or as a thoughtful handmade gift.


