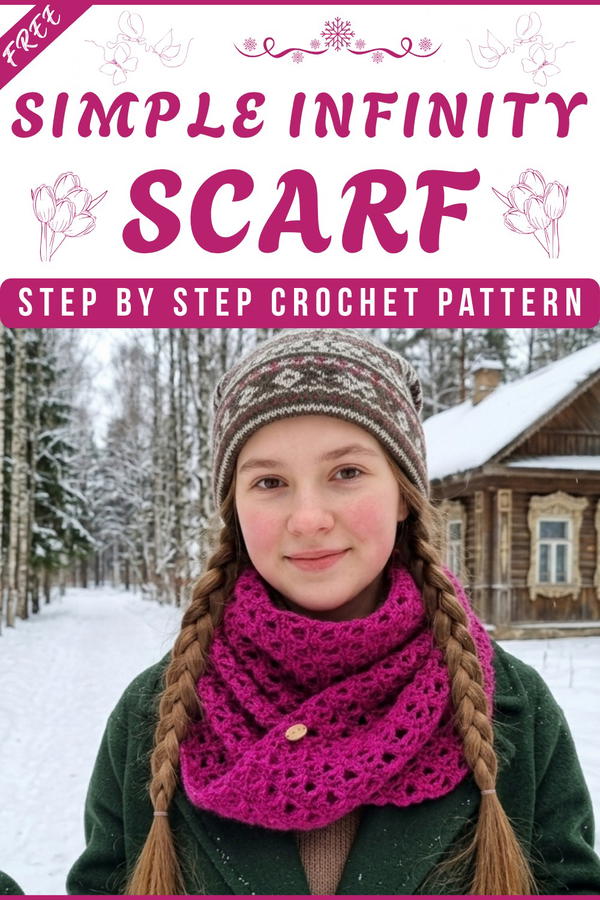
Wrap yourself in comfort with this free infinity scarf crochet pattern, offering a stylish accessory that’s perfect for any season and effortlessly chic.
Finding something that keeps you warm, stylish, and comfortable all at once can feel impossible, especially when scarves keep slipping or don’t match your outfit. That’s where the free crochet infinity scarf pattern solves it all. This scarf stays securely in place while wrapping you in softness and warmth. Its clean, elegant design suits any occasion, whether you’re heading out for a chilly morning walk or need something cozy for a casual day out.
Free Infinity Scarf Pattern: Stay Warm & Stylish
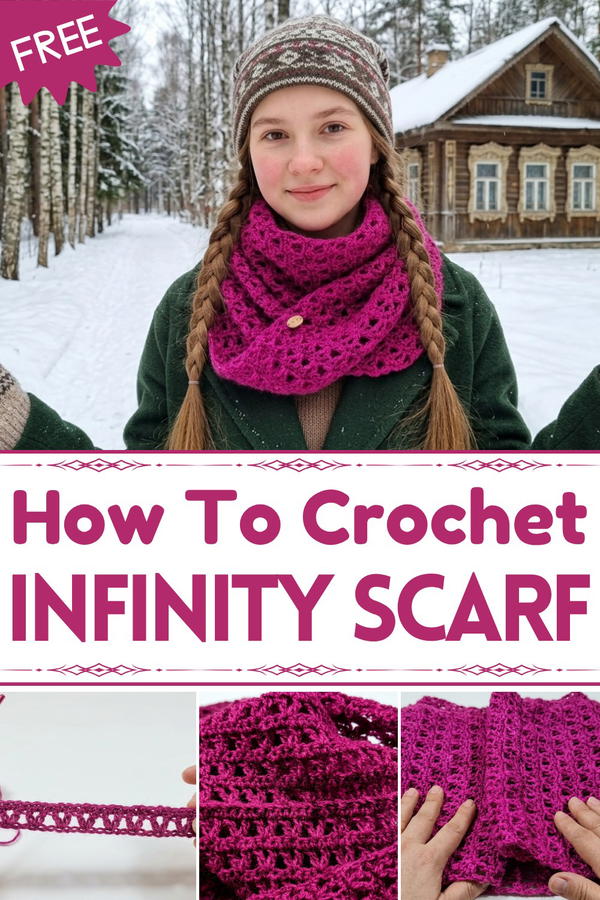
The scarf’s textured appearance adds character and charm, making it a versatile piece that fits effortlessly with your wardrobe. You can choose colors that reflect your style, adding a personal touch to every stitch. Lightweight yet snug, the infinity scarf delivers just the right amount of warmth, making it a practical choice for any season. Whether gifted to a loved one or made for personal comfort, it’s a timeless accessory that combines convenience with beauty in every wear.

Infinity Scarf – Simple V‑Stitch Pattern
Skill Level
Advanced Beginner to Intermediate
You should be comfortable with:
- Working into chains
- Turning rows
- Working double crochet and single crochet
- Seaming with a yarn needle
Materials
Yarn
- Suggested: Lana Gatto “Real 40” or similar
- Fiber: 60% high‑quality acrylic / 40% wool
- Ball size: 100 g ≈ 480 m (very high yardage)
- Weight: fine/light (between fingering and sport; choose hook size accordingly)
Crochet Hook
- Recommended: 4.5 mm to obtain a soft, drapey fabric
- If using a different yarn weight, choose a hook suitable to your yarn, on the larger side for good drape.
Notions
- Yarn needle (tapestry needle) – for seaming and weaving in ends
- Scissors
- Measuring tape – to check width and length
Finished Size (as in video)
- Width: ~25 cm (≈ 10")
- Length (before joining into a loop): ~130 cm (≈ 51")
- Long enough to wrap twice around the neck without excessive bulk.
You can easily customize both width and length (see notes below).
Key Abbreviations (US Terms)
- ch – chain
- sc – single crochet
- dc – double crochet
- sl st – slip stitch
- st – stitch
- sk – skip
- rep – repeat
- RS – right side
- WS – wrong side
Special Notes
- The pattern uses a multiple of 3 chains for the foundation chain.
- The main stitch pattern consists of alternating rows of:
- Row of V‑stitches (made with dc, ch 1, dc in the same stitch)
- Row of sc
- Very important: Each row of V‑stitches starts and ends with a “half V” (a single dc at each edge) to keep the sides neat and straight.
- Turning chains:
- At the beginning of a V‑stitch row, you will not use a full ch‑3 as a dc; instead, you work a ch 1 + dc to simulate the first dc on repeat rows (explained below).
- At the beginning of sc rows, simply ch 1 (does not count as a stitch).
Gauge
Exact gauge is not critical, but for reference (with fine yarn and 4.5 mm hook):
- Approx. 22–24 dc stitches × 10–12 rows = 10 × 10 cm (4" × 4")
- You may adjust hook size to get about 25 cm width with a multiple of 3 starting chain.
Customization
Width:
- Foundation chain = multiple of 3 until you reach your desired width (e.g. around 25 cm).
- Sample in video: 42 chains → approx. 25 cm.
Length:
- Work pattern repeats until scarf measures about 130 cm, or longer/shorter as preferred.
- The scarf is joined at the ends to form a loop.
Stitch Pattern Overview
- V‑Stitch (V):
- In this pattern: (dc, ch 1, dc) in the same stitch.
- “Half V” at edges:
- Just 1 dc (no ch‑1, no second dc) used at the very beginning and end of a V‑stitch row.
Pattern Instructions
1. Foundation Chain
- Make a slip knot.
- Ch 42 (or any multiple of 3 to your desired width; 42 chains ≈ 25 cm with the given yarn and hook).
If using a different yarn/hook, chain in multiples of 3 until the length of the chain equals your desired scarf width.
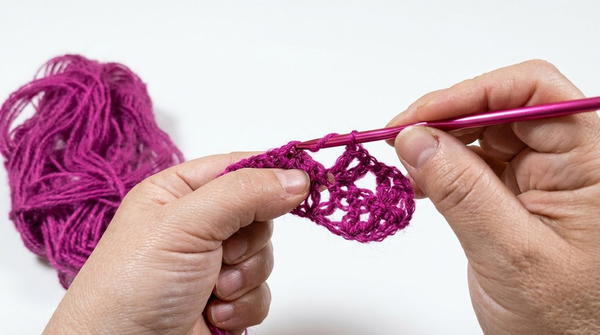
2. Row 1 – Establish V‑Stitches (on the foundation chain)
This first row is slightly different because it is worked into the initial chain.
Yarn over, count 4 chains from the hook.
- Work 1 dc in the 4th ch from the hook.
- This is your first edge dc (“half V” at the beginning).
Ch 1, then dc into the same chain (4th from hook).
- You now have a V‑stitch (dc, ch 1, dc) in that chain, but note that the teacher conceptually considers it:
- a starting dc, plus
- a V (dc, ch 1, dc) in the same spot.
- You now have a V‑stitch (dc, ch 1, dc) in that chain, but note that the teacher conceptually considers it:
Skip 2 chains, then in the next chain work:
- (dc, ch 1, dc) – this is your next V‑stitch.
Repeat step 3 across the row:
- Skip 2 ch, (dc, ch 1, dc) in next ch,
- until you reach the last 2 chains.
At the end of the row, you will have 2 chains remaining:
- Skip 1 chain, and in the last chain work 1 dc only.
- This is your edge dc at the end (final “half V”).
You now have:
- A row consisting of:
- 1 dc at the beginning,
- several V‑stitches across the row,
- 1 dc at the end.
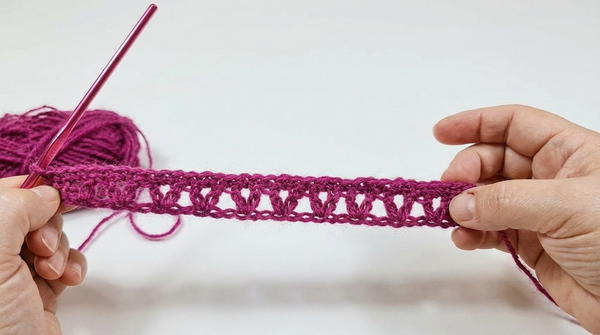
3. Row 2 – Single Crochet Row
Ch 1, turn your work.
Work 1 sc into the first dc (edge dc) of the previous row.
For each V‑stitch across the row:
- 1 sc in the first dc of the V
- 1 sc in the ch‑1 space of the V
- 1 sc in the second dc of the V
- You are placing 3 sc over each V‑stitch group.
At the end of the row, do not forget:
- Work 1 sc into the last edge dc of the previous row (this is easy to miss and would cause decreasing if skipped).
You have now completed the sc row.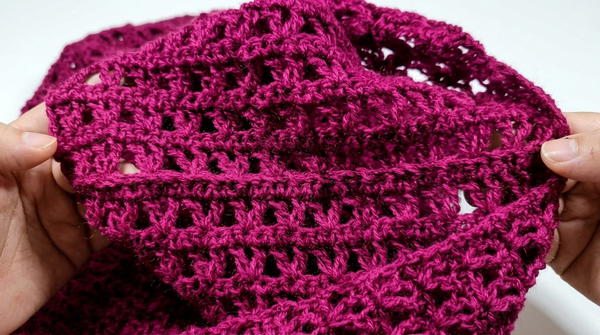
4. Row 3 – V‑Stitch Row on Established Fabric (Repeatable Version)
From this row onward, you are no longer working into chains, but into sc stitches.
Turn, DO NOT ch 3.
- Instead: Insert your hook into the first sc,
- Work 1 sc, then ch 1.
- This “sc + ch 1” combination is used to simulate your first edge dc height (as described in the video; functionally, you can consider: ch 1 plus the sc gives you your edge).
A cleaner, standard approach (recommended for advanced crocheters) is:
- Ch 2 (does not count as a stitch), then dc in the first sc – this gives a classic edge dc.
However, to stay faithful to the transcription, we follow the described method.
Now begin your first V‑stitch of the row:
- Identify the center of each V from two rows below by locating the sc that lies in the ch‑1 space of that V.
- This center sc is where you will place your V in this row.
For each V (from Row 1) across the row:
- Yarn over, insert hook into the sc that corresponds to the center (former ch‑1 space) of the V below,
- Work 1 dc, ch 1, 1 dc in that same stitch – this forms a new V‑stitch.
Move to the next “center sc” corresponding to the next V‑stitch below, and repeat:
- (dc, ch 1, dc) in that center sc.
At the very end of the row:
- After working your last V in the last center sc,
- Work 1 dc into the last sc at the edge (this corresponds to the edge dc of the previous V‑row).
- This produces the final edge dc of the row (another “half V”).
Row 3 is your standard V‑stitch row on fabric and will be repeated throughout the length of the scarf.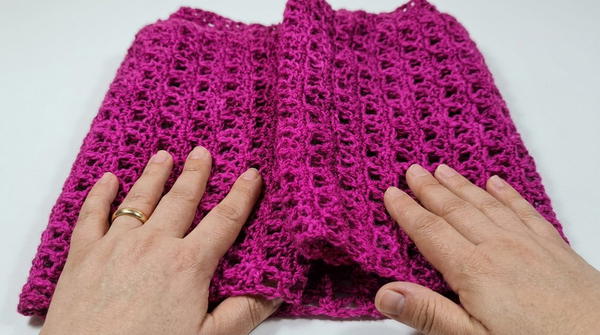
5. Row 4 – Single Crochet Row (Repeat)
Ch 1, turn.
1 sc into the first dc (edge dc) of the previous row.
For each V‑stitch across the row:
- 1 sc in first dc of the V
- 1 sc in ch‑1 space
- 1 sc in second dc of the V
Work 1 sc into the last edge dc at the end of the row.
6. Pattern Repeat
From now on, repeat Rows 3 and 4:
- Row 3: V‑stitch row (edge dc, V‑stitches into center sc of previous V’s, edge dc)
- Row 4: sc row (sc over dc/ch/dc of every V, and over edge dc at each end)
Continue alternating these two rows until the scarf measures approximately:
- 130 cm / 51" in length, or your desired length.
Always end after completing a single crochet row.
This ensures that both ends have the same “sequence” when you sew them together (V‑row followed by sc row), giving a seamless visual join.
7. Finishing the Scarf – Making It an Infinity Scarf
When your scarf has reached the desired length and you have ended with a sc row:
Fasten off:
- After the last sc row, cut the yarn, leaving a long tail for sewing (at least 30–40 cm, 12–16").
- Pull the tail through the last loop to secure.
Prepare to Seam:
- Lay the scarf flat with the WS facing you.
- Align the short ends (the initial foundation edge and the final row edge) neatly together.
Sew the Ends Together:
- Thread the long yarn tail onto your yarn needle.
- Use a mattress stitch or whip stitch:
- Insert the needle through the edge stitches of one side, then through the corresponding edge stitch on the other side.
- Alternate: insert from below on one side, then from above on the other, as the tutor mentions (“once from below, once from above”) to create a nearly invisible seam.
- Continue across until the entire edge is joined.
Secure and Weave In Ends:
- Make a couple of small backstitches to secure the seam.
- Weave in remaining ends on the WS through several stitches and trim excess yarn.
Turn the scarf right side out and smooth the seam; the pattern should look continuous around the circle.
Pattern Correction / Clarifications
The video mentions at the beginning of a repeat V‑row: “enter the first stitch, make a single crochet and a chain to simulate the first dc.”
For clarity and better structure, more experienced crocheters may prefer:At the beginning of every V‑row (except the foundation row), ch 2 (does not count as a stitch), dc in first stitch, then continue working V‑stitches as described.
This avoids ambiguity and is more standard in written patterns, but following the described method still works visually.
When working the sc rows, it is critical not to forget the last edge sc at the end of the row. Skipping this will gradually decrease your stitch count and distort the scarf shape.
Tips
Check Width Before Continuing
- After working the first few rows, measure the width. If it is too narrow/wide, adjust your starting chain by adding or subtracting chains in multiples of 3.
Maintain Edge Consistency
- Make sure each V‑row begins and ends with a single dc at the edges. This keeps the sides neat and straight.
Blocking (Optional)
- Light blocking (especially with wool blend yarn) can open the V‑stitch texture and even out the fabric.
Drape Over Density
- If the scarf feels too stiff, try a larger hook size (e.g., 5.0 mm) to improve drape.
Seam Placement
- When the scarf is worn, the seam is usually not visible, but you can place it at the back of the neck when styling, if you want it hidden completely.
Conclusion
This infinity scarf combines a simple, elegant V‑stitch pattern with a single crochet texture row, making it visually interesting yet relaxing to work. The design is versatile, easily adaptable in width and length, and the fabric is soft and drapey when made with a fine wool‑acrylic blend and a slightly larger hook.


