Style a simple dress with a beaded handbag Free Crochet Pattern for a lined accessory with a soft beige finish and a handy magnetic closure.
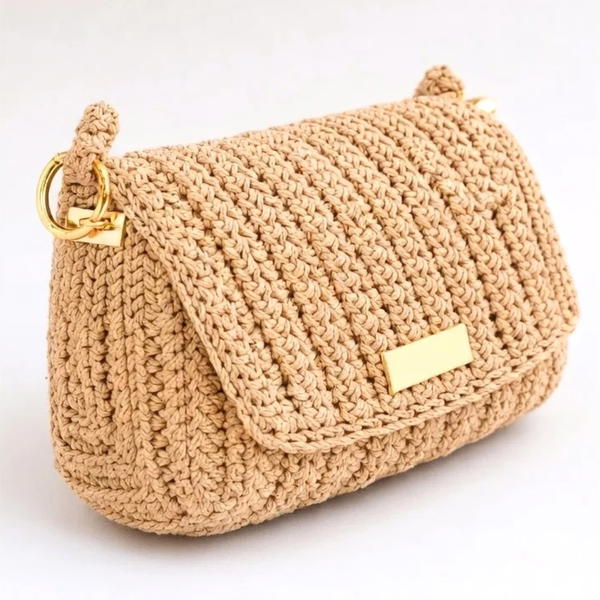
Sometimes a simple dress only needs one detail to finish the outfit. This Free Crochet Pattern for a Beaded Handbag puts that detail on a beige crochet body, where the beads catch the light as you move. The quiet color gives each bead room to show, while the stitches give the surface depth when you see it up close.
Free Crochet Easy Beaded Handbag Pattern
Inside, a fabric lining gives your belongings a smooth surface to rest against. A magnetic snap brings the opening together, and the separate base gives the bag a defined bottom. The sample measures about 25 by 12 by 22 cm, a handy size for taking a few things to dinner or a family party. Using 3 mm cord keeps the stitches small enough for the beads to stand out. The closure is also easy to work with when you’re reaching for a card or a lip balm.

For daytime, pair the beige with a plain button-down and dark trousers. At night, a solid dress puts the focus on how the beads look under indoor lights. Small earrings are enough when you want the bag to supply most of the shine. When giving it as a birthday present, tuck a handwritten note inside so it’s the first thing the person sees when they open the snap.
Bag Details From the Designer
Promlatex. Шнур для вязания. features handbags with several kinds of closures. This beaded design uses a magnetic snap, and other projects use metal clasp frames. Looking at both styles side by side gives you something to consider when you’re choosing hardware for a purse you plan to line and carry.
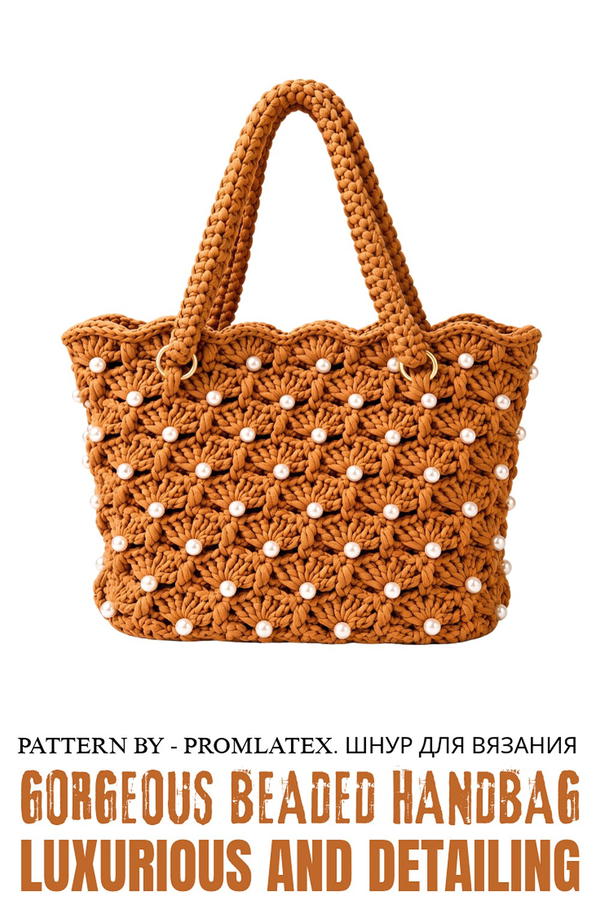
Polyester Cord Handbag with Beads and Lining
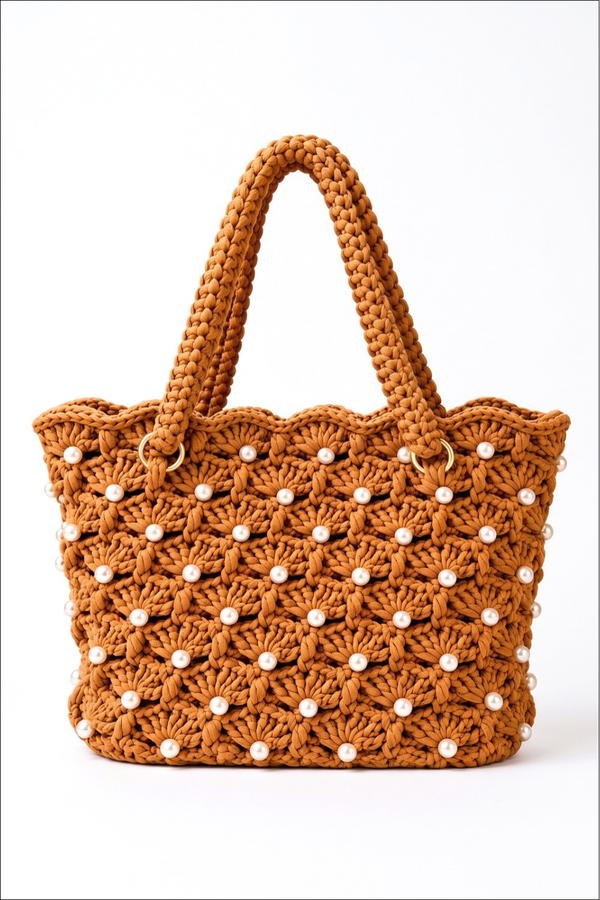
This elegant handbag combines a textured crochet pattern and beads to create a lightweight and visually striking accessory. Designed with a faux leather bottom, adjustable double-layer handles, and snap closure, this craft incorporates both crochet and sewing techniques to give you a functional yet fashionable result. Adding lining ensures durability while preventing items inside from snagging on the patterned stitches.
Skill Level
Intermediate – This pattern is ideal for crocheters familiar with single crochet, slip stitch, double crochet, and puff stitches. It also involves basic sewing skills for installing lining and snap buttons.
Materials
Crochet Supplies:
- Polyester cord: 3 mm flat polyester cord, approximately 200 m skein (Promlax recommended). It must have a slight stretch and soft touch to ensure easy handling.
- Hook: 3 mm crochet hook.
Bag Components:
- Faux leather bottom: 20 cm x 10 cm with pre-punched holes (ribbed side facing outward).
- Wooden or plastic beads:
- Outer diameter: 10 mm.
- Inner diameter: 2.4 mm (or larger if using thicker cord).
Bag Hardware:
- Magnetic snap closure: Select antenna-style snaps for secure fastening.
- 4 small rings and snap hooks: For attaching adjustable bag handles.
Lining Supplies:
- Lining fabric: Cut and prepared to fit your bag dimensions.
- Interfacing: Small pieces to reinforce areas around the snap closure.
- Sewing threads: Matching or contrasting colors as preferred.
- Scissors.
- Lighter: To seal cord ends.
- Marker: For marking increases (optional).
Stitch Abbreviations
- ch = chain
- sc = single crochet
- sl st = slip stitch
- dc = double crochet
- puff st = puff stitch
Useful Tips
- Bead Selection: Ensure beads have a sufficiently large inner diameter to thread the cord easily.
- Cord Management: Melt and shape the cord ends with a lighter to make bead threading and connections seamless.
- Custom Sizing: Adjust dimensions based on cord gauge, bottom size, or personal preferences.
- Increase Placement: Distribute increases symmetrically to maintain the handbag’s structure and avoid distortions.
- Protective Lining: The airy patterns may expose items inside the bag unless lined. Sew lining to prevent fraying and to stabilize the bag.
Step-by-Step Pattern Instructions
1. Bottom Binding
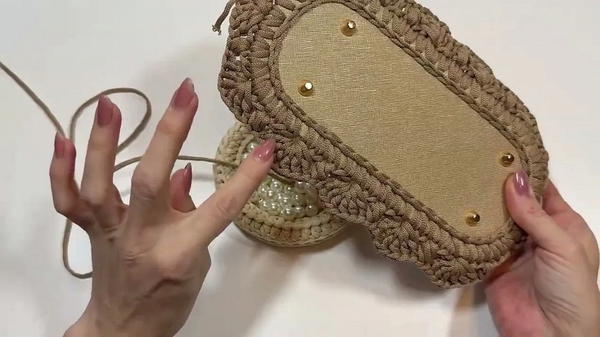
Round 1: Base Binding
- Position the ribbed side of the faux leather bottom outward. Begin from a hole in the middle of the side panel. Insert the hook into the next hole.
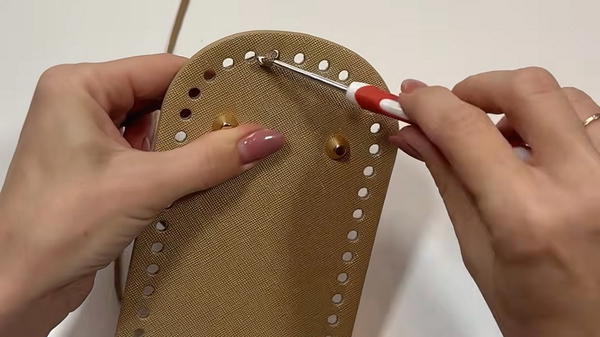
- Pull a loop through and hold the cord end from the back side. Insert the hook into the subsequent hole to pull out another loop and make a sl st.
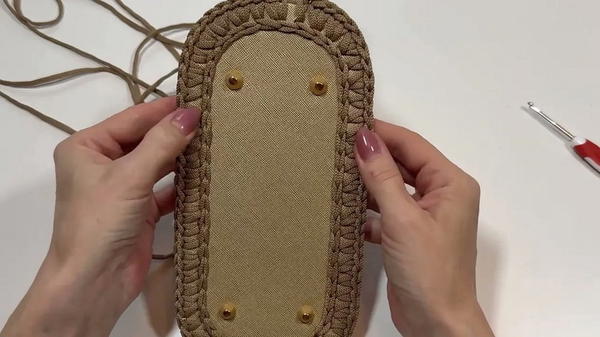
- Continue creating a braided tie around the bottom. Ensure all loops are evenly sized to cover the holes.
Closing the Round:
- On reaching the last hole, pull the cord end through the loop to secure the last st.
- Insert the hook under the first braid of the round and pull the tail through.
- Hide the tail by inserting it from the back side into the center of the final braid and pulling it to the back.
2. Preparing the Bottom for Walls
Round 2: Binding with Increases
- Calculate Total Stitches: Divide the stitches around the bottom (e.g., 52 holes) evenly into sections divisible by 6 to accommodate puff stitch placement in later rows.
- Begin from the middle hole in the sidewall, pulling up the working thread and making two single crochet stitches into it (increase).
- Follow the sequence:
- After the increase: Work 1 sc in the next hole.
- Next holes: 3 increases in a row. Work 2 sc in each of these holes.
- Alternate with single sc stitches in subsequent holes, and continue the increase-placement sequence symmetrically around the base.
3. Wall Pattern – Alternating Fans and Puff Stitches
Round 3: Row with Fans and Puff Stitches
- Alternate fan stitches and puff stitches around the row:
- Half Fan: Begin the row by working 4 ch under a braid, followed by 3 dc in the same braid.
- Puff Stitch: Skip two braids, and insert the hook into the third braid. Make 2 yarn overs and pull the loop through twice without finishing (5 loops on hook). Yarn over and pull through all 5 loops, then make 1 ch.
- Full Fan: Skip two braids, and work 3 dc, 1 ch, and 3 dc into the next braid.
- Alternate fan and puff stitches to complete the round.
Round 4: Bead Integration with Chain Stitch Rows
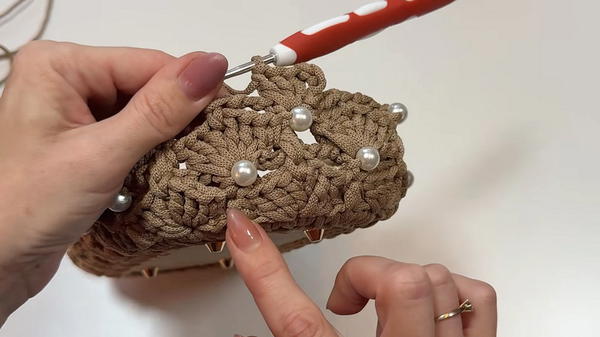
- String beads onto the cord before beginning this row:
- For 13 puff stitches, prepare 13 beads (adjust to the number of puff stitches in your round).
- Connect the round with a slip stitch at the top of the braid and work 3 ch.
- Position a bead in front of your hook and insert the hook into the braid below the puff stitch. Make sc with bead integration.
- Continue alternating 3 ch, sc into the fan center, and bead-centered sc into puff stitches around the row.
4. Alternating Rows for Wall Height
Repeat the sequence:
- Odd Rows: Fan and puff stitches alternating in a checkerboard pattern. Fans are placed over puff stitches, and puff stitches placed over fans.
- Even Rows: Integration of beads into puff stitches with chain stitches connecting sc stitches at fan centers.
Work a total of 17 rows:
- Odd rows (e.g., Rows 1, 3, 5, …): Fans over puff stitches and vice versa.
- Even rows (e.g., Rows 2, 4, 6, …): Rows with bead integration.
At the end of each bead row, cut the cord, string the beads for subsequent rows, rejoin the cord by gluing the ends or soldering with a lighter, and continue crocheting.
5. Finishing the Top Edge
Binding Row for Edging
- Work sl st in each stitch along the top edges of the bag, forming a clean braided edge.
- Once the row is completed, close the round by pulling the cord tail through the final braid and securing it in the back.
6. Handles and Hardware Assembly
Caterpillar Handle
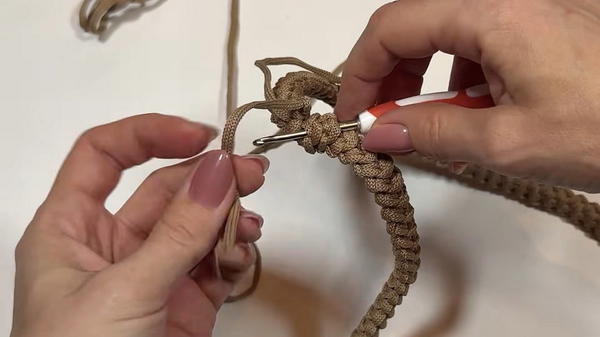
- Chain 3, and insert the hook into the first ch to work 1 sc.
- Rotate the work and insert the hook into the formed jumper to work 1 sc. Rotate again, and insert the hook into the 2 jumpers of the previous row to work 1 sc.
- Repeat until the handle reaches the desired length (~1 m).
Attaching the Handles and Rings
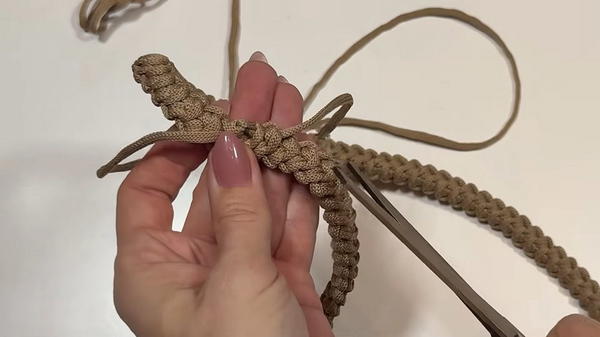
- Insert carabiner rings into the bag’s edges at equal distances.
- Attach the handles by threading them through the rings, ensuring symmetry for proper alignment.
7. Sewing the Lining
Preparing the Lining:
- Cut a rectangle based on measurements:
- Length = Bag height (+ seam allowances).
- Width = Bag circumference divided by 2 (+ seam allowances).
- Reinforce the snap button area by gluing small interlining squares to the top center of the lining.
Sewing the Lining into the Bag:
- Fold the top edge of the lining (approx. 5 cm) and press. Sew along the folded edge to create a finished seam.
- Insert the lining into the bag, adjust the folds, pin it into place, and hand-sew along the top edge, catching the cord bridges.
- Sew small stitches around the button area to secure the lining further, using thread that matches the cord.
Conclusion
This textured handbag combines functionality and beauty, with beads adding a touch of luxury and the lining ensuring practicality. The adjustable handles and magnetic closure make it versatile and comfortable to use. The choice of polyester cord guarantees durability and ease of care, making it a wonderful, thoughtful project for personal use or gifting.