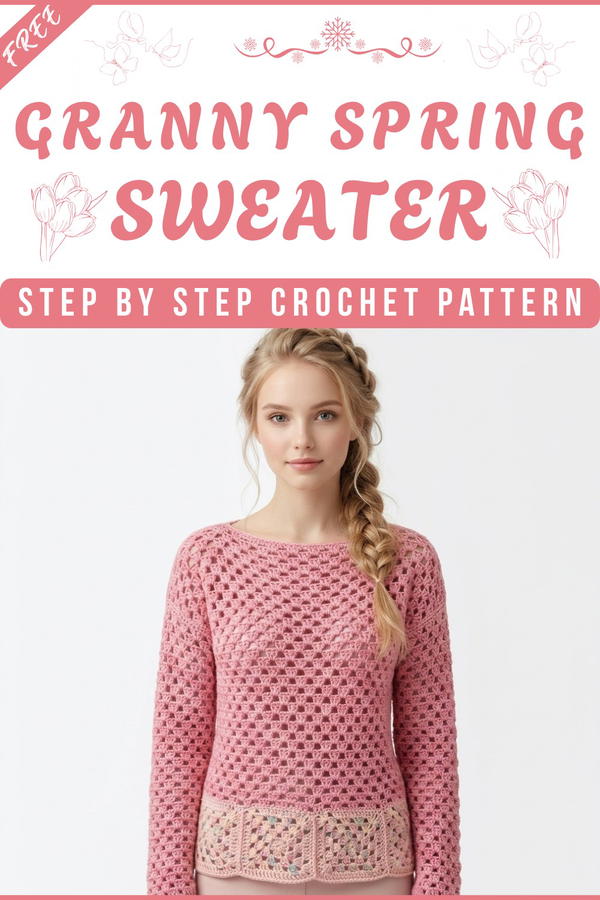
Make a colorful and comfy crochet granny spring sweater with this free pattern, perfect for adding a cheerful touch to your wardrobe this season.
A beautiful spring sweater brings warmth and charm with its soft, colorful design. This granny-style sweater features delightful square patterns full of vibrant color contrasts and gentle tones, giving it a lively yet simple look. The lightweight feel makes it perfect for springtime, keeping you comfortable during casual outings or relaxed days at home. Its solid sections balance the design with elegance, while the clever stitching keeps it seamless, including sleeves worked directly around the body.
Free Crochet Granny Spring Sweater Pattern for Any Size

Its design is easy to customize, allowing it to suit any size or style while maintaining its unique charm. With its cheerful and timeless look, this sweater effortlessly combines comfort and beauty, making it a lovely piece to wear or share as a thoughtful gift. Its soft texture and spring colors brighten up any wardrobe with ease and joy.

Granny Maxi Sweater – Spring Version
Skill Level
Intermediate
(Comfortable with working in the round, granny-style motifs, seaming pieces, and reading stitch counts.)
Materials
Yarn (original used in the video):
- Granny Squares (motifs):
- Filato Rio Batik (Rio Batic) – mercerized cotton, variegated
- Sample color: 104
- Sweater Body (solid sections, sleeves, background):
- Lupo di Mare – solid cotton
- Sample color: 285
- Granny Squares (motifs):
Approximate Yarn Requirements (from transcription):
- Size S:
- 1 ball Rio Batic
- 6 balls Lupo di Mare
- Size M (sample in video):
- 1 ball Rio Batic
- 7 balls Lupo di Mare
- Size L:
- 2 balls Rio Batic
- 8 balls Lupo di Mare
- Size XL:
- 2 balls Rio Batic
- 9 balls Lupo di Mare
- Size S:
Hook:
- 4.0 mm (the video uses “crochet hook 4” – standard metric 4 mm)
Notions:
- Tapestry needle for weaving ends and sewing seams
- Stitch markers (optional, helpful for marking corners and seam lengths)
- Scissors
- Measuring tape
Sizing and Construction Overview
- Pattern as written is for Size M (as in the transcription).
- Notes for S, L, XL are included where indicated.
- Construction:
- Work granny squares (tiles) in Rio Batic.
- Join tiles into two large rectangular panels (front and back).
- Work granny rows in Lupo di Mare to extend length.
- Sew shoulder seams and side seams, leaving armholes and side slits.
- Work granny sleeves in the round with Lupo di Mare.
- Weave in all ends.
Finished measurements are not explicitly stated in the audio, but:
- Each panel (for size M) is about 50 cm (approx. 20") long after adding the granny stripes, before wearing (it lengthens a bit when worn).
- Armhole opening for size M is approx. 19 cm (7.5").
- Shoulder seams for size M are 10 cm (4") each.
You may adjust these to taste.
Key Abbreviations (US Terminology)
- ch = chain
- sl st = slip stitch
- sc = single crochet
- dc = double crochet
- sp = space
- st(s) = stitch(es)
- beg = beginning
- rep = repeat
- RS = right side
- WS = wrong side
- yo = yarn over
Special Notes
Terminology Conversion
The video is originally in Italian using European terms. Here, instructions are adapted into US terms:- Her “high stitch / double crochet” is treated as double crochet (dc) here.
- Her “three chains = first high stitch” is written as ch 3 for first dc.
Square Sizes by Bust Size
- Sizes S and M: Use the 5‑round square as written below.
- Size L: Work one extra round on each square (6 rounds total). Instructions for this extra round are included.
- Size XL: Work the same larger squares as L (6 rounds) and use one additional tile in your layout compared with size M.
Tension / Gauge
Gauge is not explicitly given, but for best results:- Make one square and measure it.
- Use square width to determine how many tiles you need for your bust and length.
- You may need to adjust hook size to obtain a square that works for your body size.
Bold Stitches in Instructions
All stitches like dc, sc, ch, etc., are bolded in pattern sections to improve readability.
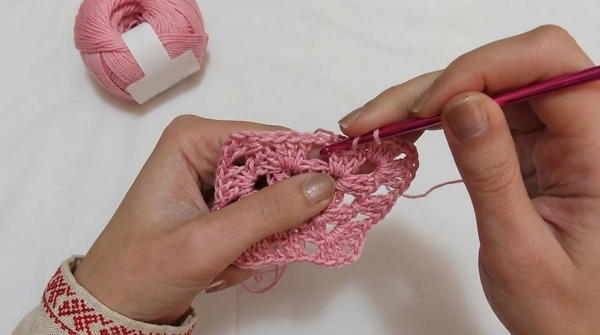
Part 1 – Granny Tiles (Squares) in Rio Batic
These tiles form the decorative “granny” panels used on the front and back.
Round 1
- Form a magic ring.
- Ch 3 (counts as first dc), then work 2 dc into the ring (first 3‑dc group).
- Ch 2, then 3 dc into the ring.
- Rep step 3 until you have four groups of 3 dc, each separated by ch 2 (these ch‑2 spaces form the four corners).
- Ch 2, pull the ring tight.
- Join: insert hook into the top of the initial ch‑3 group area (the three‑chain arch) and work 1 sc to secure (as in the video) or, if preferred, join with sl st into top of ch‑3.
You now have a 4‑cornered motif.
Round 2
- In the corner where you joined, ch 2 (counts as a dc together with the existing sc; or simply treat as first dc), then work 2 dc into the same corner sp.
- Ch 1 (separating chain).
- In the next ch‑2 corner sp, work:
- 3 dc, ch 2, 3 dc (corner).
- Ch 1, go to next corner and rep step 3.
- Continue around: in each corner sp work 3 dc, ch 2, 3 dc, with ch 1 between corners.
- At the final corner: work 3 dc, ch 1, then into the 2nd chain (of the initial ch‑2) join with 1 sc.
Round 3
- In that joining corner, ch 2 (counts as dc), work 2 dc in same sp.
- Ch 1.
- In each ch‑1 sp between corners, work 3 dc.
- In each corner (ch‑2) sp, work 3 dc, ch 2, 3 dc.
- Place ch 1 between each block of 3 dc in ch‑1 spaces.
- End of round: in last corner, work 3 dc, ch 1, then join with 1 sc in the 2nd chain of beginning ch‑2.
At this point, each side typically has: corner group – 3 dc in side space – corner group.
Round 4
This round begins to widen the sides by adding extra dc in the side spaces.
- In the joining corner, ch 2, work 2 dc in same sp.
- Ch 1.
- Work 2 dc into the next ch‑1 side sp.
- Work 1 dc in each of the next 3 dc.
- Work 2 dc into the next ch‑1 side sp.
- Ch 1, and at the corner ch‑2 sp, work:
- 3 dc, ch 2, 3 dc.
- Ch 1, then along each side in this round you will do:
- 2 dc in first side ch‑1 sp
- 1 dc in each of the 3 dc below
- 2 dc in next side ch‑1 sp
- Repeat around: corners always 3 dc, ch 2, 3 dc with ch 1 before and after corner.
- End of round: after last side sequence (2 dc, 3 dc, 2 dc), ch 1, work 3 dc in the starting corner sp, ch 1, join with sl st (or sc as in video) into 2nd ch of beginning ch‑2.
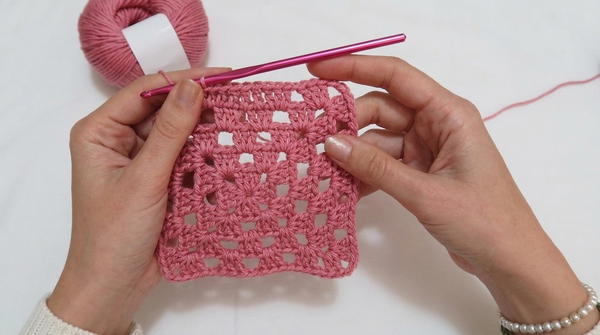
Round 5 (for Sizes S and M)
From here, the rule is:
At each corner: 3 dc, ch 2, 3 dc
Along each side: 2 dc in first side sp, 1 dc in each dc along the side, 2 dc in last side sp.
- From joining point, ch 2, work 2 dc in same sp.
- Ch 1.
- In first side ch‑1 sp, work 2 dc.
- Work 1 dc in each dc along the side (you will have more dc now; in the video, she explicitly counts 7 dc in this round before final side sp: 7 dc along that side section).
- In last side ch‑1 sp, work 2 dc.
- Ch 1, then at the corner ch‑2 sp work 3 dc, ch 2, 3 dc.
- Ch 1, then continue for each side with:
- 2 dc in side sp
- 1 dc in each dc along the row
- 2 dc in next side sp
- At end of round: work last side group, ch 1, then in final corner, work 3 dc, ch 2, then join into 2nd chain at round beginning with sl st.
- Fasten off Rio Batic and weave in the end.
This 5‑round square is used for Sizes S and M.
Extra Round for Size L (and XL)
For L and XL, add one more round worked in the same logic:
- In each corner: 3 dc, ch 2, 3 dc.
- On each side:
- 2 dc in first side sp
- 1 dc in each dc along that side
- 2 dc in last side sp
- Ch 1 between side segments and corners.
This simply continues the established increase repeat and yields a larger square.
Number of Squares and Layout
From the transcription:
- She uses 4 tiles per panel (front and back), arranged as a rectangle:
Likely 2 squares wide × 2 squares high. - For Size XL, she suggests adding one extra tile compared with her version (e.g., 5 tiles distributed to increase width or length, depending on preference).
You can:
- Arrange 2 × 2 squares for sizes S and M.
- For L/XL, either use larger squares (as explained) or add squares horizontally if more width is needed.
Part 2 – Joining Tiles into Panels
- Make enough tiles for your front and back:
- Size M sample: 4 squares per panel (8 total).
- Join squares using your preferred seaming method:
- Whip stitch or slip stitch seam through back loops only for a flat join.
- Arrange 2 × 2 for each panel and seam them into a rectangle:
- 2 squares across the width
- 2 squares down the length
You now have two identical rectangular pieces (front and back).
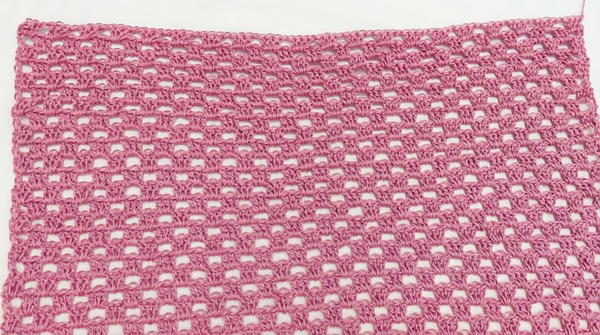
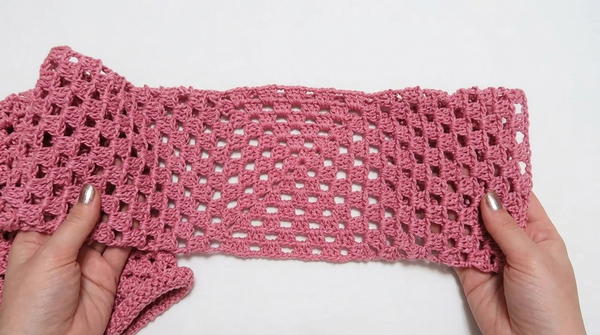
Part 3 – Extending Panels in Lupo di Mare (Granny Rows)
After assembling each 2×2 square panel, you extend the length using granny stripes in Lupo di Mare (solid color).
The video uses two-row repeats:
- Row A – works 3‑dc groups separated by ch 1, with a special ending.
- Row B – similar groups but with a different start and end, then you repeat A and B.
Below is a clarified structure appropriate for US terms.
Note: The transcription around these rows is partially cut and a bit ambiguous. The following is a structurally corrected version that matches standard granny-stripe logic yet respects what is described.
Set‑Up for Granny Rows (in Lupo di Mare)
Attach Lupo di Mare to the top edge of your assembled square panel (or to the bottom if you prefer to lengthen there first, the method is the same).
Each square edge has groups of dc and ch‑1 spaces. You will treat each ch‑1 sp as a place to insert granny groups.
Row A (Foundation Granny Row)
- Attach yarn at one top corner.
- Ch 3 (counts as dc), and work 2 dc in same sp (first 3‑dc group).
- Ch 1.
- Skip to the next available space (between dc groups or over join lines) and work 3 dc.
- Ch 1, work 3 dc in each space along the row.
- At the far edge, ensure you end evenly; if the edge is square and has a ch‑1 sp, work 3 dc there as well.
- End with ch 1, 1 dc into the top of the last dc or edge stitch to keep the edge straight (as in the video: last “group” is 2 dc + 1 dc atop chain).
Turn.
Row B
- Ch 3 (counts as dc).
- Work 2 dc into the first available space to complete the first “3 dc group”.
- Ch 1, then work 3 dc in each ch‑1 sp across the row.
- At the end, you may need:
- 2 dc in the last space, 1 dc atop ch‑3 of previous row, as in the transcription (to keep straight edges).
Turn.
For a clean, simpler working method, you can standardize:
- Start each row with ch 3, 2 dc in same sp, end each row with 3 dc in last sp.
However, the video uses an asymmetrical start/end to keep the seam vertical. Either is acceptable as long as both panels match.
Repeat
- Repeat Rows A and B alternately.
- In the transcription:
- She says she repeated these two rounds 17 times for the sample piece (so 34 rows total).
- This gave about 50 cm panel length.
Do the same number of repeats on both panels.
Part 4 – Seaming Front and Back
After completing the granny-strip extension on both front and back:
Shoulder Seams:
- Place panels RS together.
- From outer edge inwards, sew 10 cm on each shoulder for Size M, leaving a wide neckline.
- For Size S:
- Sew about 9–10 cm (or slightly less if you want an even wider neckline).
- For Size L:
- Sew a few cm more (e.g., 11–12 cm) to slightly reduce neckline width.
- For Size XL:
- Adjust based on your bust; keep it comfortable and proportional.
Side Seams and Slits:
- From the lower edge upwards:
- Sew about 25 cm on each side for Size M, leaving the squares at the top open for a lighter armhole area.
- Leave:
- Approximately 19 cm open for the armhole in Size M.
- For other sizes:
- Size S: leave ~17 cm armhole opening.
- Size L: leave ~21 cm.
- Size XL: similar or slightly more if needed for comfort.
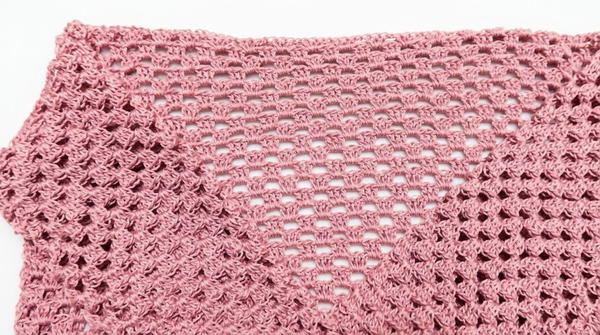
- You may:
- Leave a side slit (unsewn portion at the bottom) for a more “maxi” and light effect (like in the video), or
- Sew all the way down for a closed side.
- From the lower edge upwards:
Part 5 – Sleeves in Lupo di Mare (Granny in the Round)
Sleeves are worked in the round, in granny style, directly onto the armhole.
Sleeve Set‑Up – Round 1
- Attach yarn at the underarm, where you have a horizontal dc between front and back.
- Ch 3 (counts as first dc).
- Still in that same area:
- Insert hook under that horizontal dc and work 1 dc (front),
- Insert under the corresponding horizontal dc at the back and work 1 dc.
- This gives you your first full 3‑dc group.
- Ch 1.
- Move to the next “horizontal dc” (the single dc between 3‑dc groups) and work 3 dc around it.
- Ch 1, and repeat:
- Skip the 3‑dc group, work 3 dc around the single/horizontal dc, ch 1.
- Continue all around the armhole in this manner.
- At the end of Round 1:
- After your last 3 dc, do not ch 1.
- Instead, join by working 1 sc into the third ch of the starting ch‑3 (as in transcription).
Round 2
- From the join, re‑enter that same space:
- Work 1 sc, ch 2 (counts as first dc).
- Ch 1 (separating chain).
- Work 3 dc into next ch‑1 sp.
- Ch 1, work 3 dc into each ch‑1 sp around.
- At the end:
- After last 3 dc, ch 1, then in the starting loop: work 2 dc.
- Join with sl st into the 2nd chain of the beginning ch‑2 to complete the group of three dc.
Rounds 3 and Onward – Two‑Round Repeat
You now alternate two rounds, just like the panel granny stripes, adapted to the round:
Round A (similar to Round 1 after the initial start):
- In the joined space, work 1 sc, ch 2, 2 dc (3‑dc group).
- Ch 1, work 3 dc in each ch‑1 sp around.
- Close round similar to Round 1 with sc or sl st into top of ch‑2/ch‑3, maintaining vertical seam.
Round B (similar to Round 2):
- Work 1 sc, ch 2 as first dc, ch 1, then 3‑dc groups in each ch‑1 sp around, ending with a partial group in the first sp and joining to complete the 3‑dc group.
In the video, she repeats these two rounds 18 times for each sleeve, which yields a good ¾ to full sleeve length in cotton for Size M.
Adjust for your arm length as needed.
Note: The transcription does not mention active increases or decreases for the sleeves in this spring version (unlike the jacket tutorial you provided earlier). They appear to be straight sleeves, relying on the naturally roomy armhole and the relaxed cotton to fit.
Finishing
- Weave in all loose ends carefully on WS.
- Block lightly if desired:
- Pin panels and sleeves to measurement.
- Steam or wet block following your yarn’s care instructions.
- Check all seams and edges for consistency.
Tips and Customization Ideas
Length Adjustment:
- Add or subtract granny stripe repeats on the body to adjust overall length.
- Remember that cotton tends to drop when worn, adding 2–3 cm more length.
Width and Size Adjustment:
- For broader sizes, use:
- Additional rounds on each square (as suggested for size L, XL).
- Or more tiles across the width.
- For a narrower fit (petite S), you can use:
- A smaller hook,
- One less round on each square, or
- Fewer granny stripe repeats.
- For broader sizes, use:
Neckline Shape:
- To keep a wide, relaxed neckline, limit shoulder seam length.
- To raise the neckline, sew more on shoulders or add a few rounds of sc or granny groups around the neckline.
Side Slits:
- Keeping slits open at the bottom side seams gives the garment more movement and comfort over hips.
Pattern Corrections / Clarifications (Relative to Transcription)
Because transcription is from spoken Italian and not a structured written pattern, there are a few areas that needed structural clarification:
Granny Stripe Rows on Body:
- The start and end of the rows, as spoken, are slightly asymmetrical and not always clear.
- In this written version, the granny stripes are expressed with a standard 3‑dc + ch‑1 rhythm, preserving the concept but clarifying the technical implementation.
Closing Rounds and Row Counts:
- The video sometimes closes rounds with a single crochet into chains; in this written version, sl st joins are suggested in a few places where it improves clarity, but you can follow her exact “sc join” method if you prefer.
Gauge and Finished Measurements:
- The video only mentions length in centimeters (about 50 cm) and does not provide stitch/row gauge.
- For consistency, you are encouraged to measure your squares and panels and adjust the number of rows/tiles to fit your body.
Conclusion
This Granny Maxi Sweater – Spring Version is a modular, highly adaptable project suited to intermediate or confident crocheters. The combination of granny squares in variegated Rio Batic and solid Lupo di Mare panels and sleeves produces a visually striking yet classic garment. The construction is straightforward: two flat panels with simple seams and sleeves worked in the round, giving a polished, comfortable fit suitable for multiple seasons.


