Handmade fashion comes alive with this free crochet balloon bag pattern, complete with easy instructions to help you design a charming and practical bag.
FEATURED BY: Örgü ütopyası
Handmade bags bring a unique touch of creativity and style to everyday life. Creating a stylish, balloon-shaped bag that not only looks charming but also serves practical purposes for carrying your essentials. This special design, inspired by soft curves and rounded shapes, captures the lightness and joyfulness of balloons, making it a delightful accessory.
Free Crochet Balloon Bag Pattern With Easy Tutorial

About Designer
The channel owner SUNA's offers clear and friendly crochet tutorials that help crocheters of all levels create beautiful projects. Their step-by-step videos make learning easy and enjoyable, perfect for anyone wanting to try new crochet patterns.
This bag is thoughtfully made using polyester macrame yarn with a crochet hook size 3mm, giving it a sturdy yet flexible feel. One of its most attractive features is the clever lid that opens and closes smoothly, secured by two magnetic buttons, adding both security and elegance. The bag also includes charming tassels, which can be added as personal touches to enhance its playful character.
Sizing
- Width: 35 cm
- Height: 19–20 cm
- Opening (depth): 22 cm

The working style is beginner-friendly, focusing on single crochet stitches worked mostly into the back loop to create neat textures. The pattern involves careful increases and decreases to shape the balloon silhouette perfectly, while maintaining balance so the bag sits well and looks polished. Attaching handles from haberdashery stores further completes the professional finish.
This balloon-inspired bag is perfect for daily use, shopping, or gifting, blending creativity with everyday practicality.
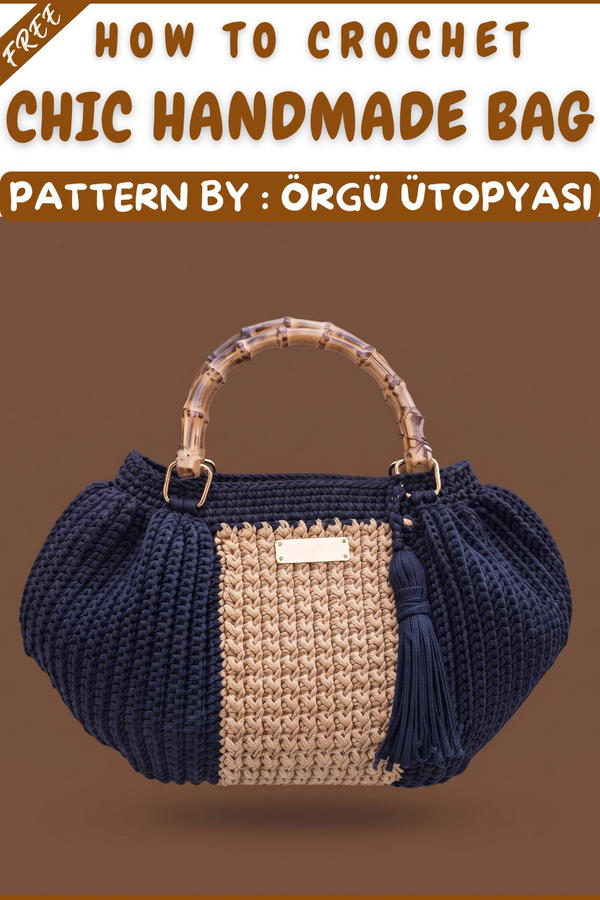 Structured Crochet Handbag Pattern
This structured crochet handbag features a flat, rectangular base, sides sculpted with careful increases and decreases, a crisp fold-over lid with optional magnetic snap closure, and options for handles, a lined interior, and a decorative tassel. The final result is a substantial bag measuring about 35 cm wide, 19–20 cm tall, and 22 cm deep at the opening. The pattern emphasizes precise shaping, a neat texture, and practical finishing touches for a functional and stylish accessory.
Skill Level
Intermediate
Competency with single crochet, increases, and decreases in both rows and flat work is required, along with basic slip stitch, seaming, and familiarity with shaping. Attention to row counting and symmetry is essential for a polished outcome.
Materials
- Yarn: Polyester macrame yarn, size 3 (approx. 250g black, 200g light yellow)
- Crochet Hook: 3 mm (US D/3 or size 5)
- Bag Hardware: Two magnetic buttons/snap buttons
- Bag Handles: Store-bought or crocheted, with attachment hardware
- Canvas (optional): For stabilization/lining
- Scissors, stitch markers, sewing needle, and thread (for lining and handle attachment)
- Lining fabric (optional, for interior finish)
- Lighter: To secure synthetic yarn ends (optional, for macrame yarn)
Special Stitches
- Single Crochet (sc): Insert hook, yarn over, pull through (2 loops), yarn over, pull through both loops
- Slip Stitch (sl st): Insert hook, yarn over, pull through all loops
- Chain (ch): Yarn over, pull through loop on hook
- Back Loop Only (BLO): Insert hook into back loop only for subtle ridge and flexibility
Stitch Abbreviations
- ch – chain
- sc – single crochet
- sl st – slip stitch
- BLO – back loop only
- st(s) – stitch(es)
- inc – increase (make 2 sc in the same st)
- dec – decrease (single crochet 2 or more sts together)
Useful Tips
- Work increases and decreases precisely in the marked “center” stitches to keep sides and base even.
- Always crochet into the last stitch of every row to maintain width and shape.
- Use a stitch marker for the central and edge stitches in every row when increasing or decreasing—this will ensure symmetry.
- Crocheting in the back loop only (BLO) produces a pleasing ridge, adding style and flexibility to the bag.
- When using macrame/polyester yarn, melt ends with a lighter to secure and prevent fraying.
- For additional structure, add a custom-sized canvas panel or lining after crochet assembly.
The Pattern
Main Panel/Base
Foundation:
- Make 42 chains with black yarn.
- Skip first chain from hook. Work 41 sc, starting in the second chain from hook.
Row 1:
- Work 41 sc across. (Do not work into the turning chain.)
- Ch 1, turn.

Rows 2–21 (Shaping Base with Increases):
- Stitch count: Increases at the center stitch every row until reaching 81 sts.
- Identify the center (begin with 20 sc, work 3 sc in 21st st, then 20 sc).
- Place a stitch marker in the middle stitch of the 3-sc cluster.

- Always crochet BLO (into the back loop only) for these rows.
- Work up to the marked center st, then 3 sc in center (inc), continue to row end.
- Ch 1, turn. Repeat.
- Each row adds 2 stitches (one each side of center).
- Repeat until reaching 81 sc (including increases—40 on each side, one center), 20 increases total.
Rows 22–26 (No Increase, Straight Body):
- Work 81 sc across, one in each st, BLO.
- Ch 1, turn.
- Repeat for 5 rows (provides a straight side before colorwork).

Colorwork Transition (Yellow Stripe):
- Join yellow yarn at the start of a new row.
- Work 81 sc as usual (crocheting under both loops now for structure).
- Ch 1, turn.
Texture Pattern (Front and Back):
Pattern Setup:
- Turn work; with yellow, crochet the texture:
- (1 sc, 1 sl st) alternately to row end. Start with sc, then sl st, repeat.
- Ch 1, turn.
Texture Pattern Rows:
- Repeat: One row of (sc, sl st) alternately, then one row BLO sc all across.
- Maintain sequence for 10 alternating rows (count both texture and BLO sc rows).
- End with 1 row of sc to stabilize.

Upper Body and Decreases (Black):
- Return to black.
- Work 8 rows straight (1 full row sc, then 7 rows BLO sc).
Decrease Rows (Shaping Upper Sides):
- Begin with 81 sts; decrease the same way as increases, around the central marked stitch.
- In decrease rows, when you reach 3 sts centered at midpoint:
- sc3tog (insert hook into BLO of 3 consecutive sts, pull through all together).
- Place marker in decreased stitch.
- Crochet to ends, ch 1, turn.

- Each decrease row reduces by 2 sts; continue for 20 decrease rows until reaching 41 sts (20 on each side, one in the middle).
Finalize with One Row (No Decrease):
- Work one last row of sc across to mirror the first section.
Seaming and Assembly
- Fold bag in half with the right side out; align all corners and edges.
- Use single crochet or whipstitch seam to join the side and bottom together, weaving through both sides for a crisp edge.
- Fasten off, secure ends.
Bag Opening/Finishing
Bag Rim and Gathered Edge:
- Attach black yarn at inner rim.
- Work sc evenly around the opening; for each 3rd st, skip 1, sc into next, to gather and round corners.
- Continue in pattern around, slip stitch to join.
Single Crochet Edge:
- Next round: Work sc in each st around for a clean, even rim.
- Slip stitch, pull up chain, fasten off.

Lid/Flap
Attach at back panel, center:
- Use black/yellow. Attach at 22nd st.
- Work 22 sc (BLO) across for flap.
- Ch 1, turn. Work sc rows back and forth for 7 total rows (including first).
- Fasten off and weave in ends.
Closure:
- Hand-sew or install two magnetic snaps or a zipper at the flap and body as desired.
Handles, Lining, and Finishing
- Sew on purchased or handmade handles. Make sure placement is exactly symmetrical (fold bag in half for accurate measuring).
- For stability, sew a canvas insert inside, attaching securely to yellow band with sewing thread.
- If desired, line with fabric, sewing neatly around edges.
- Optional: Add tassel at flap or handle for embellishment.

Conclusion
The structured crochet handbag uses careful shaping—increases, straight rows, and decreases—to create a substantial form with a distinctive texture. Alternating color bands, flat stitch work, a crisp flap, and a variety of practical finishes provide functionality and polish. With lining and solid hardware, this handbag offers both durability and a classic handmade aesthetic, making it a stylish and useful addition to any wardrobe.