Add floral charm to your style with this free crochet flower mesh cardigan pattern perfect for creating lightweight and stylish cover-ups.
A lightweight and stylish cardigan can make any outfit pop, especially when adorned with floral charm. The Free crochet Flower Mesh Cardigan Pattern, offered by the talented creator Gülşah Özcan Filiz on her YouTube channel, is a wonderful guide to design a dreamy cardigan that’s perfect for special occasions, casual wear, or as a heartfelt handmade gift. Combining beauty with functionality, this pattern provides clothing that is versatile, elegant, and filled with personal warmth.
Free Crochet Flower Mesh Cardigan Pattern for Any Season
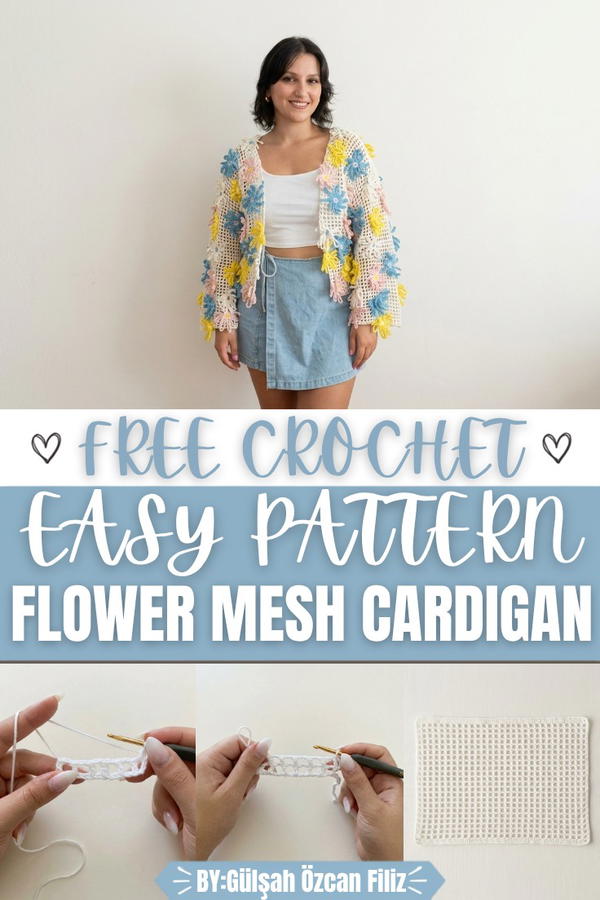
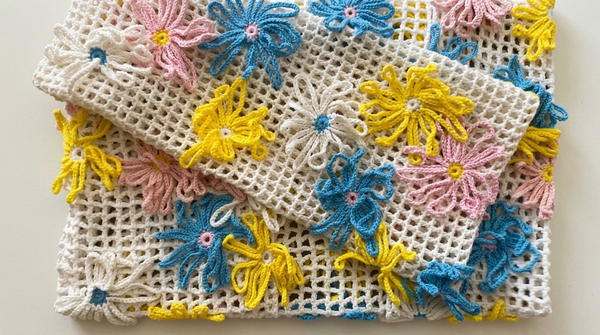
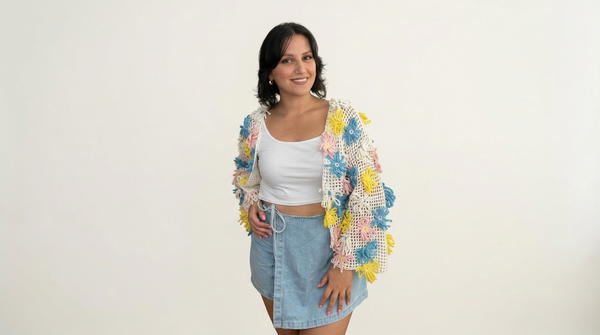
This cardigan stands out with its delicate floral mesh design, featuring intricate flower motifs scattered throughout its open, airy fabric. Soft and flowing, it drapes beautifully over any outfit like tops, adding an ethereal touch to everyday looks or elevating more formal attire. The lightweight texture ensures year-round wearability, while the balanced use of structure and floral style makes it suitable for all ages. Its relaxed yet graceful silhouette adds a timeless charm to the overall design.
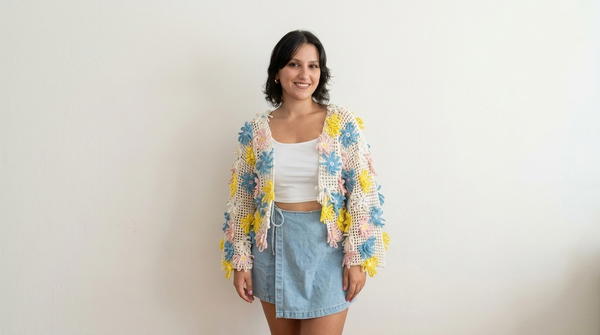
What makes this piece even more special is its decorative value and flexibility. It’s wonderful for layering over summer dresses, pairing with jeans and tanks, or styling for beachwear. It also serves as a thoughtful and one-of-a-kind gift, perfect for surprising someone close with an item tailor-made with care and attention to detail. Whether enhancing your wardrobe or spreading joy through your creative skills, this cardigan is an ideal project that merges beauty and practicality effortlessly.
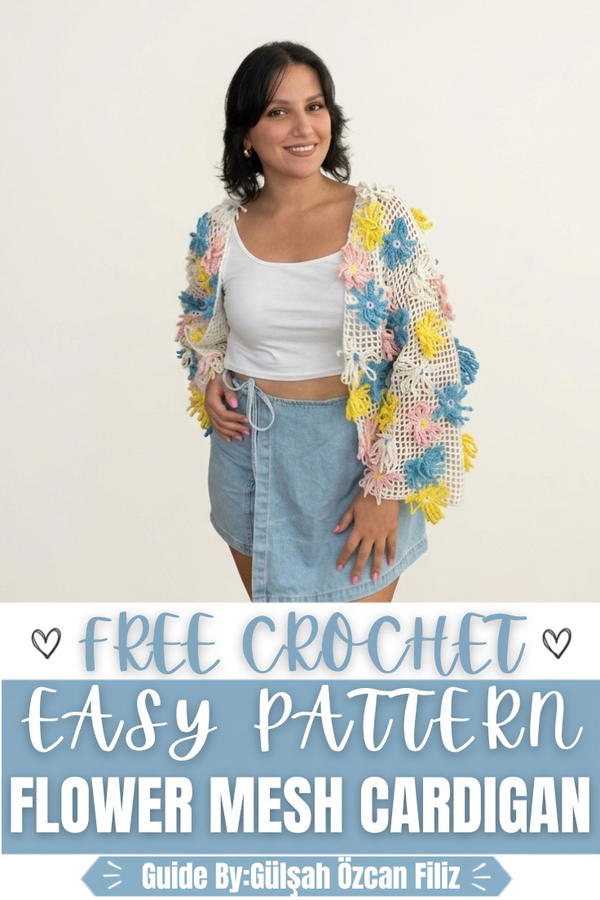
Mesh Flower Jacket Crochet Pattern
This mesh flower jacket is a light and elegant layering piece, constructed from simple rectangular panels and adorned with small crochet flowers. The base of the jacket is worked entirely in mesh stitches, making it quick and approachable, while the applique flowers add a playful and customizable touch. The open fabric is ideal for transitional weather or cool evenings, especially when worked in cotton or similar yarns.
Skill Level
Beginner to Intermediate
The jacket base is suitable for confident beginners who are comfortable with chains and double crochet stitches. The flower embellishments and assembly require some attention to detail, making this an engaging project for intermediate crocheters as well.
Materials
- Yarn for Jacket Body:
- Cotton yarn or denim-style yarn recommended.
- Alternative options: velvet yarn or other medium-weight yarns. Mercerized yarn is not recommended if too thin, as flowers may not show well.
- Yarn for Flowers:
- Cotton or similar yarn in 3–4 different colors for variety (approximately 80–90 small flowers for an adult size jacket, adjust amount for size and density).
- Crochet Hooks:
- 3.0 mm–3.5 mm hook for the mesh jacket (3.25 mm used in the video).
- Same or slightly smaller hook for flowers, depending on tension.
- Notions:
- Scissors
- Yarn needle for weaving in ends and sewing flowers
- Measuring tape
- Stitch markers (optional, for marking shoulder and arm openings)
- Hot glue/silicone gun (optional, to secure some flowers for extra stability)
Special Stitches Used
- Double Crochet (DC): Yarn over, insert the hook into the stitch, yarn over and pull up a loop (3 loops on the hook), yarn over and pull through 2 loops, yarn over and pull through remaining 2 loops.
- Slip Stitch (Slst): Insert hook into stitch, yarn over, pull through the stitch and loop on hook in one motion.
- Magic Ring (MR) for flower centers: Wrap yarn around fingers to form a loop, insert hook into loop, pull up a loop, and work stitches into the loop, tightening afterwards.
Stitch Abbreviations
- Ch: Chain
- DC: Double Crochet
- SC: Single Crochet
- Slst: Slip Stitch
- MR: Magic Ring
Useful Tips
- Sizing by Measurement: Instead of following a fixed stitch count, size the back panel by comparing it to a well-fitting cardigan or jacket. Lay your work over it periodically to check width and length.
- Mesh Box Counting: The mesh fabric is naturally divided into “boxes” (spaces between DC clusters). Counting boxes is easier than counting individual stitches when planning front panels, shoulders, and neck opening.
- Tension: Do not crochet chains too tightly; loose chains make it easier to insert the hook and maintain even mesh.
- Flower Density: Decide on the number of flowers based on how dense you want the decoration to be. More flowers give a fuller look; fewer flowers create a minimalist style.
- Flower Attachment: Tie knots firmly when sewing flowers, and optionally add small dots of silicone under some petals or leaves to keep them from drooping excessively.
Detailed Pattern
1. Jacket Base – Mesh Panels
You will make one back panel and two front panels. All are rectangles worked in the same mesh pattern; only widths differ.
Back Panel
- Foundation Width
- Form a slip knot on hook.
- Ch to desired back width: No fixed number is given because yarn and body size vary.
- Measure the chain against the back of a jacket you like or around your shoulders. It should match the desired width.
- Establish Mesh Boxes (Row 1)
- After you have your chain:
- Yarn over, skip 5 chains,
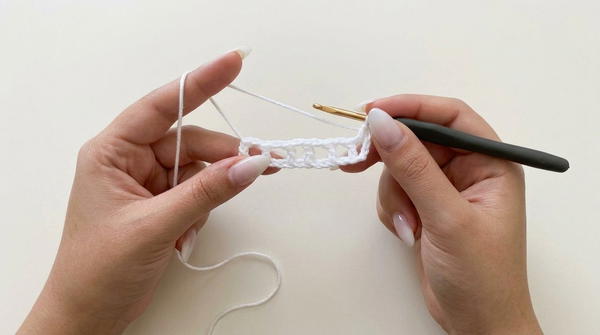
- DC into the 6th chain from the hook.
- Ch 2, yarn over, skip 2 chains, DC into the 3rd chain.
- Repeat:
- Ch 2, skip 2 chains, DC into 3rd chain
- until you reach the end of the chain.
- At the end of row, you should have a series of DC “posts” separated by 2-chain spaces, forming boxes.
- For reference in the transcription, the sample front used 16 boxes; your back panel will usually use more boxes than the front.
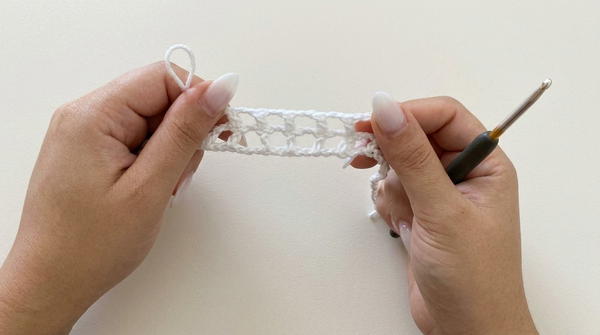
- Yarn over, skip 5 chains,
- After you have your chain:
- Mesh Rows (Rows 2 and Up)
- Row 2:
- Ch 5, turn.
- (Ch 3 counts as DC + Ch 2 counts as box spacer.)
- DC into the top of the next DC from previous row.
- Ch 2, DC into the next DC across the row.
- Finish with DC into the last DC or chain space.
- Ch 5, turn.
- Subsequent Rows:
- Repeat Row 2:
- Ch 5, turn, then DC in each DC, Ch 2 between DCs to maintain the mesh.
- Repeat Row 2:
- Continue until the back panel reaches the desired length. In the example, 47 rows of mesh were worked.
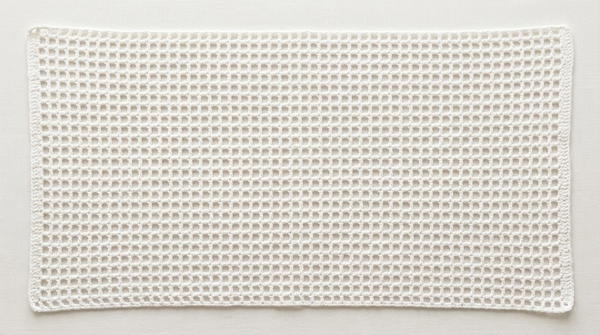
- Row 2:
Front Panels (Right and Left)
Each front panel is worked the same way as the back, but narrower. In the example, each front panel is 16 mesh boxes wide.
- Foundation Chain
- Form slip knot.
- Ch long enough to produce 16 boxes (or the number of boxes you decided for your front width).
- Work Row 1 of mesh exactly as for the back:
- Skip 5 chains, DC, Ch 2, skip 2 chains, DC repeated until 16 boxes are formed.
- Mesh Rows
- Work the same mesh pattern:
- Row 2 and onward:
- Ch 5, turn, DC into each DC, Ch 2 between DCs.
- Row 2 and onward:
- Work 47 rows for each front piece (to match the back panel length).
- Work the same mesh pattern:
Neck Opening on Back Panel
- Once the back panel reaches the target length:
- Identify the center top region where you want the neck opening.
- In the example, the maker skipped 9 boxes for the neck.
- Work the last 3 rows on either side of the neck separately:
- From one shoulder edge, mesh as usual across a number of boxes, leaving the center 9 boxes unworked.
- Fasten off.
- Attach yarn on the other shoulder side and repeat for symmetrical neck shaping.
- This produces a rectangular neck opening on the back.
2. Joining Shoulder and Side Seams
After the back and both front panels are completed:
- Place the back panel flat, right side facing down.
- Lay front panels on top, right sides facing down, so that right sides face each other (i.e., panels are reversed for seaming).
Join Shoulders
- Attach yarn at one shoulder edge.
- Work SC seams:
- Insert hook through the first box on the front and corresponding box on the back.
- Pull up yarn and SC.
- In each box: work 2 SC through both layers (front and back).
- At each DC “post” (the top of a DC): insert hook through both corresponding stitches and work 1 SC.
- Continue across the shoulder width until fully joined.
- Fasten off.
- Repeat for the other shoulder.
Join Sides and Leave Arm Openings
- With panels still wrong sides together, join sides in the same manner:
- Start from hem edge.
- Work 2 SC per box and 1 SC per DC post along the side seam.
- Decide on armhole height by trying the piece on or measuring.
- When you reach the desired arm opening (for example, leaving 20 boxes open on each side as in the transcription), stop seaming.
- Fasten off, leaving the upper remainder of the sides open for armholes.
Flip the jacket right-side out when all seams are finished.
3. Sleeves
Sleeves are worked directly onto the arm openings in mesh, in the round.
- Attach Yarn Underarm
- With the jacket right side out, attach yarn at the underarm area where side seam meets armhole.
- Form a loop and secure to the fabric.
- Round 1 (Mesh Establishment)
- Ch 5 (counts as DC + Ch 2).
- DC into top of nearest DC post along the armhole edge.
- Ch 2, DC into next DC or appropriate box edge all around the arm opening.
- At the end of the round, join into the top of the starting DC or chain with Slst.
- Subsequent Rounds
- For each round:
- Ch 5, DC into next DC, Ch 2, DC around.
- Join with Slst at end of round.
- Continue until the sleeve reaches the desired length. In the example, the sleeves had 44 rounds of mesh.
- Sleeve length can be adjusted for short, three-quarter, or long sleeves.
- For each round:
4. Flower Appliqués
The jacket is embellished with simple floral elements made from small centers and long chain “leaves” or petals.
Flower Center (Round Puff)
- Center with Magic Ring
- Using the center color yarn:
- Make a MR.
- Work 11 SC into the ring.
- Pull the ring tight to close.
- Slst into the first SC to join the round.
- Ch 1 and leave a moderately long tail. Cut yarn.
- Using the center color yarn:
This forms a small round center.
Chain Leaf/Petal
- Join another color (e.g., blue) to the center:
- Insert hook through any SC on the center.
- Pull through new color yarn and secure.
- Ch 27 (adjust length depending on yarn thickness; thicker yarn may require fewer chains, thinner yarn more).
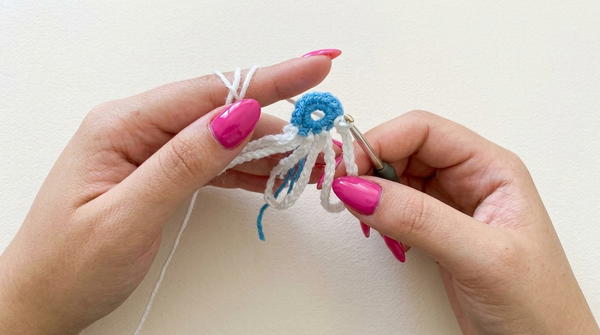
- Work SC back along the entire chain, inserting the hook into each chain from the second chain from the hook until you return to the center.
- Slst into the same SC on the center to anchor the leaf/petal.
- Fasten off, leaving tails for sewing.
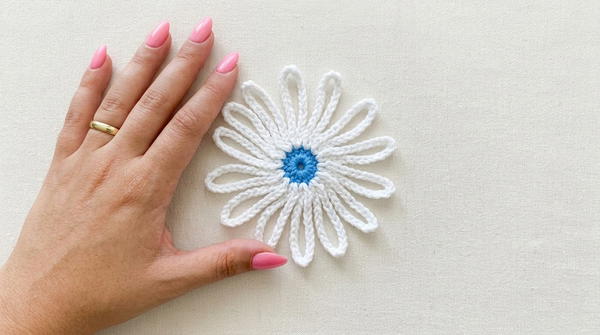
Repeat leaf/petal steps around as desired. In the transcription, the maker treated each chain strip as a “leaf” and produced many flowers with this motif. Approximately 80–90 flowers were made for a full-size jacket, but this number is flexible.
Assembly and Sizing
- Attaching Flowers
- Decide placement by eye: distribute flowers across front panels, sleeves, and optionally back.
- Use yarn tails to attach each flower:
- Thread the tail onto a yarn needle.
- Pass through the mesh fabric and tie two secure knots at the back of the jacket to prevent loosening.
- Weave in remaining tails and trim.
- For extra stability, apply a small dot of silicone or hot glue under some petals or leaves, especially in areas where flowers tend to droop. Do not fully glue every edge unless a very fixed, flat look is desired.
- Final Measuring
- Example finished measurements from the transcription:
- Length of jacket from shoulder to hem: approx. 50 cm.
- Back width: approx. 51.5–52 cm.
- Sleeve length from armhole: approx. 45.5–46 cm.
- Adjust chain counts and row numbers to create larger or smaller sizes, referencing a garment that fits you well.
- Example finished measurements from the transcription:
- Finishing Touches
- Weave in all yarn ends.
- Optionally, lightly steam or block the jacket to even out the mesh.
- Check seam strength and flower placement before wearing.
Conclusion
This mesh flower jacket demonstrates how a simple mesh structure can transform into a distinctive garment with the addition of colorful crochet flowers. The flexible construction allows for easy sizing and adjustments, and the decorative appliqués invite personal creativity with color and layout choices. This piece pairs well with a variety of outfits and can be adapted with different yarn types to suit seasons and styles.