Make your handmade wardrobe stand out with this Free Crochet Bustier Top Pattern, blending a pretty silhouette, creative stitches, and a fun crochet journey.
A stylish summer top can bring a fresh and beautiful touch to a simple outfit, and this lovely design is a great example of that. Special thanks and appreciation to Gülşah Özcan Filiz for sharing this beautiful tutorial and making the process easier to follow. Her video series shows how to create a pretty bustier-style top with a clear and useful approach.
Free Crochet Bustier Top Pattern | Stylish Summer Wear
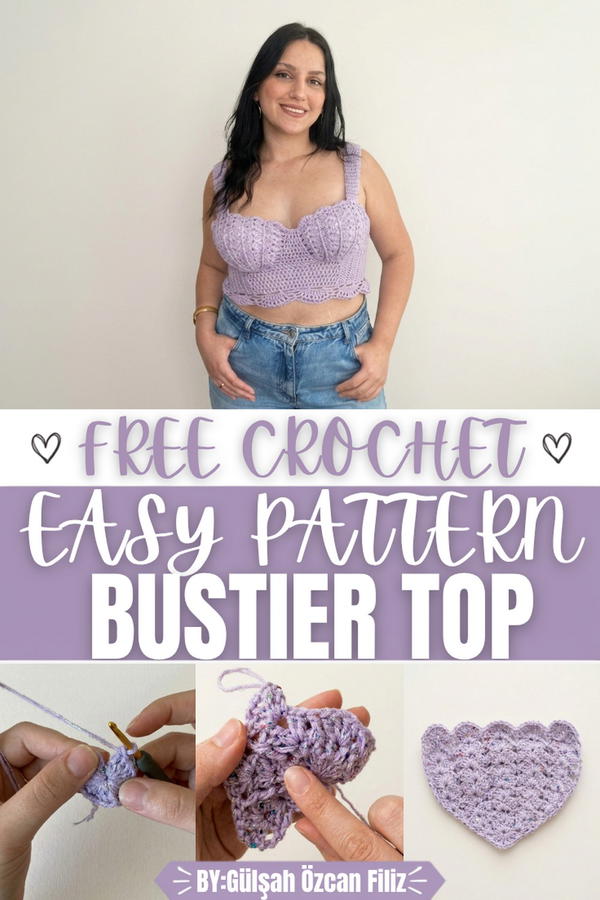
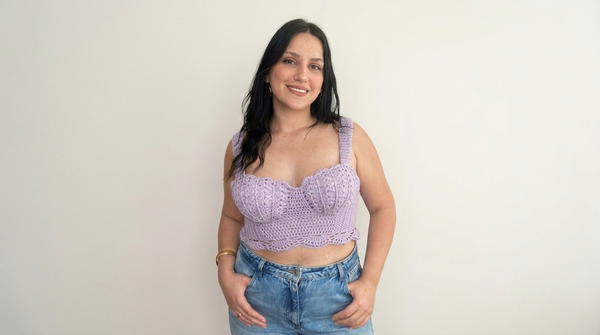
The design has a neat shape that sits nicely around the upper body while giving the top a modern and attractive look. Its most eye-catching feature is the shell-like texture, which gives the front a soft, decorative appearance and makes the top look more special than a basic summer piece. The shape can be worn with skirts, jeans, shorts, or loose trousers, making it useful for many casual outfits.
The working style is simple to understand when followed step by step. The video series is divided into two parts, so each stage can be followed without feeling rushed. The design also gives room for size changes, allowing the length and fit to be adjusted according to personal comfort.
What makes this pattern appealing is its combination of beauty, simplicity, and everyday use. The clean shape, lovely texture, and light summer feel make it a charming choice for anyone looking for a fashionable top that is easy to style and enjoyable to make.
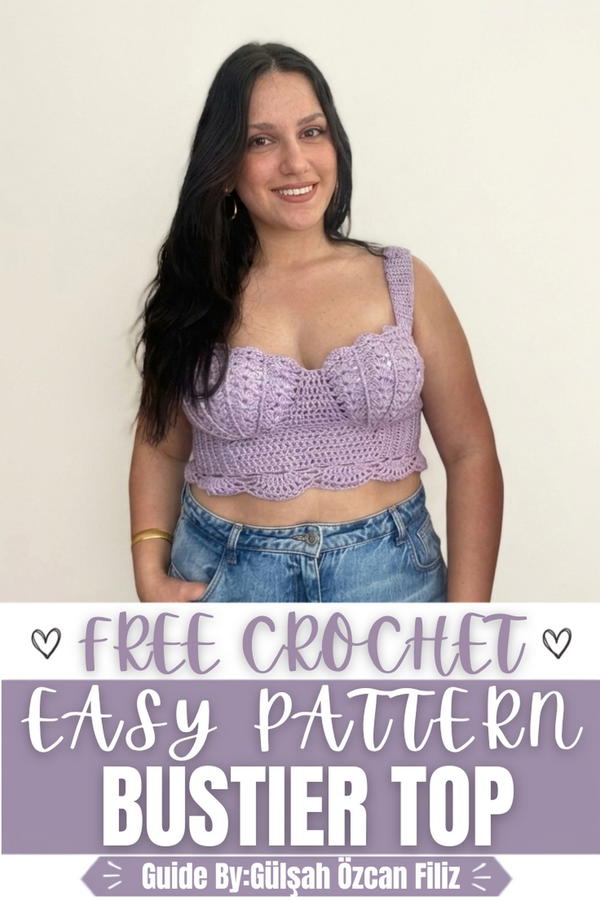
Crochet Mussel Bustier Pattern
This pattern creates a decorative and structured crochet bustier featuring a distinctive mussel shell motif along the lower border. The design is constructed using two yarns held together simultaneously — a cotton yarn paired with a metallic or beaded yarn — which gives the finished piece an elegant and textured appearance. The bustier is built from individually shaped cup pieces that are joined at the center, then expanded outward to form the body, side panels, straps, and decorative edging. The combination of V-stitch cup shaping and shell motif border work results in a garment that is both technically interesting and visually striking.
Skill Level: Intermediate to Advanced — This pattern requires confident knowledge of working in the round, V-stitch construction, back-post double crochet, motif joining, and basic garment shaping. Crocheters who have completed structured garment projects will find this pattern manageable and rewarding.
Materials
- Yarn: Cotton yarn and a metallic or beaded decorative yarn held together throughout (no specific brand required)
- Hook: 3.25mm crochet hook
- Tools:
- Tapestry needle for sewing and assembly
- Scissors
- Measuring tape
- Stitch markers
Special Stitches
- V-Stitch: Work dc, ch 1, dc all into the same stitch or space, creating an open V-shaped unit that forms the structural base of the cup sections.
- Back-Post Double Crochet (BPdc): Insert the hook from behind and around the post of the stitch below, then complete the double crochet as normal. Creates a raised textural ridge on the fabric surface.
- Shell Motif (Mussel Stitch): Work 8 dc all into the same chain space created by a 5-chain box, forming a fan-shaped shell cluster that produces the signature mussel pattern along the lower border.
- Magic Ring: An adjustable loop used to begin the cup piece from the center, allowing the ring to be pulled completely closed after the first round of stitches is complete.
Stitch Abbreviations
- ch — chain
- sl st — slip stitch
- sc — single crochet
- dc — double crochet
- BPdc — back-post double crochet
- MR — magic ring
- sp — space
- st(s) — stitch(es)
- rep — repeat
- inc — increase
- yo — yarn over
- tch — turning chain
Useful Tips
- Hold both the cotton yarn and the metallic yarn together throughout the entire project to ensure consistent texture and weight across all sections.
- When working the V-stitch rows on the cup pieces, maintain an even and relaxed tension to keep the V-stitch gaps open and uniform in size.
- After completing each cup piece, lay it flat and measure against your body to confirm the size is correct before beginning the joining process.
- Use stitch markers to clearly identify the center joining point of the two cup pieces before working the increase rows across the body section.
- When working the mussel shell border, ensure the 5-chain boxes are evenly spaced along the lower edge before beginning the 8 dc shell clusters so that the motifs align symmetrically.
- The back tie length and strap length should be measured against the wearer's body before fastening off to ensure a comfortable and secure fit.
- Block the finished bustier lightly after assembly to even out the stitches and help the shell border lie flat.
Pattern Instructions
Cup Construction (Make 2)
Foundation — Magic Ring
- Using both yarns held together, create a MR.
- Ch 3 (counts as first dc).
- Work 19 dc into the ring.
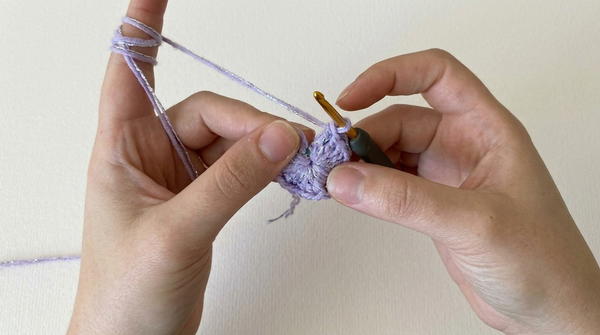
- Pull the tail of the magic ring to close the center tightly.
- Sl st into the top of the beginning ch-3 to join.
- Total: 20 dc
Row 1 — V-Stitch Foundation Row
- Ch 3, turn.
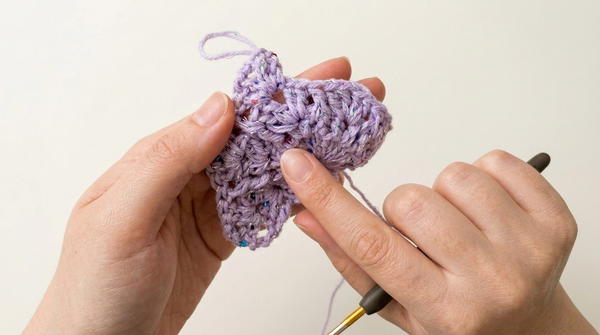
- Skip 2 sts, work V-stitch (dc, ch 1, dc) into the 3rd st.
- Skip 1 st, work V-stitch into the next st.
- Rep the sequence of skip 1 st, V-stitch into next st across the row.
- End with 1 dc into the top of the turning ch-3.
- Total: Multiple V-stitches established across the row with single dc at each end
- Total: Multiple V-stitches established across the row with single dc at each end
Row 2 — First Cluster Row
- Ch 3, turn.
- Into each V-stitch ch-1 sp, work 2 dc, ch 1, 2 dc.
- For each single stitch between V-stitch groups, work 1 BPdc around the post of the stitch below.
- Rep across the row, ending with 1 dc in the top of the tch.
Row 3 — Expanded Cluster Row
- Ch 3, turn.
- Into each V-stitch ch-1 sp, work 2 dc, ch 2, 2 dc.
- Work 1 BPdc around the post of each single stitch between clusters.
- Rep across the entire row.
- End with 1 dc in the top of the tch.
Rows 4–5 — Increased Cluster Rows
- Ch 3, turn.
- Into each ch-2 sp, work 3 dc, ch 2, 3 dc.
- Work 1 BPdc around the post of each single stitch between clusters.
- Rep across both Row 4 and Row 5.
- End each row with 1 dc in the top of the tch.
Increasing Rows — Cup Size Adjustment
- Ch 3, turn.
- Continue increasing the cluster size by adding 1 dc to each side of the cluster per increase row:
- Work 4 dc, ch 2, 4 dc into each ch-2 sp.
- Work 1 BPdc around each single post stitch between clusters.
- Rep increasing rows until the cup piece covers the desired cup size fully.
- End with 1 dc in the top of the tch after each row.
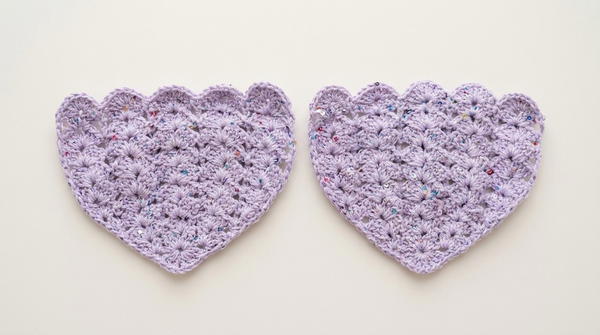
Finishing Rows — Cup Edge
- Work 4 rows without any further increases:
- Ch 3, turn.
- Work 4 dc, ch 2, 4 dc into each ch-2 sp.
- Work 1 BPdc around each post stitch.
- End with 1 dc in the tch.
- On the final finishing row, reduce the cluster to 3 dc, ch 2, 3 dc in each sp to tighten and neaten the upper cup edge.
- Fasten off.
Cup Border Row
- Ch 1, turn.
- Work 7 dc into each V-stitch ch-2 sp around the lower cup edge.
- Work 1 sc into the top of each BPdc post stitch between shell groups.
- Sl st to join at the end of the border row.
- Fasten off and weave in ends.
- Rep all cup construction steps to make the second cup piece.
Assembly and Sizing
Joining the Two Cup Pieces
- Place the two completed cup pieces together with their right sides facing each other (wrong sides outward).
- Using a tapestry needle and matching yarn, sew the two cup pieces together along their shared center edge to join them at the front center point of the bustier.
- Turn the joined piece right side out after seaming.
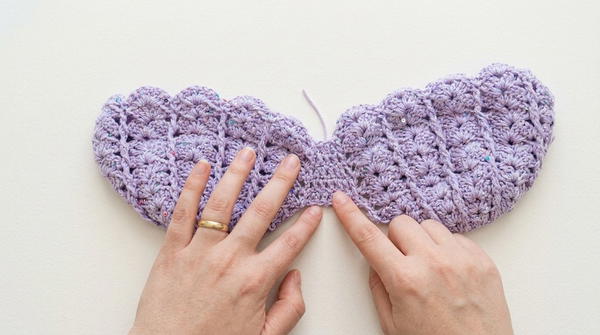
Expanding the Body Section
- Join yarn at the center joining point of the two cups.
- Work across both cup pieces, adding increase stitches at the beginning and end of each row by working 2 dc into the first and last stitch of every row.
- Continue increasing on both sides for several rows until the center body section reaches the desired width across the chest.
Lower Body Extension
- Once the body width is established, work sc evenly along the entire lower edge of the joined body section.
- Then work straight rows of dc (without further increases) for approximately 5 rows or until the lower body reaches the desired length beneath the bust.
Side Panels
- Without fastening off, continue working dc rows outward along both side edges of the body panel.
- Work side panel rows in dc until the total width across the body reaches the full measurement required for your size.
- Continue for a total of approximately 22 rows across the body and side sections combined, adjusting as needed for fit.
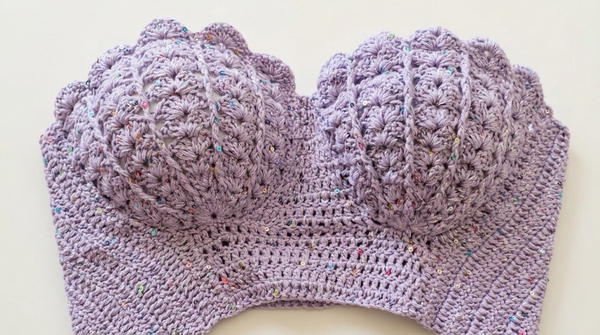
Mussel Shell Border
- Join yarn at the lower edge of the completed body section.
- Work evenly along the lower edge, ch 5 and insert the hook into the fabric at regular intervals to create a series of evenly spaced chain boxes.
- Into each 5-chain box sp, work 8 dc to form one complete mussel shell motif.
- On the second border row, work 1 ch between each pair of dc stitches within each shell cluster to add detail and definition to the motif.
- Fasten off and weave in all ends.
Cup Edge Finishing
- Using a tapestry needle, pierce small holes evenly along the outer edges of each cup piece.
- Work sc through these holes using a crochet hook to create a neat and stable finished edge along the cup perimeters.
- Sew the cup outer edges securely to the body section using the tapestry needle and matching yarn.
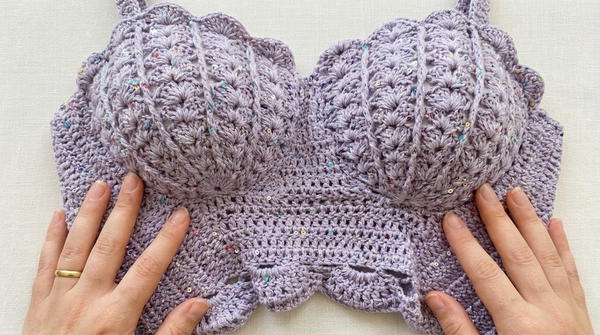
Back Tie
- Join yarn at the back edge of the side panel.
- Ch to the desired back tie length and fasten off, leaving a long tail.
- Thread the tie chain through the spaces along the back opening to create an adjustable back closure.
Shoulder Straps
- Join yarn at the upper edge of one cup piece at the shoulder position.
- Work a combination of triple crochet, double crochet, single crochet, and sc stitches to shape a tapering strap that narrows toward the shoulder.
- Work the strap to the desired length for a comfortable shoulder fit.
- Fasten off and rep for the second strap on the opposite cup.
- Sew both straps securely to the upper edge of the bustier using the tapestry needle.
Sizing Notes
- The pattern as written is designed for an 85-size cup.
- Adjust the number of increase rows on the cup pieces to accommodate smaller or larger cup sizes.
- Measure the body section width against your actual measurements at the underbust before beginning the side panels.
Conclusion
This mussel bustier pattern combines elegant structural shaping with a decorative shell motif border to produce a garment that is as technically refined as it is visually distinctive. The use of two yarns held together throughout gives the fabric a unique texture and sheen that elevates the finished piece beyond a standard crochet project. The step-by-step construction from individual cup pieces through body expansion, side paneling, and decorative border work provides a comprehensive introduction to garment-scale crochet design. The adjustable back tie and tailored shoulder straps ensure that the finished bustier can be adapted to fit a range of body types with minimal modification.